


Introduction
Email Sync refers to the process of synchronizing or integrating email functionality across various devices or platforms to ensure consistent and updated information. In the context of an application, Email Sync typically involves connecting and coordinating email-related activities seamlessly.
Features
- Email Sync app is utilized to synchronize incoming and outgoing emails with Salesforce. Consequently, the synchronized emails are displayed within the activity panel of the respective records. In this app, we provide a Lightning Web Component (LWC) and two objects.
- Users can configure email syncing for specific objects of their choice using the Lightning Web Component (LWC). To accomplish this, they should create a new record by selecting an object and an email field using the component.
Use Cases
- Access to this functionality is shared with the record owner and the employees working under them. Teams can collaborate effectively by ensuring that all members have synchronized access to shared emails and attachments.
- The app enables effective collaboration among teams by ensuring that everyone has access to the latest email communications and updates.
Configuration Setup for Incoming Email Sync:
For incoming configuration, you have to create an email service in Salesforce. Please follow the following steps to create this.
1. Go to Setup in your Salesforce org and type ‘Email Service’.-
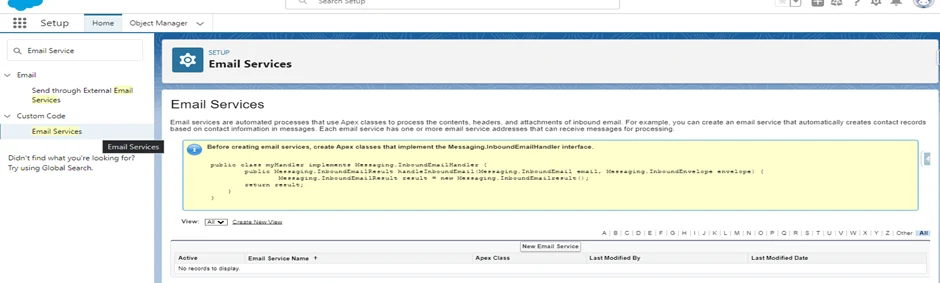
2. Click on ‘New Email Service’ and fill the details like,
a) Email Service Name.
b) Select the Apex Class from Package
c) Select the Attachment type you want to accept from sender like Text, Binary and All.
d) Check the Active check box.
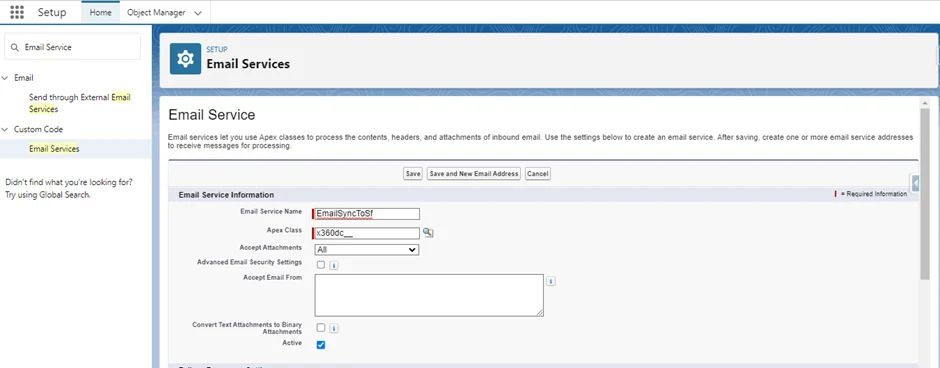
e) Click on ‘Save and New Email Address’.
f) Enter Email Address Information
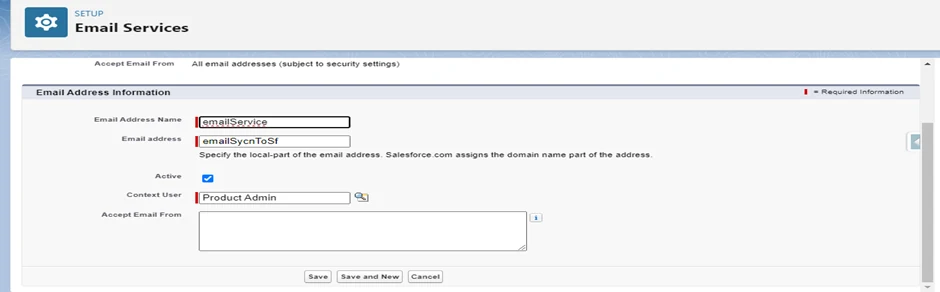
By adding the email address from Gmail account.

Emails Setup Configuration:
To ensure an email routing address for verification and other purposes, we create “EmailVerifactionKey,” “VerificationEmailAddress,” and “InternalDomains” records on the object named Emails Setup.
Email Setup Object:
Within the Email Setup Object, we provide two distinct record types:
i. Object Setup:- This record type is utilized to create a mapping record between the selected object and field.
ii. Custom Setting:- Within this record type, users can create records for storing specific values. Here are some essential records:
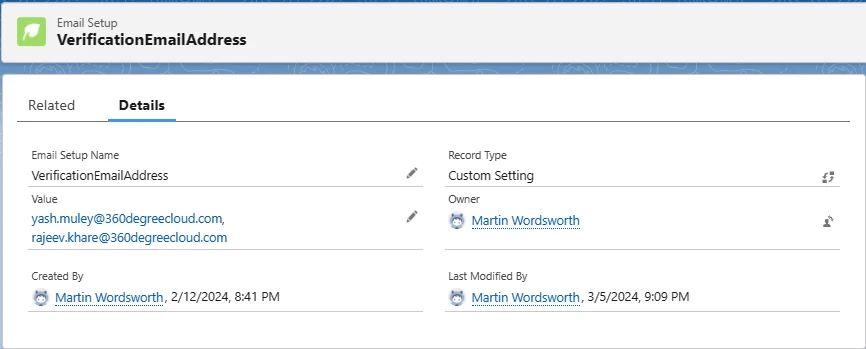
a) VerificationEmailAddress:
– Users should create a record with the name “VerificationEmailAddress” and input the desired email address in the value field. This is used for receiving verification codes.
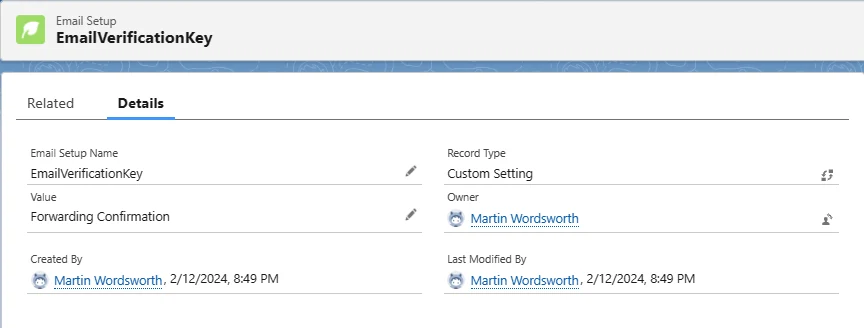
b) EmailVerificationKey:
Users are required to create a record named “EmailVerificationKey” and enter the subject of the confirmation code.
c) InternalDomains:
To skip searching for internal communication, users can create a record under the name “InternalDomains” and specify the internal domains to be excluded. Here we enter the domains whose emails we don’t want to be synced into the Salesforce system.
Note: Please be extremely careful regarding the capital case while naming. Keep it exactly the same as shown.
Gmail-side Configuration:
To establish a connection between Gmail and Salesforce
Follow the below steps –
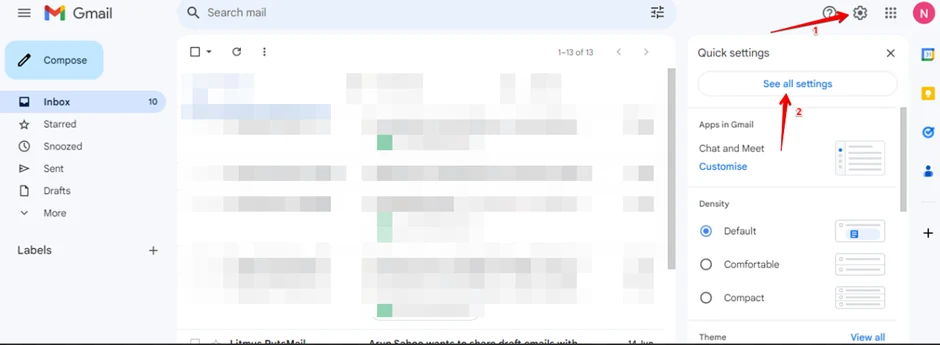
1. Click on Setting (Gear Icon) and then click on ‘See all Settings’.
2. Click on Forwarding and POP/IMAP tab and then click on Add a forwarding address button.
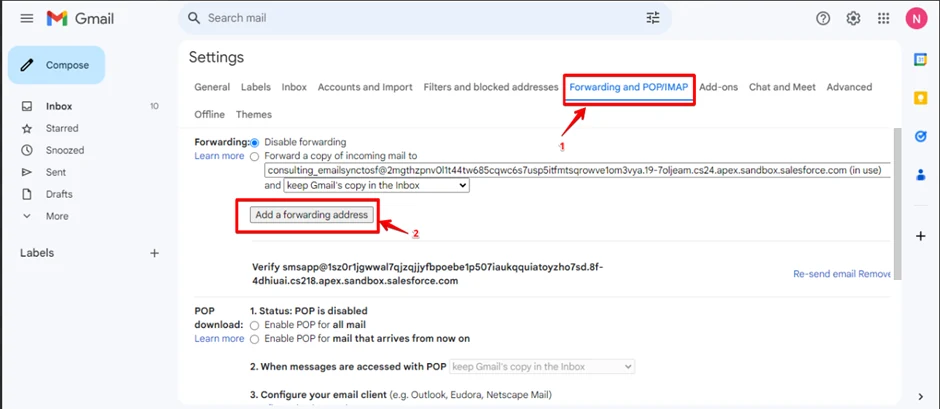
3. Then enter that email service address into the Please enter a new forwarding email address: Filed. 4. Then click on Next and verify your email, and then click on Proceed. Then your admin will get an email to approve you.
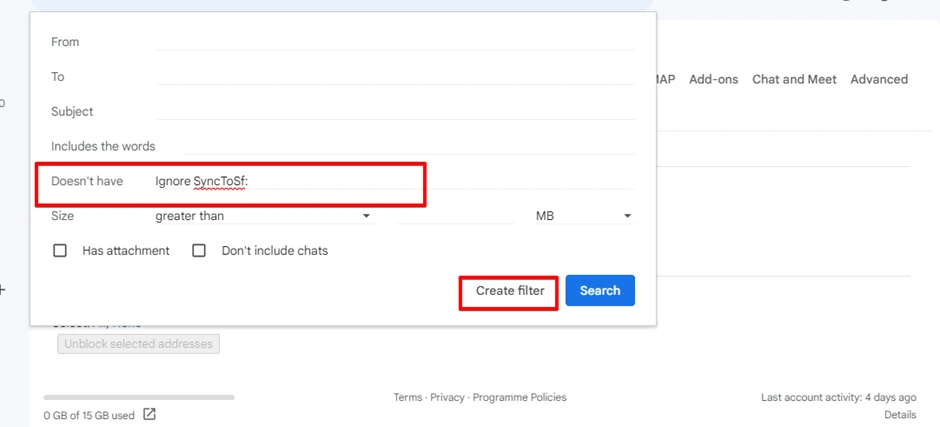
g) Create a filter, by clicking on the Filters and blocked addresses tab and click on Create a New filter.
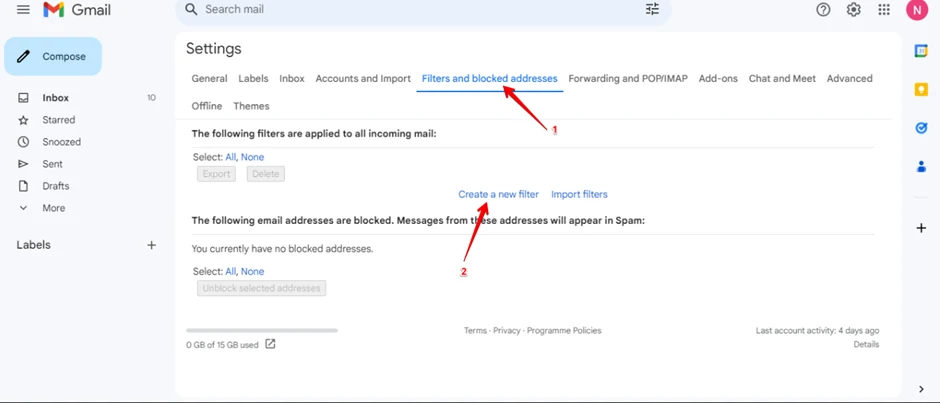
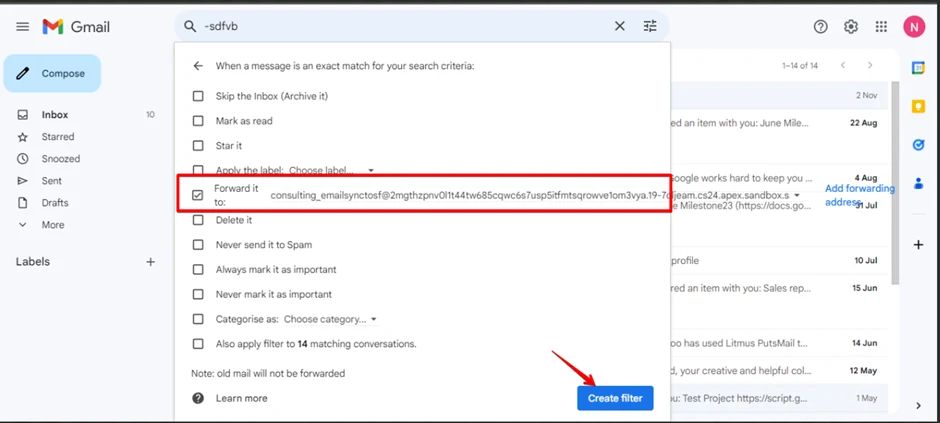
“It doesn’t have a section to enter – ignore SyncToSf. Click on ‘Create Filter,’ then check the checkbox ‘Forward it to:’ and select the email service address you have added.
Finally, create the filter. Now, the setup for incoming emails has been completed.”
Configuration for Outgoing Emails.
To configure the outgoing emails, we need to create a project on Google. The Google project will be created by the admin of the organization who has access (currently, it is with Rajeev Sir). This project requires the email ID to be validated as the sender email ID, the email service address created, the org ID and name of the Salesforce org, and the project name.
1. The first step is to send the concerned details- organization name, email ID, Internal Domains for which you want to restrict the syncing of emails, and email service created in Salesforce org. Once the project is completed, you will receive an email like the one shown below
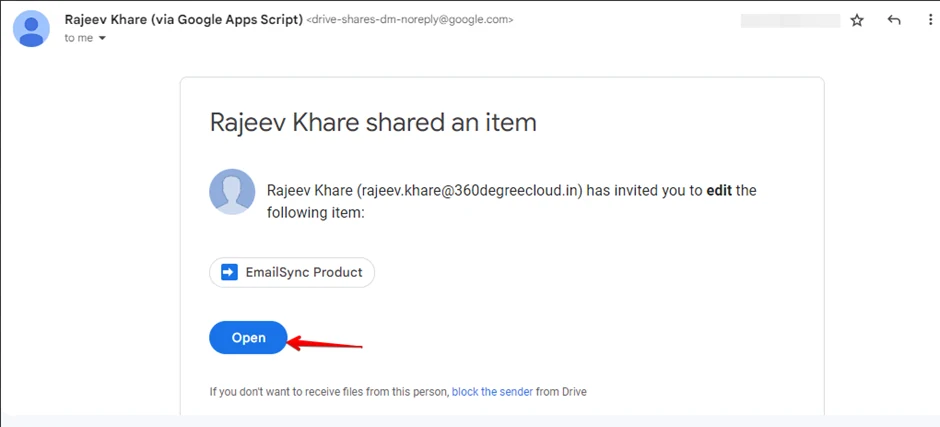
2. Next, click on “Open.”
3. After opening it, you will see a clock icon on the left side. Select that icon, and you will find an “Add Trigger” button in the bottom-right corner. Click on “Add Trigger.”
4. Fill in the values according to the figure.
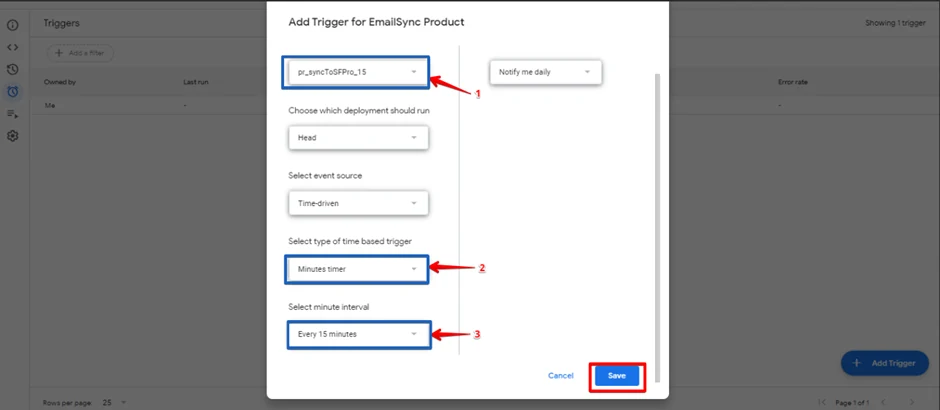
5. Then, click on “Save” and select your email.
6. If you encounter this type of screen.
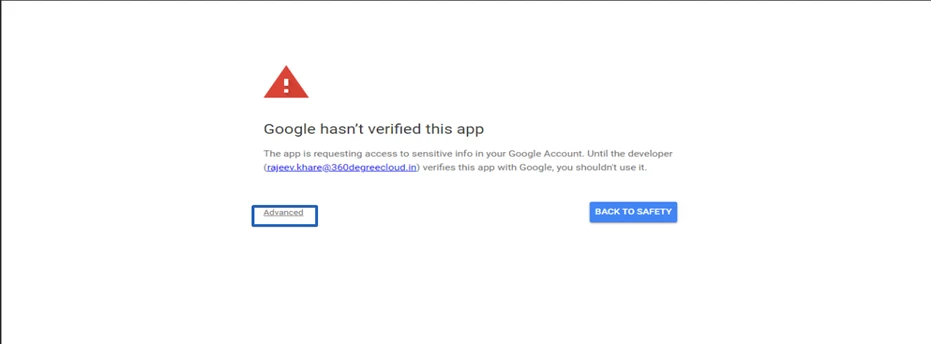
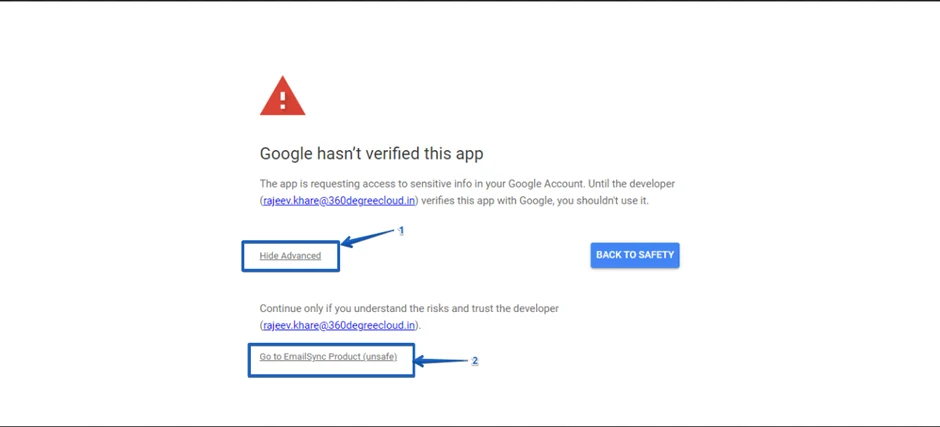
7. Click “Advance” and then “Go to EmailSync.” Click on “Allow.”
Note: Please note that there is only one trigger for each user.
Contact Us
For more information or assistance, please contact 360 SMS experts at Email: care@360smsapp.com Phone number: +1 323 641 4417 (USA); +44 740 327 9473 (UK); +61 48885 3632 (AUS) Website: https://360smsapp.com/