


Overview
This guide explains how to create, configure, and submit WhatsApp message templates for Meta approval using the direct template creation flow inside Salesforce (360 SMS App). It expands on the original template walkthrough to cover all three Meta template categories — Utility, Marketing, and Authentication — including the Carousel template type, all supported button types, approval submission, status tracking, and common validation errors.
What you’ll learn
- How template categories differ (Utility, Marketing, Authentication) and when to use each
- Step-by-step configuration for every category, including the Carousel template type
- All button types — Quick Reply, Call-to-Action (Website / Phone), and Flow — and how to configure each
- How to submit a template for Meta approval and track its status
- Common validation errors and how to resolve them
Template Naming Guidelines
When creating a template, follow these strict rules — they apply to every category:
- Use only lowercase letters (a–z)
- Use numbers (0–9) if required
- Use underscores ( _ ) to separate words
- Do NOT use:
- Capital letters
- Spaces
- Special characters (e.g. – ! @ #)
Example:
- utility_template – correct
- Utility Template – incorrect (capitals, space)
- utility-template! – incorrect (hyphen, special character)
Template Categories at a Glance
Meta requires every WhatsApp template to be assigned one of three categories in the “Template Category” field. The category you choose determines which content rules, buttons, and review criteria apply.
| Category | Purpose | Typical Use Case | Key Rules |
|---|---|---|---|
| Utility | Transactional, account, or service updates the customer expects | Order updates, appointment reminders, service alerts | Free-form body text; no promotional content |
| Marketing | Promotions, offers, announcements, re-engagement | Sale announcements, new product alerts, carousels | Must give the customer a clear opt-out (e.g. an “OPT-OUT” quick reply); supports the Carousel template type |
| Authentication | One-time passcodes / login verification codes | OTP for login, transaction verification | Body content is largely fixed by Meta; only toggles (security note, code expiry) and a single Copy Code button are configurable |
Common Fields — Every Template Starts Here
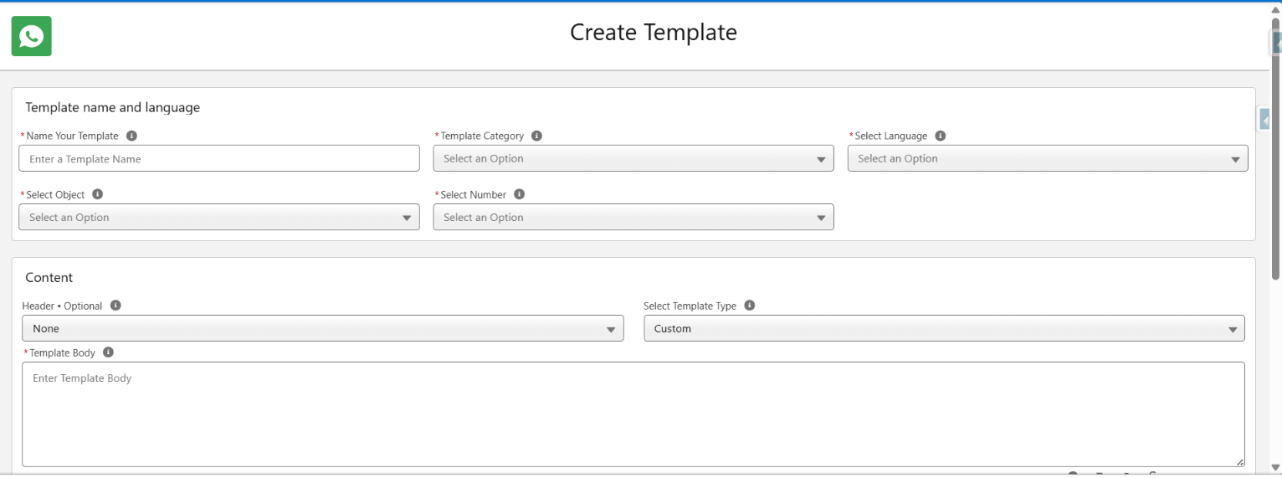
Regardless of category, every new template begins on the same “Create Template” screen with these fields:
- Name Your Template – must follow the naming rules above.
- Template Category – Authentication, Marketing, or Utility. This choice reshapes the rest of the form.
- Select Language – the language Meta will review the template copy in.
- Select Object – the Salesforce object (e.g. Inquiry, Lead, Contact) whose merge fields you want available in the template.
- Select Number – the WhatsApp-enabled sender number this template will be associated with.
Creating a Utility Template
Utility templates are the most flexible category — use them for status updates, reminders, and any transactional message the customer is already expecting.
Steps
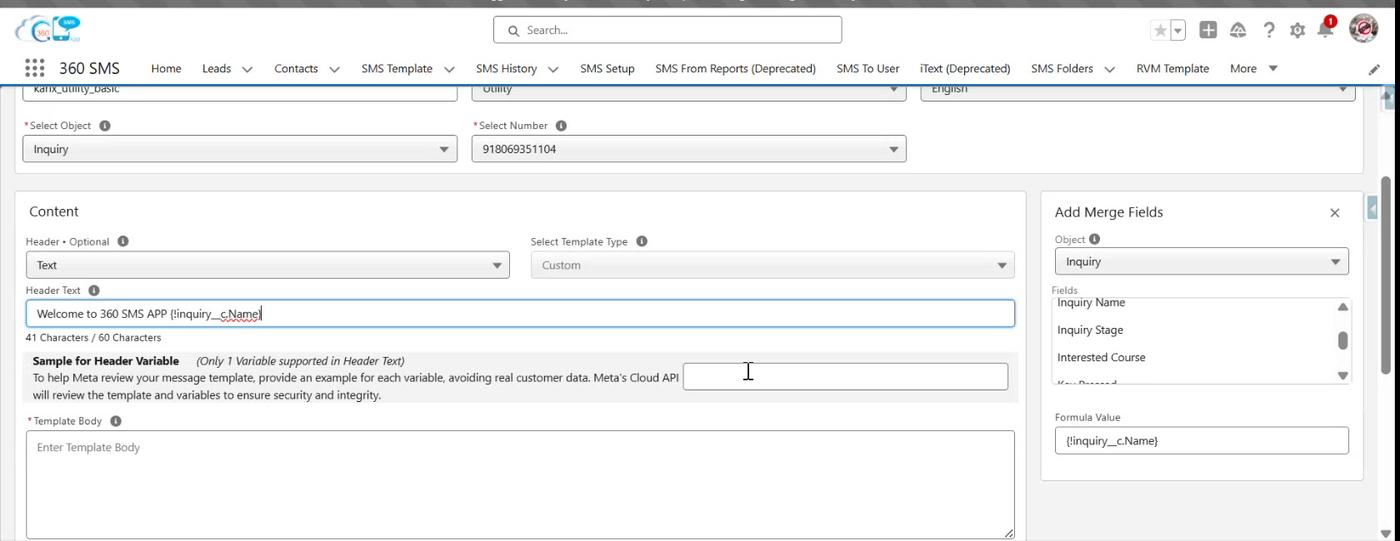
- Click New on the SMS Template tab, then set Template Category to Utility.
- Choose the Header type (Optional): None, Text, Image, Video, or Document.
- If you choose a Text header and insert a merge field, Meta requires a Sample for Header Variable — provide a realistic example value (never real customer data) so Meta can review the template.
- Write the Template Body. You can insert merge fields from the selected object via + Add Variable.
- Optionally add a Footer.
- Add Buttons if needed (see Buttons & Actions below).
- Tick Request Approval from Meta and click Save.
Creating a Marketing Template
Marketing templates are used for promotions, announcements, and re-engagement campaigns. Because these are unsolicited by nature, Meta requires a clear way for the recipient to opt out.
Steps
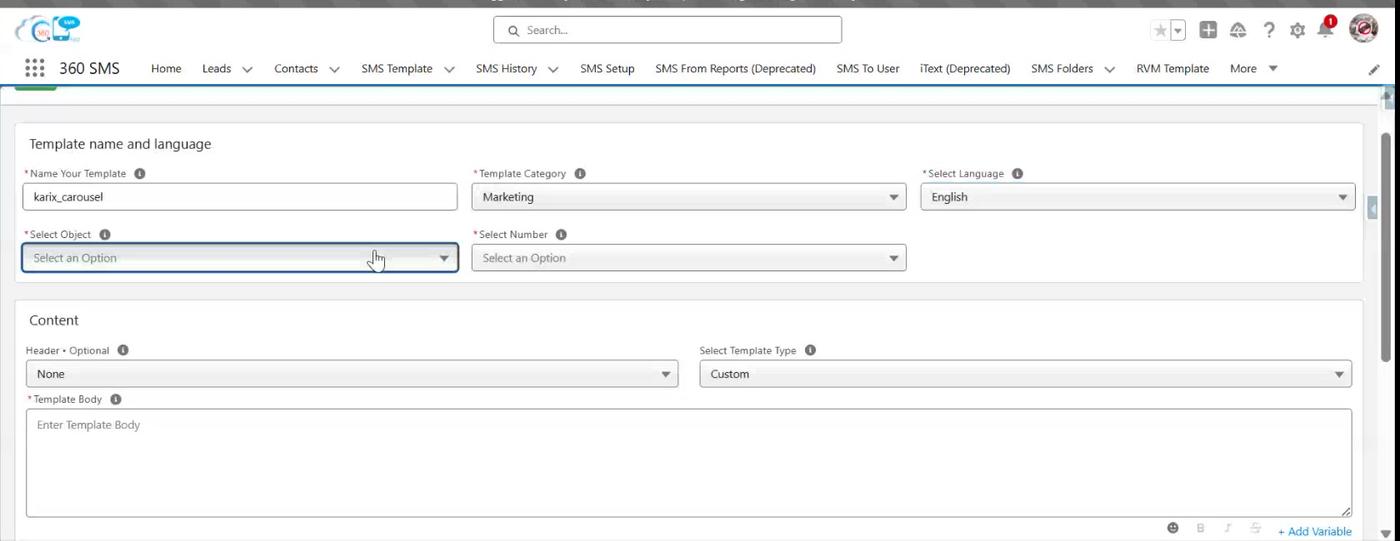
- Set Template Category to Marketing.
- Choose a Header type (None, Text, Image, Video, or Document) exactly as with Utility templates.
- Set Select Template Type to Custom (a standard text template) or Carousel (see the dedicated section below).
- Write the Template Body and optional Footer.
- Add at least one button that lets the customer opt out or disengage — typically a Quick Reply button such as “OPT-OUT” or “STOP.” Add any additional Call-to-Action buttons you need.
- Tick Request Approval from Meta and Save.
Why the opt-out matters
- Meta reviewers check Marketing templates for an explicit opt-out path — templates without one are commonly rejected or held for edits.
- Keep the opt-out button text short and unambiguous (“OPT-OUT”, “Stop Updates”, “Unsubscribe”).
Creating a Carousel Template (Marketing)
A Carousel template shows the customer a horizontally-scrollable set of cards, each with its own image/video, body text, and buttons. Use it for multi-product promotions, catalog highlights, or step-based offers.
Steps
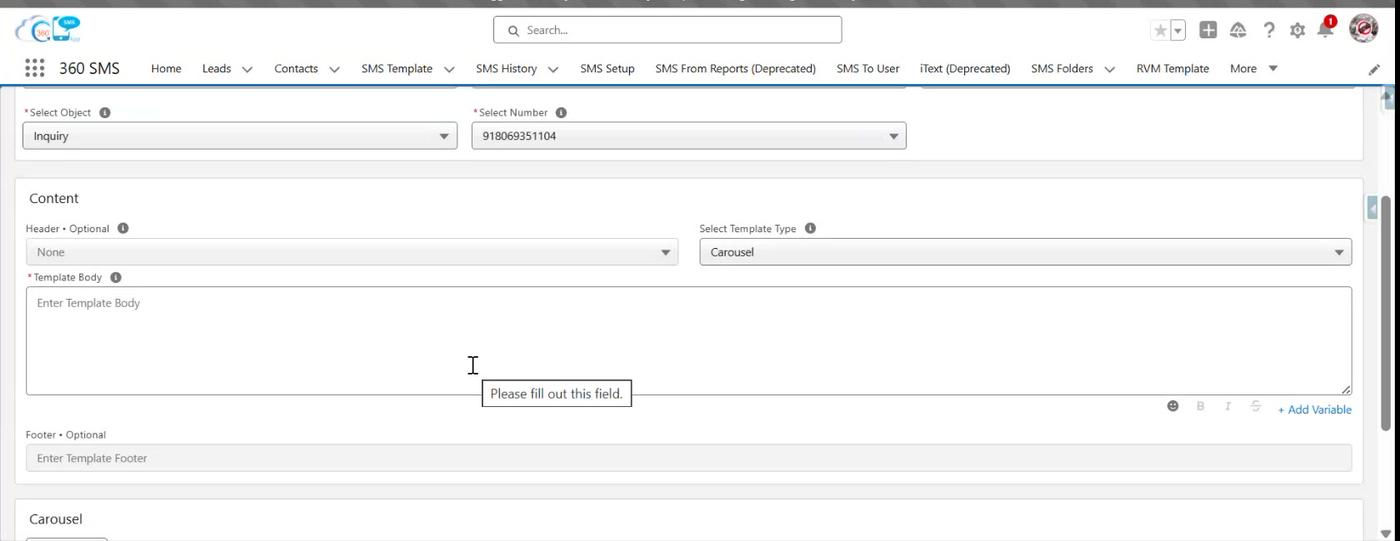
- Set Template Category to Marketing and Select Template Type to Carousel.
- Write the main Template Body (this is the intro text shown above the cards).
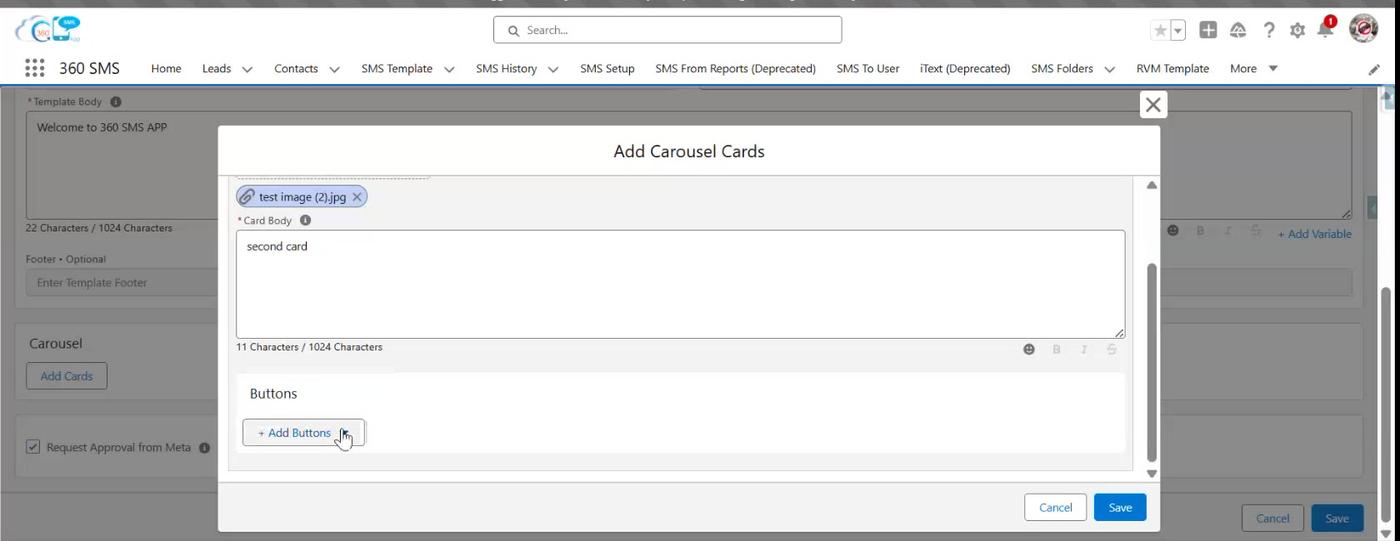
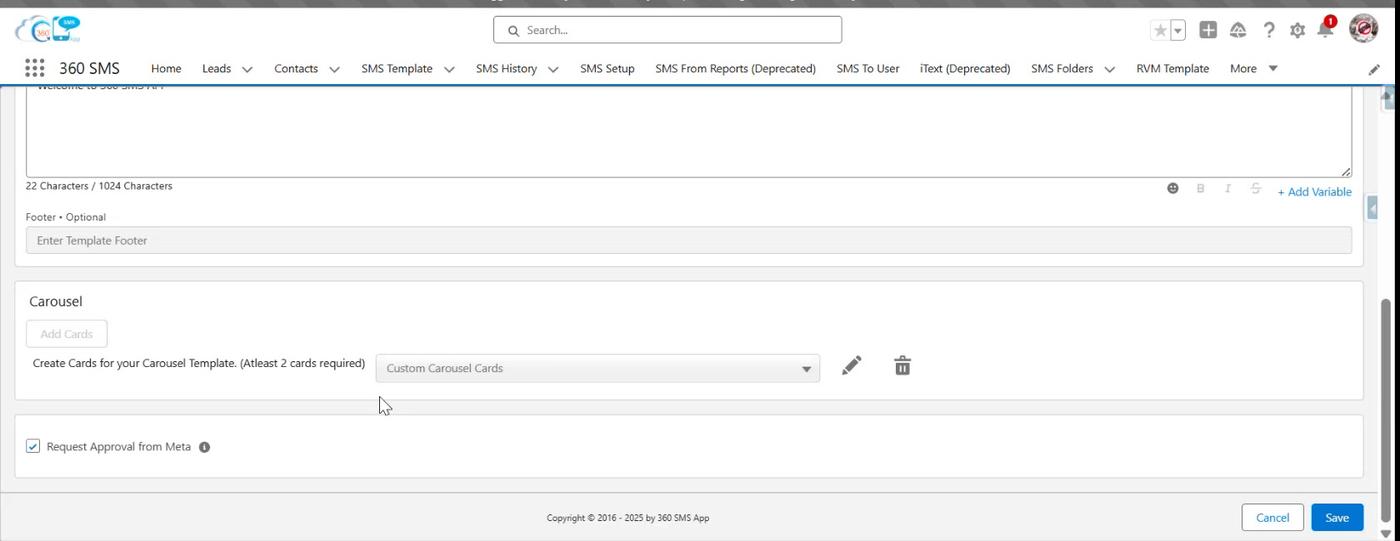
- Under Carousel, click Add Cards to open the Add Carousel Cards window.
- For each card, upload an image or video (Upload Files or drag-and-drop) and write the Card Body (up to 1024 characters).
- Add buttons to the card if needed — every card in the carousel must use the same button type(s) and the same sequence.
- Click + to add another card. A Carousel template requires a minimum of 2 cards.
- Save the cards, tick Request Approval from Meta on the main form, and Save the template.
Carousel rules to remember
- At least 2 cards are required before you can save.
- All cards must share the same button configuration (type and order) — mismatched sequences block saving.
- If you edit an existing card, you must re-upload its media — previously attached files are not retained automatically during edits.
Creating an Authentication Template
Authentication templates deliver one-time passcodes (OTPs). Meta locks most of the body copy for this category — you cannot free-type the message body. Instead, you assemble it from a small set of controlled options.
Steps
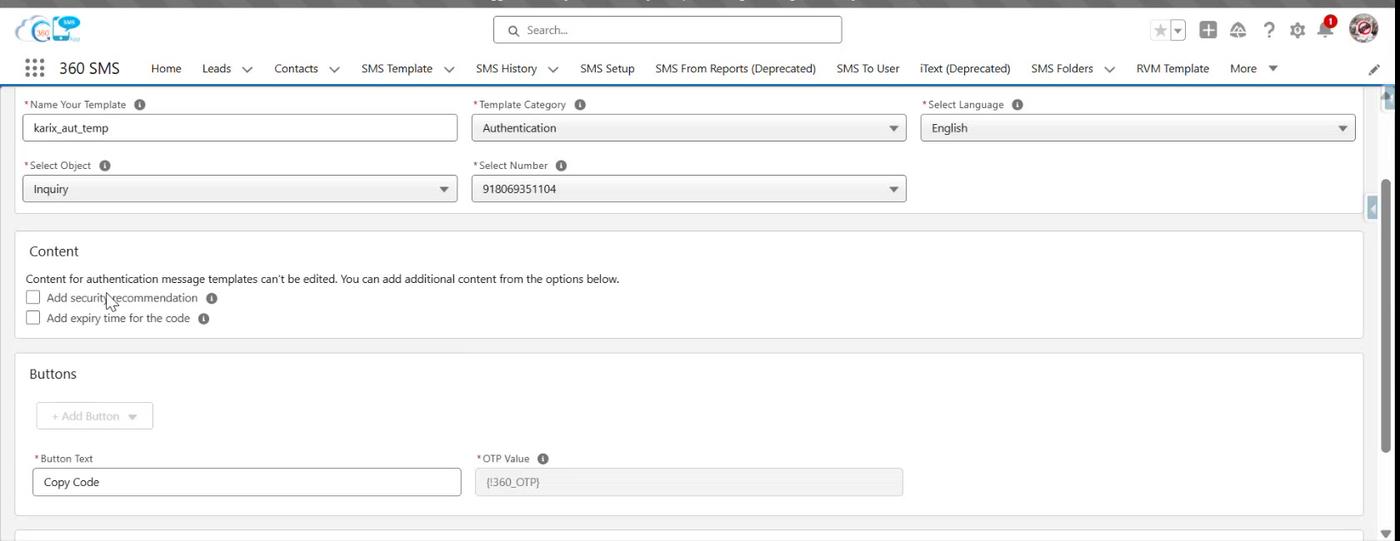
- Set Template Category to Authentication.
- Note the field-level message: “Content for authentication message templates can’t be edited. You can add additional content from the options below.”
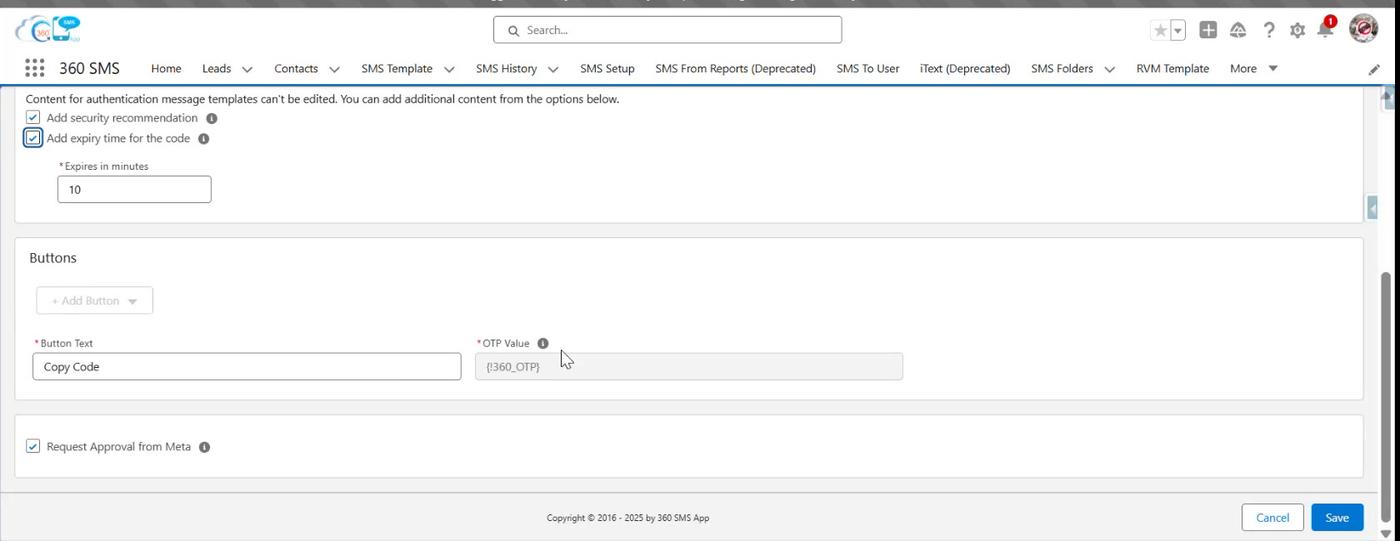
- Optionally tick Add security recommendation to append a standard security warning (e.g. reminding the customer not to share the code).
- Optionally tick Add expiry time for the code, then set Expires in minutes (e.g. 10). This adds a code-expiry warning to the delivered message.
- Under Buttons, the Button Text is fixed to Copy Code, and the OTP Value field holds the merge field Meta uses to inject the one-time code (for example {!360_OTP}).
- Tick Request Approval from Meta and Save.
Good to know
- There is no free-text Template Body, Header, or Footer for Authentication templates — this is a Meta policy restriction, not a 360 SMS limitation.
- Only one button (Copy Code) is supported for Authentication templates.
Buttons & Actions — Full Reference
Available button types depend on the template category. The table below summarizes every button type seen across Utility, Marketing, and Carousel templates.
| Button Type | Available In | Configuration | Notes |
|---|---|---|---|
| Quick Reply | Utility, Marketing, Carousel cards | Button Text only (e.g. “Yes”, “Support”, “OPT-OUT”) | Sends the button text back as the customer’s reply; the standard way to build an opt-out for Marketing templates |
| Call-to-Action – Visit Website | Utility, Marketing, Carousel cards | Button Text, Website URL Type (Static or Dynamic), and the Website URL / URL pattern | Use Dynamic when the link needs a merge field (e.g. a per-customer tracking link) |
| Call-to-Action – Call Phone Number | Utility, Marketing, Carousel cards | Button Text and the phone number to dial | Opens the customer’s dialer with the number pre-filled |
| Flow | Utility, Marketing | Select an existing Flow, or build a new Flow using the screen-based Flow builder (add screens and components such as text, input fields, and headings) | Launches a multi-step, in-chat interaction instead of a simple reply |
| Copy Code | Authentication only | Fixed button text; bound to the OTP merge field | The only button type Meta allows on Authentication templates |
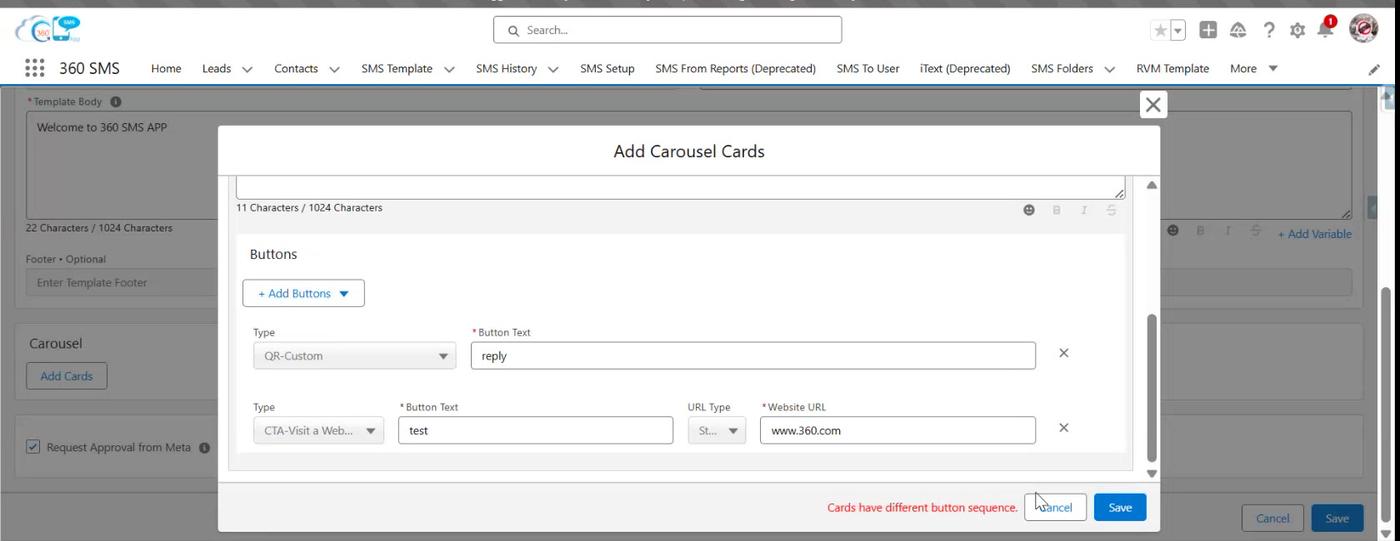
Multiple buttons: You can add more than one button via + Add Button / + Add Buttons. On Carousel cards, remember that every card must repeat the identical button set and order.
Configuring a Flow (“Complete Flow”) Button
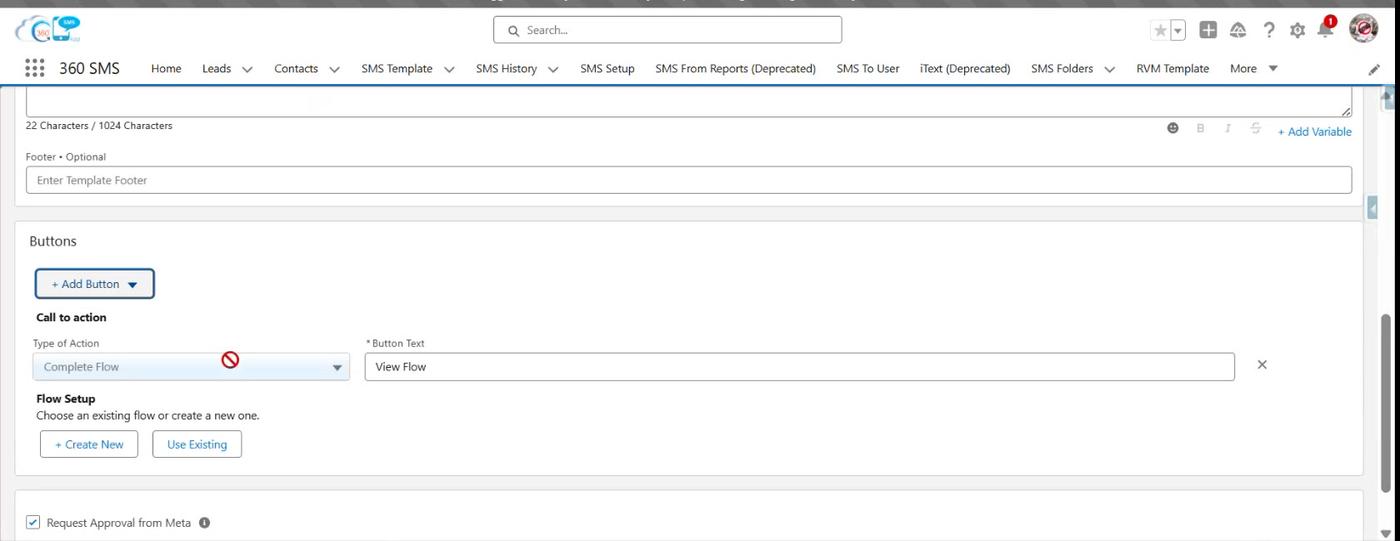
A Flow button launches a guided, multi-screen form directly inside WhatsApp — useful for surveys, lead-qualification questions, bookings, or any structured data collection. It is configured as a Call to Action button with its Type of Action set to Complete Flow.
Steps
- On the template’s Buttons section, click + Add Button and choose Call to action.
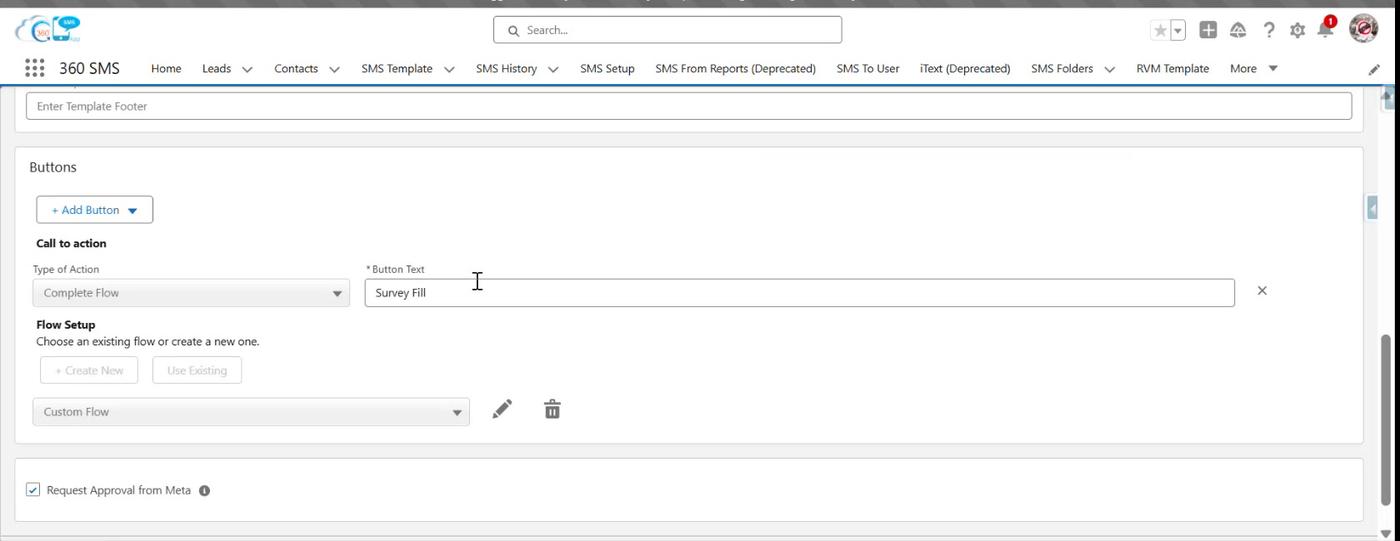
- Set Type of Action to Complete Flow, then enter the Button Text the customer will see (e.g. “View Flow”, “Survey Fill”).
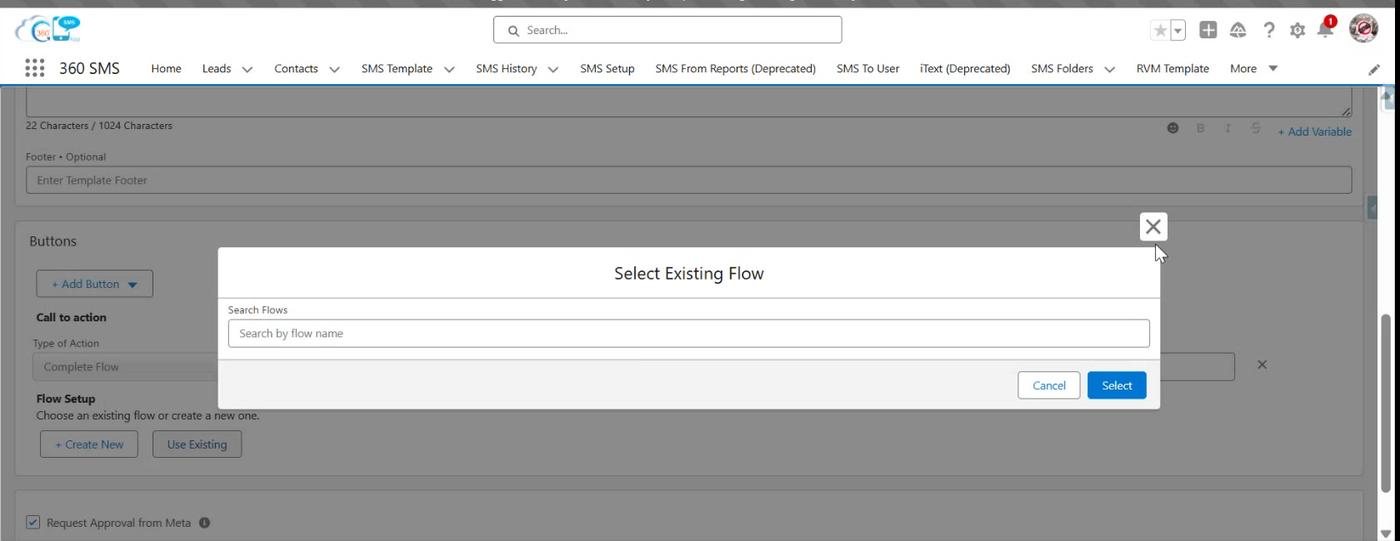
- Under Flow Setup – Choose an existing flow or create a new one – pick Use Existing to search and attach a flow you’ve already built, or + Create New to open the Flow screen builder.
Building a New Flow
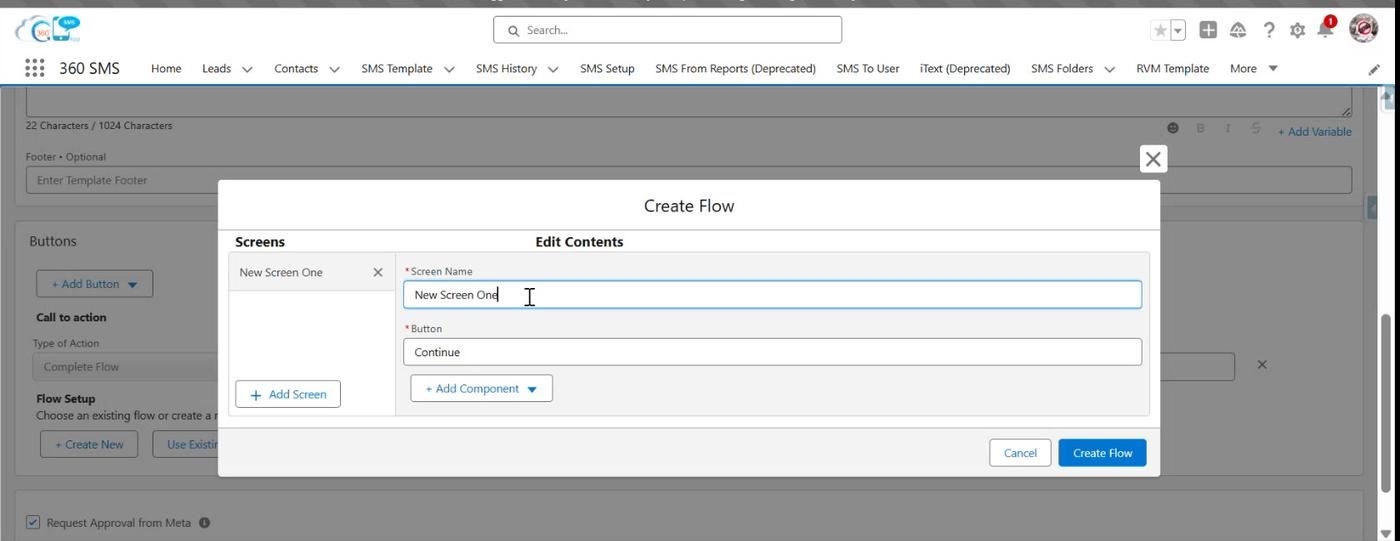
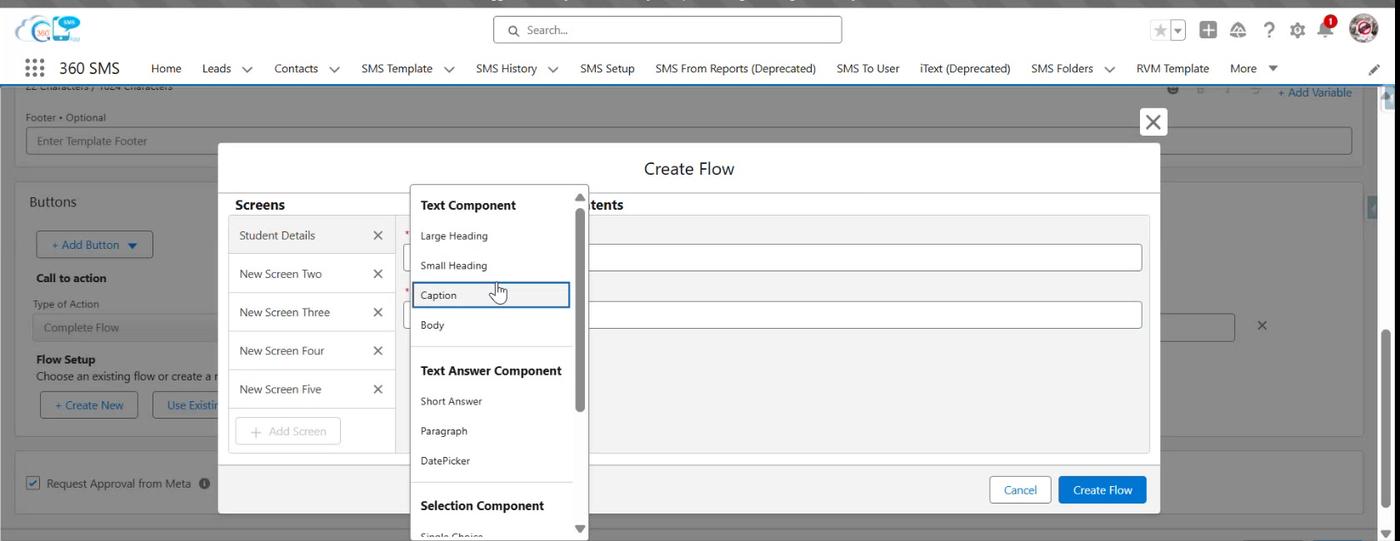
- + Create New opens the Create Flow builder with two tabs: Screens and Edit Contents. A new flow starts with five placeholder screens you can rename, reorder, add to, or delete.
- Select a screen, then set its Screen Name and (optionally) rename its Button — the default is Continue.
- Click + Add Component to insert content into the screen. Components are grouped into four families (see table below).
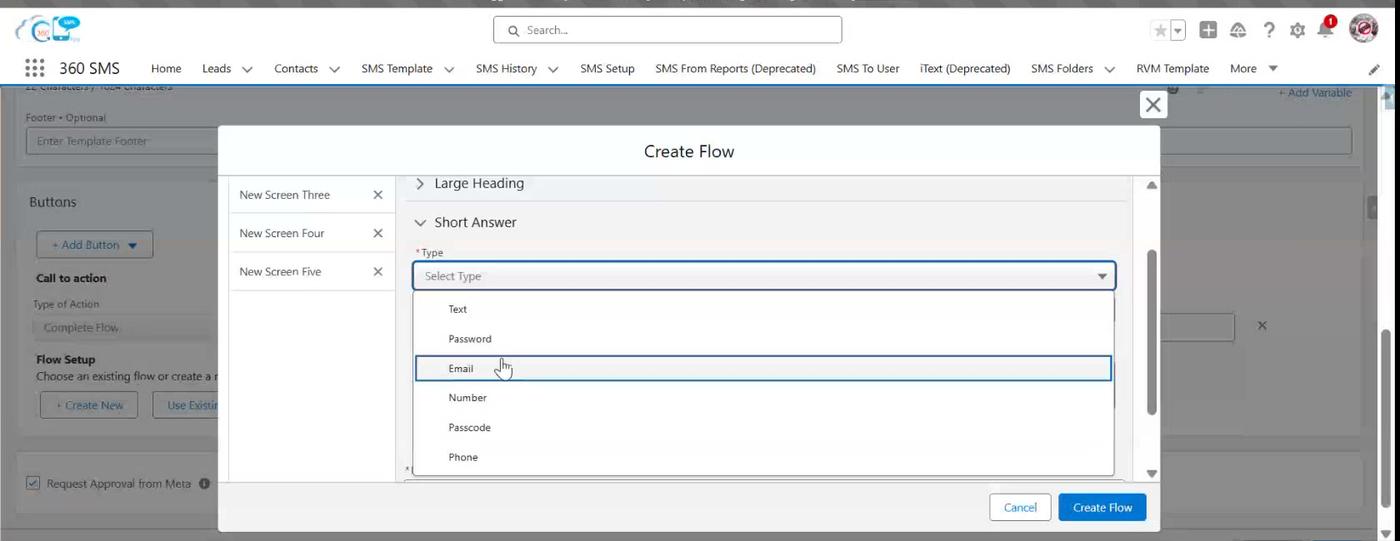
- For answer-type components (Short Answer, etc.) set the *Type, a Label, and optional Instructions text.
- Repeat for each screen, then use + Add Screen if you need more steps than the default five.
- Once saved, the Flow Setup field on the main template switches from Create New / Use Existing to a dropdown (e.g. Custom Flow) so you can select the Flow you just built.
| Component Family | Options | Typical Use |
|---|---|---|
| Text Component | Large Heading, Small Heading, Caption, Body | Display-only text — titles, instructions, descriptive copy |
| Text Answer Component | Short Answer (Type: Text / Email / Password / Number / Passcode / Phone), Paragraph, DatePicker | Free-text or structured single-value input from the customer |
| Selection Component | Single Choice, Multiple Choice, Drop-down | Let the customer pick from a fixed set of options |
| Media Component | Image / media display within a screen | Show a picture as part of the flow step |
Submitting a Template for Meta Approval
This step is the same for every category:
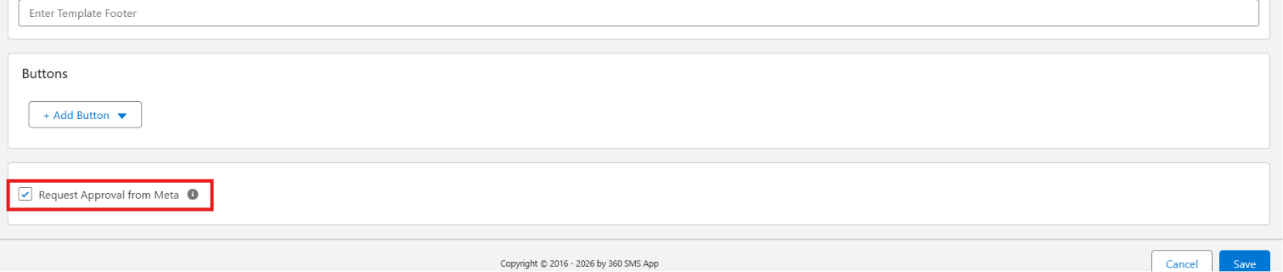
- Request Approval from Meta – tick this checkbox while creating or editing the template.
- This step is mandatory — if left unchecked, the template saves as an SMS Template only and is never sent to Meta for review.
Approval Timeline
- Once submitted, Meta’s review typically takes up to 24 hours.
- In some cases approval happens sooner.
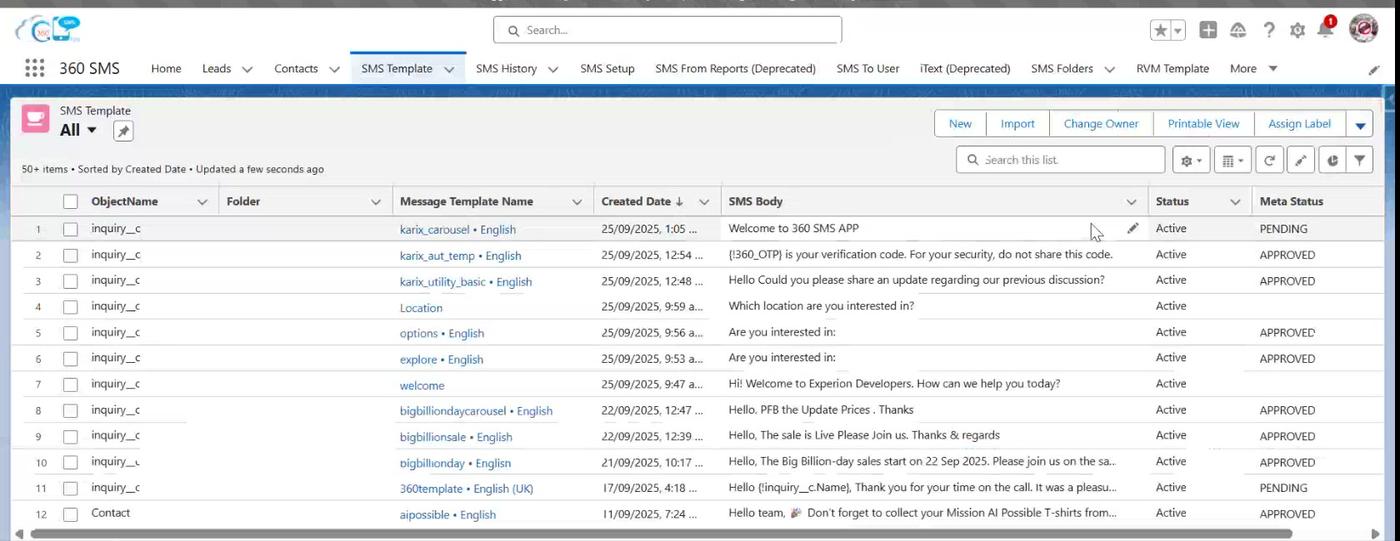
Checking Approval Status
Track status directly in Salesforce from the SMS Template list view or the template record’s Meta Status field.
- Approved – the template is live and ready to use.
- Pending – still under review by Meta.
- If Meta requires changes the template will need to be edited and resubmitted for another review — keep an eye on templates that stay in Pending longer than 24 hours.
Common Errors & Troubleshooting
| Error / Symptom | Likely Cause | Fix |
|---|---|---|
| “Complete this field” / required fields missing | A required field (button text, card body, sample header value, etc.) was left blank | Scroll through the form and fill every field marked with a red asterisk before saving |
| “Cards have different button sequence” | Carousel cards have different button types or a different button order from each other | Edit each card so the button type(s) and order are identical across all cards |
| “You need to re-upload files while editing cards” | An existing Carousel card’s media wasn’t retained when the card was reopened for editing | Re-attach the image/video for that card before saving again |
| “Message template ‘components’ param is missing expected field” | A backend/API validation failure — usually a card or button left partially configured | Re-check every card and button on the template, then Save again; if it persists, remove and re-add the incomplete component |
| Template stuck in Pending | Normal review time not yet elapsed, or Meta is requesting manual review | Wait for the 24-hour window; if it exceeds that, check the record for reviewer comments and resubmit if edits are needed |
Important Notes
- If Request Approval from Meta is not selected, the template will not be sent for approval and will be saved as an SMS Template only.
- Always verify the Meta Status before using a template in campaigns or messaging.
- Marketing templates must give the customer a way to opt out; templates without one are routinely rejected or held back.
- Authentication template content cannot be freely edited beyond the provided toggles (security recommendation, code expiry) — this is enforced by Meta, not by 360 SMS App.
- Carousel templates require a minimum of 2 cards, each with identical button configuration.