Sending SMS Through Flows Basics
Salesforce Flows provide a code-free approach for effectively managing the triggering of Outbound Text Messages and handling Incoming Messages based on Keywords or other criteria. It offers the flexibility to trigger actions on any object within the Salesforce platform.
Lead/Contact: These are commonly used scenarios where Outbound SMS messages are triggered when leads/Contact are created or when specific fields undergo changes.
Custom Objects: Similar to Lead/Contact cases, 360 SMS supports triggered messages from any custom object. Its SMS Templates and iTexts are compatible with all custom objects.
SMS_History: This is particularly valuable for handling incoming SMS messages. It allows you to read the message and take subsequent actions based on the content, such as updating the corresponding Salesforce record or sending out additional questions. This functionality is useful for conducting iTexts, where a reply of “INTERESTED” or “NO” can trigger updates to fields or statuses in the associated Salesforce record.
To trigger a message, you only need to configure a few straightforward settings:
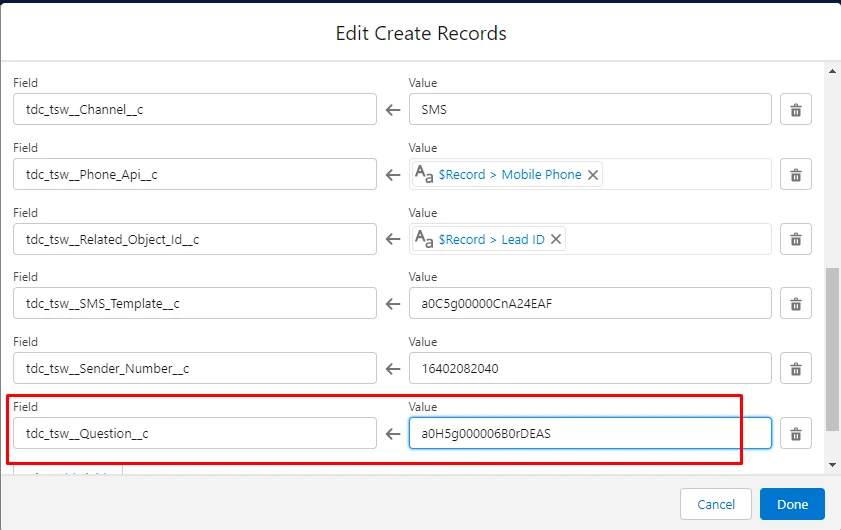
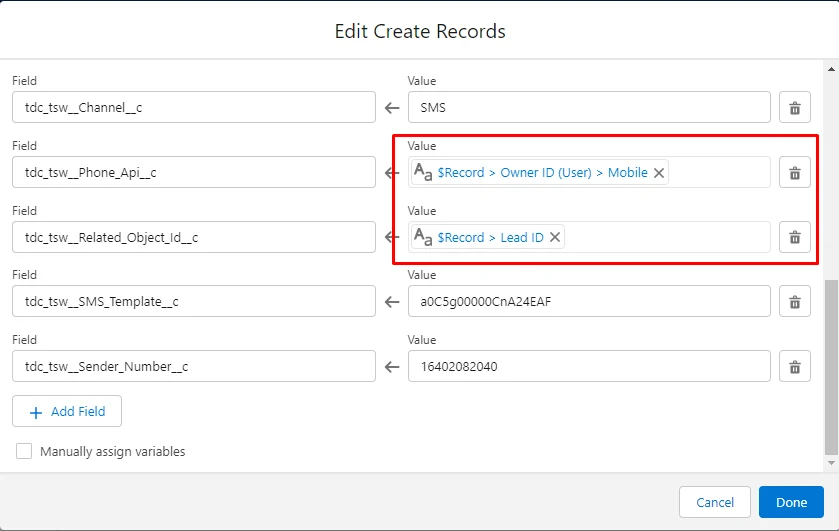
For immediate action, set “Create a Record” to “Scheduled SMS” and then specific the following parameters either through Flow:
Please note that only the parameters listed below are allowed. It’s important to emphasize that setting the “OWNER” or “Message_Text” fields is not possible, despite them being exposed in the Scheduled SMS object. However, allows for providing a custom string, while requires the use of either an SMS_Template_Id or a Question_Id.
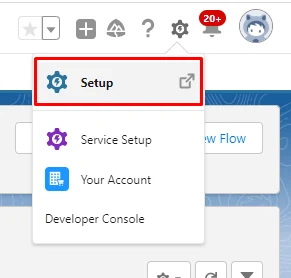
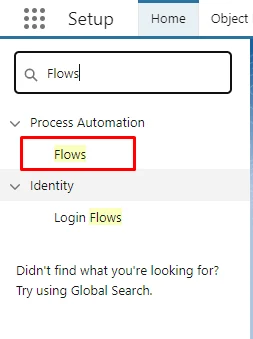
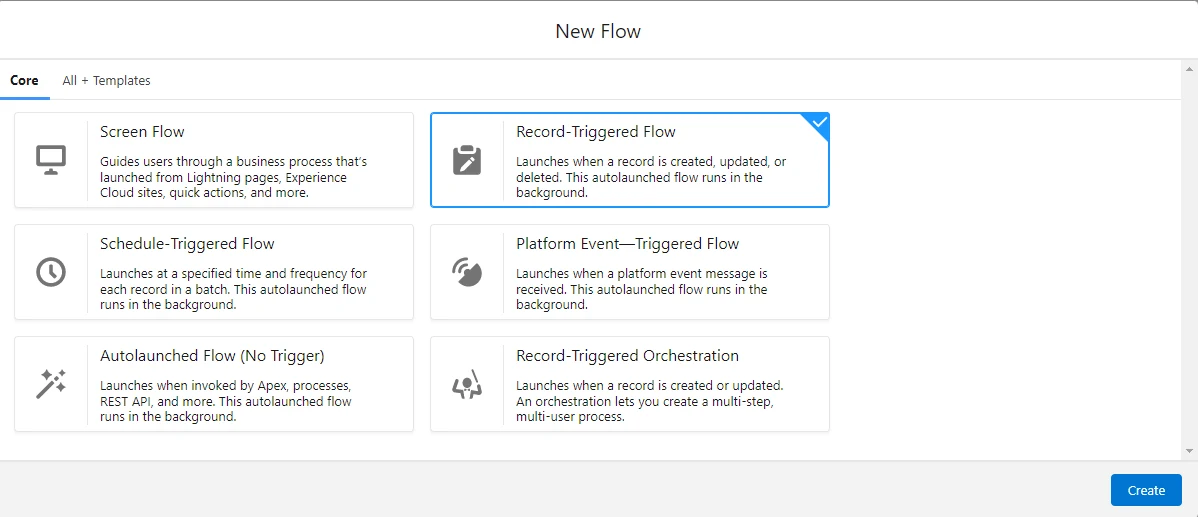
To Create the Flow follow the below steps:
Go to Setup>> Search for “Flows” on Quick Action>> Click on “New Flow” >> Choose the Flow Type>> And here you go, you can create the flow now as per the requirement

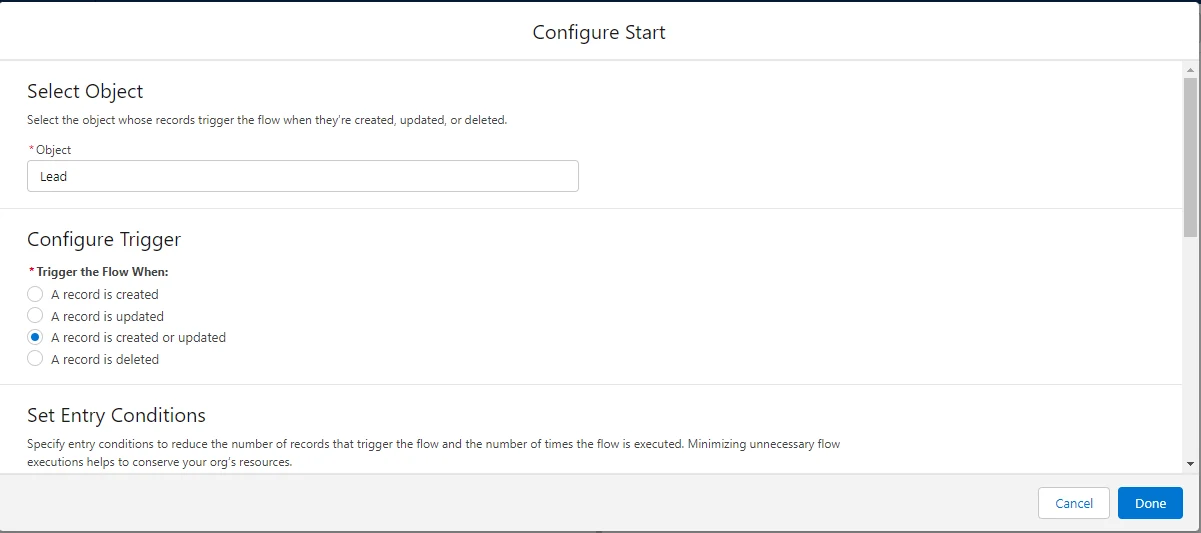
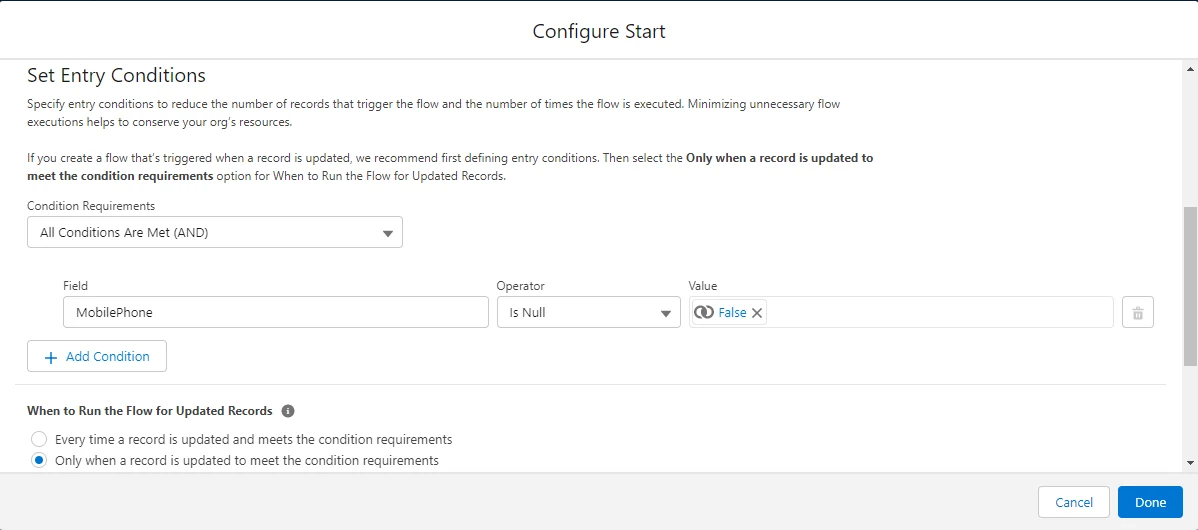
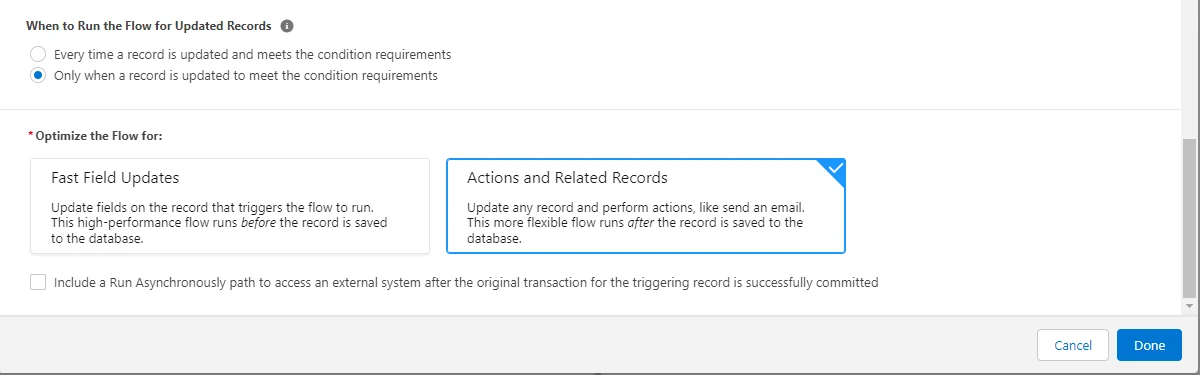
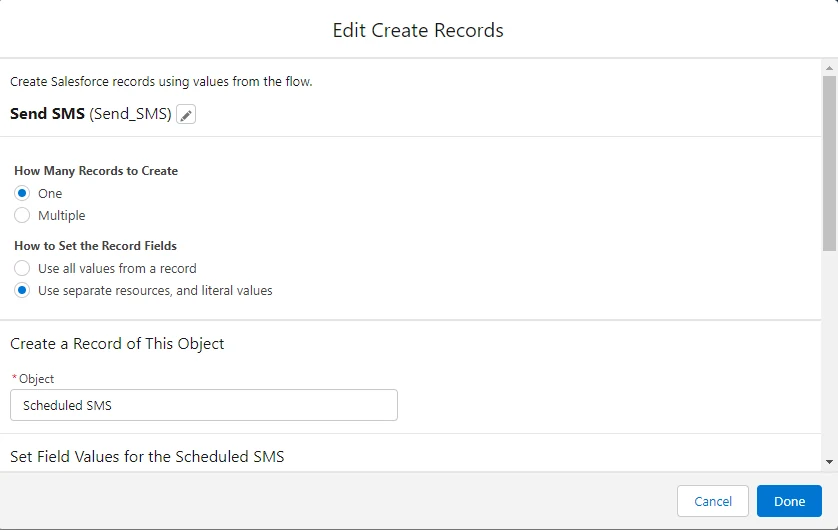
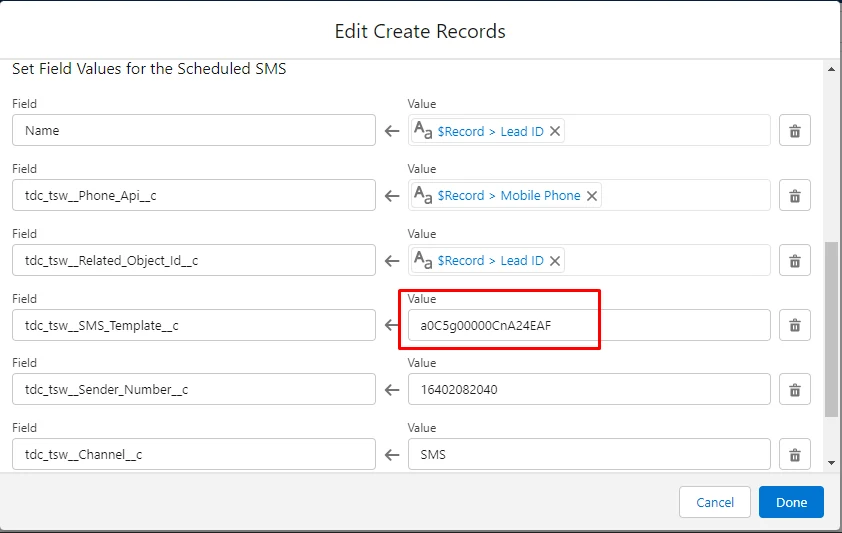
- Scheduled SMS Name: The ID field of the triggered object/record must be provided. It should match with the SMS Template based on the object to enable merging. For example, if you supply a Contact.Id, you should use a matching SMS Template based on the Contact object.
- Related Object Id: Set the Related Object Id to either Lead.Id or Contact.Id. Additionally, you can set it to other objects to gain visibility into the text conversations. For instance, setting it to an Account ID will attach the SMS History there. However, this approach will not set the SMS_History.Contact_Id.
- Phone Api: Provide the API Name of the phone field to which you want to send the message. It can be a string like “MobilePhone” or “Mobile_Phone c” (for a custom field), or you can reference the actual phone value from the record, such as Lead.MobileNumber. Alternatively, you can pull the value from the Incoming SMS SENDER_NUMBER, set it with a formula, or use User.MobileNumber for sending SMS to employees.
- When utilizing the Scheduled Time field to schedule the SMS, we highly recommend using the Field Name for the PhoneAPI value instead of the Field Reference. This is because the application will dynamically retrieve the phone value at the time of firing. If you explicitly set the value through Field Reference and the MobilePhone field is empty at that time, your SMS will not be triggered, even if you have set a value. Additionally, if the MobilePhone field changes between the scheduling of the message and its sending, the old value will be used. Therefore, to ensure the accurate and timely sending of SMS, it is advisable to use the Field Name for PhoneAPI value.
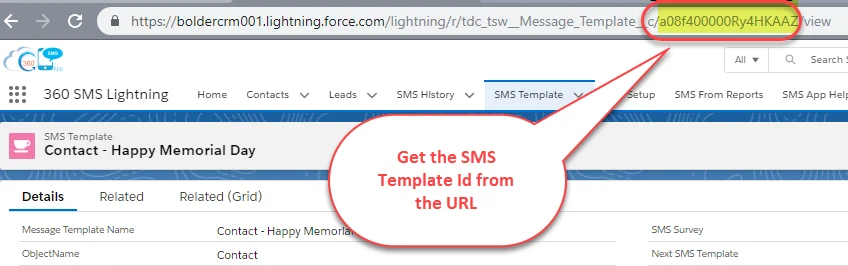
- SMS Template: Specify the ID of the template that you wish to use. You can obtain this ID from the template’s URL.
- Alternatively, you can use a reference field like Contact.SMS_Template (if you have set up an SMS Template ID on your Contact). Please refer to the “Create a Master Send SMS Handler” section for more details.
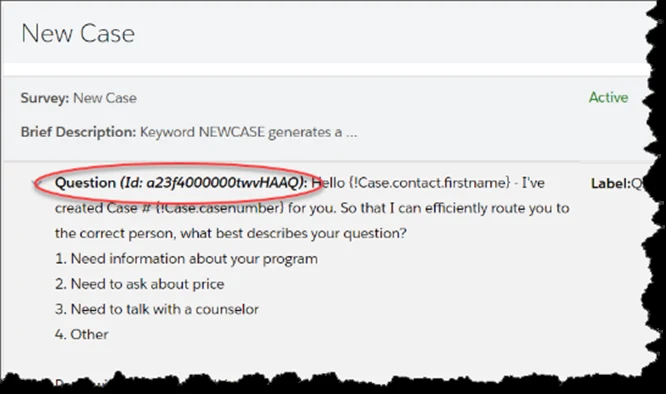
- Question: Instead of setting an SMS Template, you have the option to set the Question field. The QuestionId corresponds to the first question of a 360 SMS iText. By doing so, the first question of the iText will be triggered, and subsequent responses will be automatically handled. We strongly encourage the utilization of the iText object as it enables automatic handling of responses, which is particularly valuable since most outbound SMS messages are likely to generate a response.
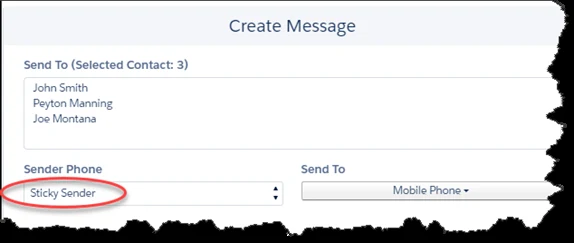
- Sender Number: Specify the Sender Number, which is the number from which you are sending the message. You can also use a referenced field like Lead.Owner.Phone to send from different salespeople, or a formula to assign different numbers based on geographies. If your organization has only one outbound number, this field is optional and can be left empty.
The sender number must always be in the format CountryCode+Number, without any formatting or special characters. For example, 17206050632. When dynamically setting the Sender Number, such as from Contact.Owner.Phone or from the Incoming SMS_History.To_Number, you can use the following valuable formula to remove all characters: [provide the formula].

- We suggest utilizing the Sticky_Sender c field, which is a custom formula field recognized by the Send SMS buttons and Conversation View. It overrides the user’s Default SMS Number with the formula value, ensuring that the number “sticks” to the record. This way, the customer always receives SMS from the same number.
- The formula field enables the definition of custom business logic for record-based sender numbers, guaranteeing consistent SMS delivery from the same number.
- This feature is particularly beneficial for geography-based solutions (such as differentiating between USA and UK numbers) or when each Record.Owner requires their own sender number.
- Sticky_Sender is especially useful for Batch Texting so a marketing user can batch text many customers across many numbers.
Scheduled Time: The scheduled time field can optionally be set. If a value is provided (usually with a formula), then instead of the SMS going out immediately it creates the Scheduled SMS row as a related list item and fires the message at the allotted time.
a. If using this feature, you MUST also set the Lookup field of the object whose Related List it should appear under, such as Contact or Lead. Setting the Related Object field is not the same as setting ContactId or LeadId, that field has a different purpose.
b. Usually you’ll use a formula such as these common ones below. Remember, Salesforce date math is in DAYS so you might Google your desired syntax for minutes and hours.
i. NOW() + 1 /* Same time as today + 1 day, i.e. tomorrow */ ii. NOW() + (1/24) /* 1 hour from now */ iii. NOW() + (10/60/24) /* 10 minutes from now */ iv. Specifying a specific time of day can be tricky because Salesforce stores time in Greenwich Mean Time (GMT) which you must account for. Below is an example of setting a Happy Birthday SMS to go out at 9:00am Mountain Time which is -7 hrs from GMT, so we set the time as 16:00:00 GMT.

Relating Outbound SMS to an Alternate Object
The Related Object Id, which is available only for Method #1, has some interesting uses, primarily when it is desired to link the message to an alternate object than where it is being initiated from and where its template is based on. This can be very useful as the REPLY comes back into whatever the RELATED OBJECT is. Use cases:
1. Linking a message to the parent CONTACT object when the message is initiated from a Salesforce EVENT (event reminders) or some other child object.
2. Linking a message initiated from an Opportunity to a primary Contact or Account
3.Or the big use case is when triggering messages to internal users in which case you should use the Related Object to link the message to the USER object rather than the main object so that the internal notification does not appear in the Contact/Lead SMS History and look like a message was sent to the customer.
Read the related section named “Roll-up SMS Conversations to Parent Objects” to learn a technique where you allow the SMS to be sent from the child object but then with a flows you also set the Ids of the parent Contact and/or Account objects.
Below is an example which triggers an internal user notification SMS when a new Lead is created from the Web Site. Note how the Phone API is pulled from Lead.Owner.User.MobilePhone and the Related Object Id is set to Lead.OwnerId. This allows us to use a template based on the Lead Object so we give the Lead.Owner the lead details but it keeps the SMS History from showing up under the Lead itself.
Note that the SMS Template’s object must match the object of the ID supplied in the Scheduled SMS Name field, it has nothing to do with the Related Object Id.
Method #2 – Apex Class
360 SMS also has an Apex class that can either be called in Flows or in trigger code. There is an Apex class for sending regular SMS and another one for sending MMS which includes a parameter for the picture or file.
The Apex classes accept parameters in a comma separated string that you pass to the param field of the Apex class. This method is nice for copying/pasting into sophisticated workflows. One of the best things about this method is that Salesforce allows comments in formula fields, so we strongly recommend commenting your formulas using the /* some comment */ syntax.
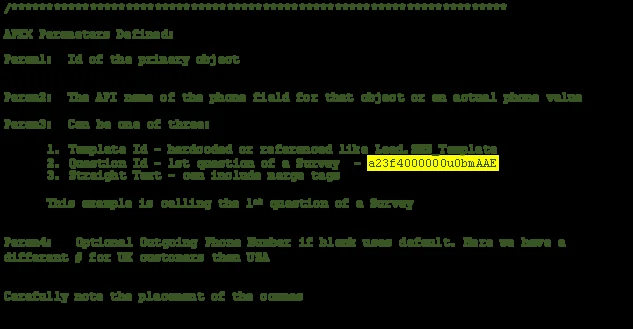
For the regular Send SMS From Flows Apex Class the string of parameters is defined as:
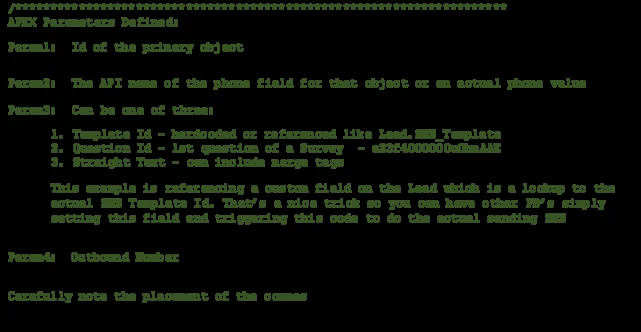
Param1: Id of the primary object you are triggering from – this must match your Template object and it will be the primary object that the outbound SMS will relate to.
Param2: The API name of the phone field for that object or it can be any value evaluating to a valid phone number
Param3: This parameter can take an SMS TemplateId, a QuestionId or a String.
TemplateID: Use a Template Id pulled from the URL of an SMS Template – its object must match the object defined in param1.
QuestionId: Use a Question Id which is typically the first Question of a iText. This will trigger iText question #1 and all responses will be handled automatically.
String: You may pass a string in this parameter if you do not want to use templates, this works well for simple SMS messages. The string also supports merge tags. e.g.
‘Okay {Contact.firstname} – this is a msg w/o a template’
Param4: Outbound phone number, if blank it sends the default phone number for the org or the first phone number found in the 360 SMS User Configuration tables for the current user.
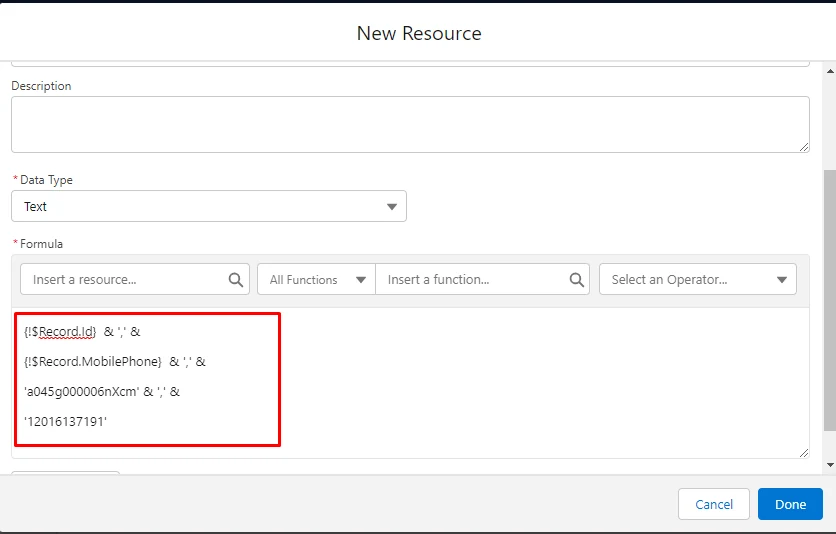
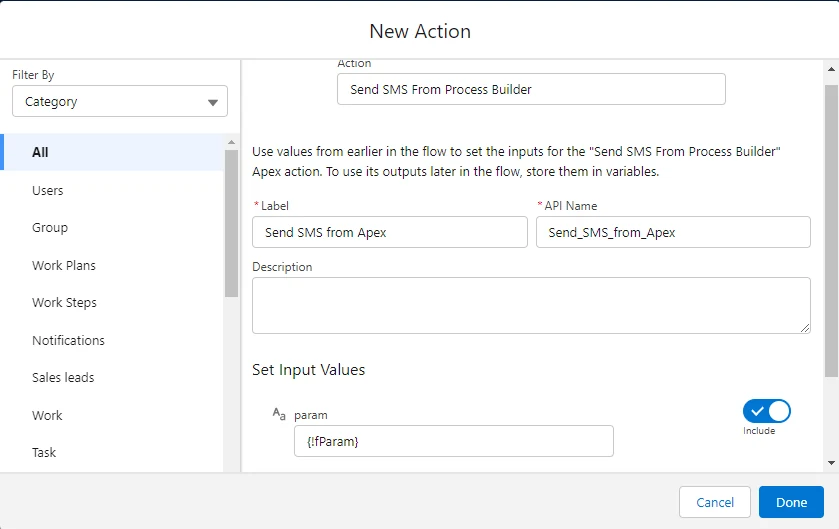
Below are a couple of code snippets for easy copy/pasting
Method #3 – Apex Triggers
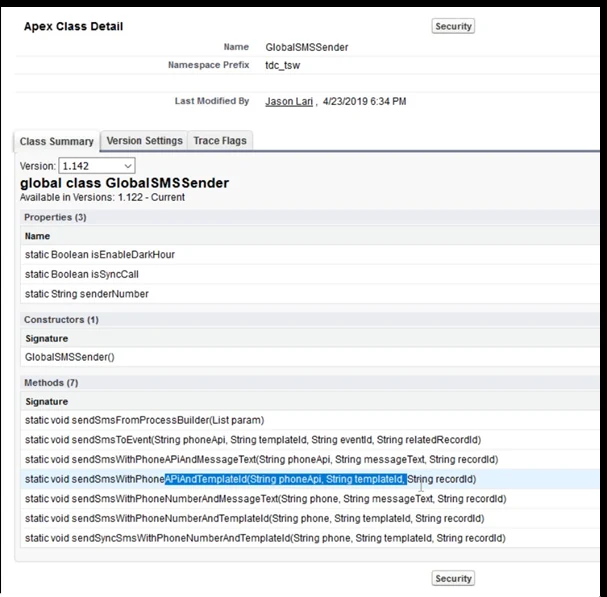
For more advanced developers that prefer using APEX Triggers over Flows, one can simply call the APEX class named tdc_tsw.GlobalSMSSender.sendSmsWithPhoneAPiAndTemplateId from your code.
The class accepts three parameters:
1. Mobile Phone Field: The field where the phone number of the contact would be stored, e.g.
objContact.MobilePhone 2.Template Id: The TemplateId similar to the methods described above, e.g. ‘a022800000Pj0Ia’
3. Object Id: The id of the record which is being sent the SMS, e.g. objContact.id
Below is a sample trigger from the CONTACT object.
Trigger (for Contact object)
trigger ContactTrigger on Contact (after insert) { if(trigger.isAfter && trigger.isInsert) {
ContactTriggerHandler.onAfterInsertContact(trigger.new);
}
}
Apex Class
public class ContactTriggerHandler {
public static String onAfterInsertContact(List<Contact> lstContact) {
String result; if(lstContact.size() > 0) {
for(Contact objContact : lstContact) { if(objContact.MobilePhone
!= null) {
try { tdc_tsw.GlobalSMSSender.sendSmsWithPhoneAPiAndTemplateId( objContact.MobilePhone,
'a022800000Pj0Ia',
objContact.id);
result = 'Success'; } catch(Exception e) {
result = 'failure'; }
}
}
}
return result;
}
}
Note that there are other APEX methods available as well which are intuitively named:
Send MMS Via Flows:
MMS is the term for sending or receiving PICTURES in a text message. The string of parameters are described below: Param1: Id of the primary object you are triggering from – this must match your Template object and it will be the primary object that the outbound SMS will relate to.
Param2: The API name of the phone field for that object.
Param3: This parameter can take an SMS TemplateId, a QuestionId or a String.
TemplateID: Use a Template Id pulled from the URL of an SMS Template – its object must match the object defined in param1.
QuestionId: Use a Question Id which is typically the first Question of a iText. This will trigger iText question #1 and all responses will be handled automatically.
String: You may pass a string in this parameter if you do not want to use templates, this works well for simple SMS messages. The string also supports merge tags. e.g.
‘Okay {Contact.firstname} – this is a msg w/o a template’
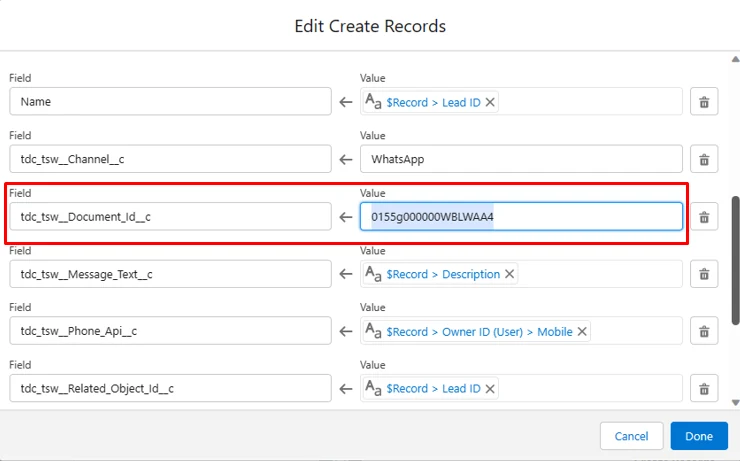
Param4: Optional Document ID of the picture or file to send
Param5: Optional originating phone number, if blank it sends the default phone number for the org or the first phone number found in the 360 SMS User Configuration tables for the current user.
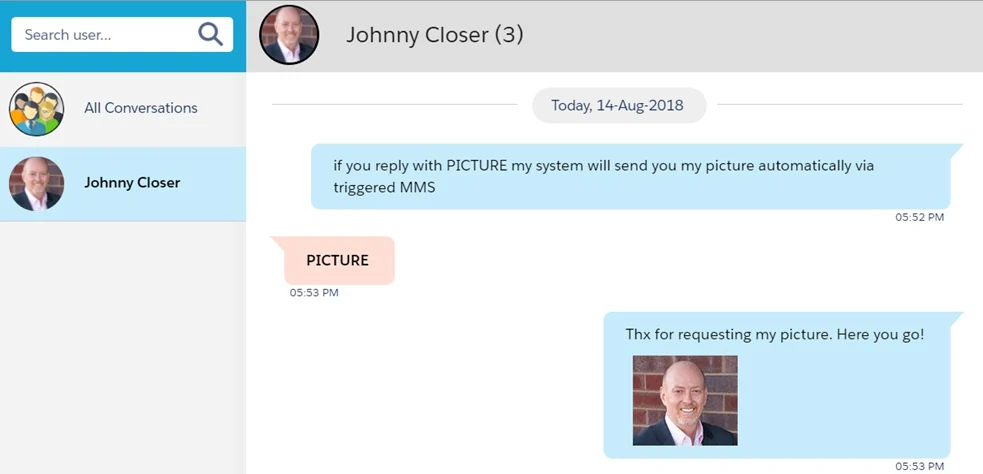
Figure 13.1 Also demonstrates a completely dynamic solution where the picture is derived by navigating to a custom field on the User record via SMS_History.Owner and the outbound phone number is also gathered from the User record. Most of the time you will be dynamically setting the Pictures and Outbound Number.
Dynamic Sender Number
No matter which method one uses, it is common that the developer wants to dynamically set the outbound Sender Number so that the customer experience is to interact from a single phone number. This only applies to organizations with multiple sender numbers.
The sender number must always be in format CountryCode+Number with absolutely no formatting or special characters, e.g. 17206050632. When dynamically setting the SenderNumber such as from Contact.Owner.Phone or from the Incoming SMS_History.To_Number use this valuable formula to strip out all the characters:
/************************************************************ Here's an example of getting the Sender Number from the Contact.Owner.Phone field (USER object).
***************************************************************
/ '1' & SUBSTITUTE( SUBSTITUTE( SUBSTITUTE( SUBSTITUTE( SUBSTITUTE( SUBSTITUTE( Owner.Phone , "(",""),
")",""),
" ",""), "-",""), "+",""), ".","")
Fig: 14 Useful formula for reducing a number to 17206050632 format
There are four common use cases:
1. Record Based Sender Number – assign a specific sender number based on business logic such that all SMS to that Contact or Lead always comes from a single sender number whether that be Record.Owner based, Geography based or defined by other business logic.
2. Dynamically set the Sender Number based on record owner – pulling from the
<record>.Owner’s designated SMS number.
3. Dynamically set the Sender Number based on geography or some other business logic.
4. Automatically replying to an incoming SMS using the number which the customer wrote to, the To_Number for an SMS_History of type = Incoming (API name: tdc_tsw ToNumber c)
a. Note that the 360SMS iText tool does this automatically – always responding to the original number that the customer wrote to.
Record based Sender Number (Sticky Sender)
360 SMS allows one to create a custom field named specifically Sticky_Sender c (you can label it any way you like). This is a custom formula field that can hold any business logic that one wants, such as Geography-Based numbers, Marketing Campaign Based Numbers or Record.Owner based numbers or it could be defined as the Last SMS number used for the contact. The point is that any business logic can be defined.
If this field exists, all interface elements of the platform (Buttons and Conversation View) will recognize that the Sticky_Sender and override the current users Default SMS Number and instead offer this field as the default. For example, a marketing user may want to select a large list of contacts for batch SMS but want the Sender Number to be the number that the customer has already been getting messages from, such as the [Record].Owners sender number.
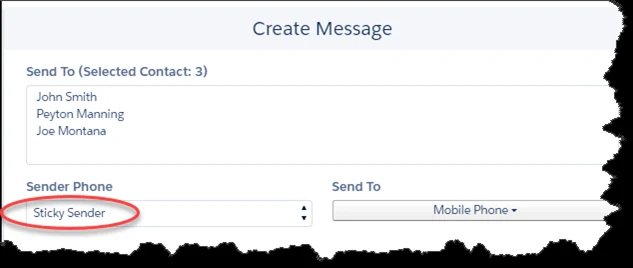
Programmatically, one references the Sticky Sender number field to make sure messages are coming from the correct number and to concentrate the business logic in the formula field.
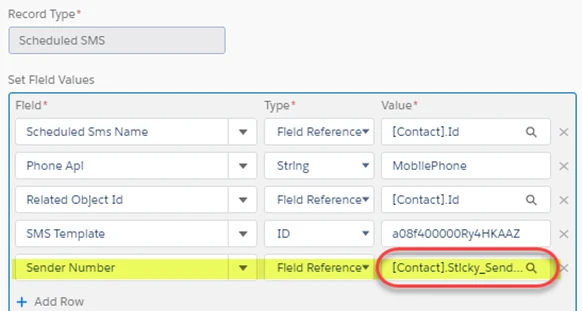
Dynamic Sender Number – Record Owner
Many orgs use separate numbers for each user, primarily for voice call forwarding situations. The mapping of Users to Numbers is defined in the SMS Setup à User Configuration which is unfortunately not accessible via flows. However, with a simple customization to your USER object you can make your flows dynamically obtain the Outbound SMS Sender Number parameter that either method makes available as an optional parameter.
Simply, create a custom text field named something like User.SMS_Number. Then copy the number associated to each user into the field. Be careful if using the standard User.MobilePhone or Phone field as Salesforce formats these numbers, such as (720)605-0632. The number needs to be completely unformatted and have the country code prefix, i.e. 17206050632.
You can now traverse to the User table such as Lead.Owner/Contact.Owner and get the number from your custom field. Or better yet define this logic in a Sticky_Sender c formula field such as: Owner.SMS_Number c or using the formula below which makes sure to strip out the various phone formatting characters.

Dynamic Sender Number – Geography or Business Rule Based
In larger organizations with many geography’s or complex business rules it is desirable or even a requirement to use specific sender numbers. In the case of multiple countries, it is a requirement to use a sender number that matches the country of destination. There are three solutions here:
1. Use the Sticky Sender custom formula field explained above.
2. Utilize the 360 SMS Co-Pilot feature which will use its Area Code/Country Code picker to dynamically pick the sender number if you have purchased a matching Area Code or Country Code number in your pool. For more on Co-Pilot refer to this hyperlinked document: Batch Texting – Auto-Routing
3. Use theflows formula editor to build in your business logic for the Sender Number but still you are better off now putting your logic in the Sticky Sender formula field rather than defining the logic in the flows Dynamic Sender Number – Incoming SMS
The third common scenario is to dynamically set the SMS Number parameter based on the Incoming Message. This is common when responding to Keywords. In this case, you don’t need to lookup the number from a user table, you simply need to get it from the SMS_History.To_Number field (the number that the customer wrote to). However, be careful as the value will have a “+” character in front of it which is invalid for an outbound number, so you must use the SUBSTITUTE function as shown below to remove the +. The formula is provided below for easy copy/pasting.
/********************************************************************* APEX Parameters Defined:
Param1: Id of the primary object – pulled from SMS_History.ContactId
Param2: The API name of the phone field for the contact object.
Param3: Can be a TemplateId, QuestionId(first Question of a iText) or straight text if you
don’t want to use a Template or Question
Param4: Outgoing Phone # – pulled from Inbound SMS_History.To_Number but we have to remove the + that is inherent with inbound numbers
Carefully note the placement of the commas
***********************************************************************/
[tdc_tsw Message c].tdc_tsw Contact c & ',' &
'MobilePhone' & ',' &
'a08f400000Dfo3fAA
B’ & ‘,’ &
SUBSTITUTE([tdc_tsw Message c].tdc_tsw ToNumber c , '+', '')
Dynamic MMS – such as sending a picture of a particular user
Like a dynamic Sender Number, one can create a custom field on the User record that holds the Document Id of a previously stored picture.
In this example, we simply uploaded a Picture to the Salesforce Document object and manually copy/pasted the actual ID of the picture into a custom field named User.Picture_Doc_Id. We obtained the Document Id from the URL when we opened the picture.
For ease of copy/pasting the code for the Dynamic MMS has been provided below.
/********************************************************************* APEX Parameters Defined: Param1: Id of the primary object - pulled from SMS_History.ContactId Param2: The API name of the phone field for that object. Param3: Template Id: a08f400000DflORAAZ = Contact - Event Reminder Param4: Document Id pulled from the Owner.Picture_Doc_Id field
Param5: Optional Outgoing Phone # – pulled from Contact.Owner –> User.SMS_Number (custom)
Carefully note the placement of the commas
***********************************************************************/
[tdc_tsw Message c].tdc_tsw Contact c & ',' & 'MobilePhone' & ',' &
'a08f400000DflORAAZ' & ',' &
[tdc_tsw Message c].tdc_tsw Contact c.Owner.Picture_Doc_Id c & ',' & [tdc_tsw Message c].tdc_tsw Contact c.Owner.SMS_Number c
Dark Hours
360SMS has a feature titled Dark Hours, which when enabled, delays any Triggered or Scheduled SMS messages from firing until the “Sending time/Next Day.” In the screen capture below any messages that were triggered after 4:00pm and before 6:00am will be delayed until 6:00 AM of the following day.
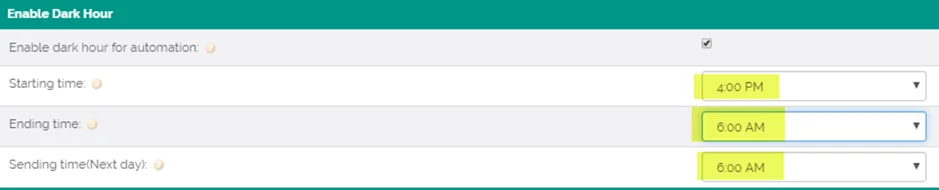
Technically what occurs is that if a process triggers the sending of an SMS during the dark hour time frame, it will create a Scheduled SMS related list record shown below with the Schedule Date/Time feature. Then the Scheduled SMS will fire the next day at the start time.
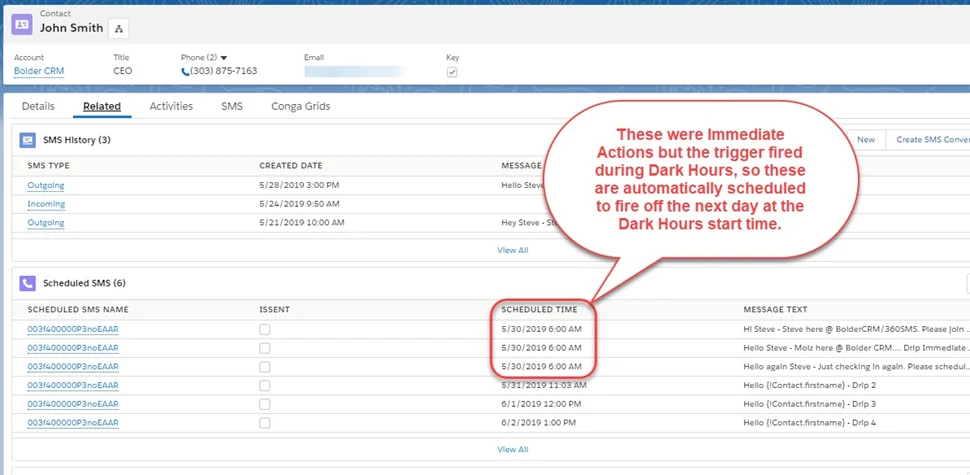
Roll-up SMS Conversations to Parent Objects
It’s good CRM best practice that when texting either manually or via automation from a child object, that the SMS “rolls-up” to also display on the parent CONTACT object. Or in the case of texting from the Contact it should roll-up to the Account so from the Account page one can see all the conversations with all the contacts.
The CASE object automatically rolls-up any SMS linked to the Case to the parent Contact so that when looking at the Contact record you can see contextually each conversation as it is related to both the Contact and the Case. For other objects we need to intercept the SMS History via Flows and do the roll-up with an Immediate Action updating the SMS History.
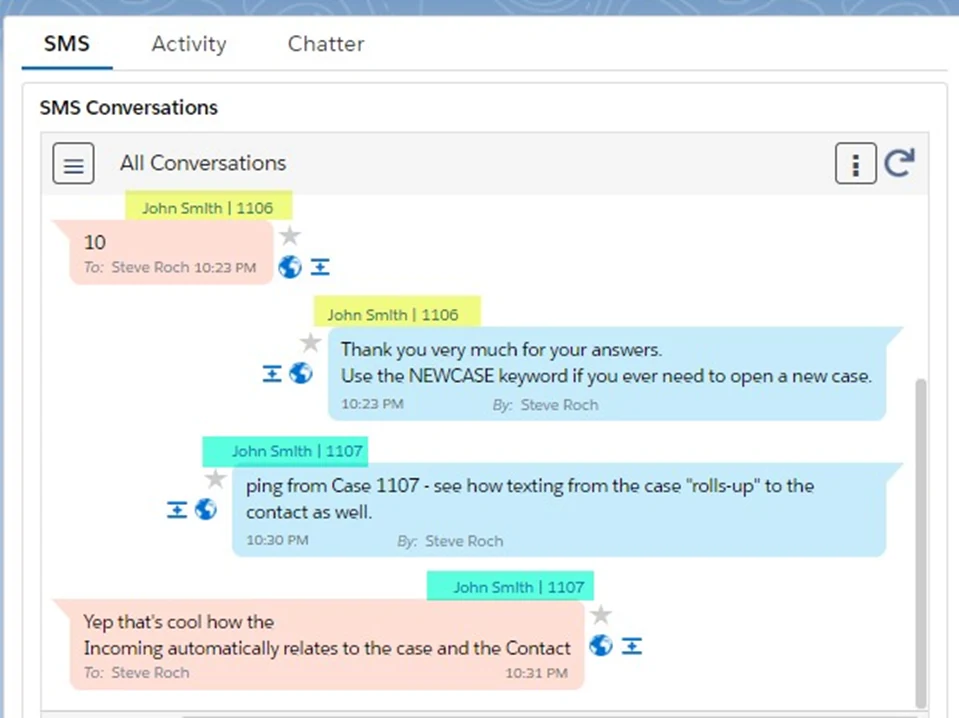
In the example below, we have a classic child object named Job_Listing which is the child of a Job and the child of a Contact (a contacts potential interest in a Job that is being offered for a recruiting company). Usually recruiting firms batch text or trigger text from the Job_Listing and they want to see
Lets Say if an incoming is come in contact and you need to update contact fields on the basis of that then all the SMS from all the Contacts in the Job’s SMS Conversation View but also from the contact record they want to see all the Job related texts they’ve sent the Contact (similar to Figure 15 with Cases). This is the perfect scenario for a ROLL UP. We detect that the SMS History’s primary related Object = Job Listing and then because the Job Listing is the child of a Job and a Contact we simply update the SMS History with those values, setting SMS_History.ContactId = Job_Listing.ContactId and SMS_History.Job = Job_Listing.JobId
Note that the platform uses the primary Related Objects NAME field for the Sender Name (the link that appears above the message and which shows in the Incoming Alert). It’s a good practice when texting from Child objects to modify the Sender
Name with a Flow so that in this case it reads “John Smith | SF Administrator”, i.e. Contact.Name & “ | ” & Job.Name
Create a Contact/Lead Last_SMS field
Often customers want to use Salesforce List Views based on the Contact, Lead or some other custom object to determine which customers have or have not received an SMS lately. However, because Salesforce List Views do not allow Cross-Object queries and even Salesforce Reports do not allow for a Does Not Exist clause this can be a challenge.
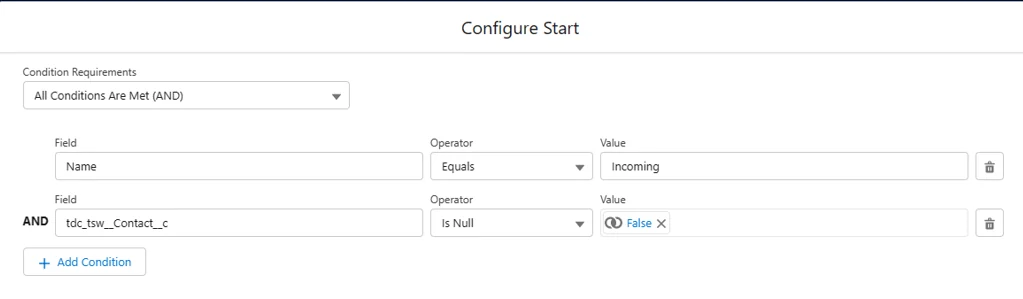
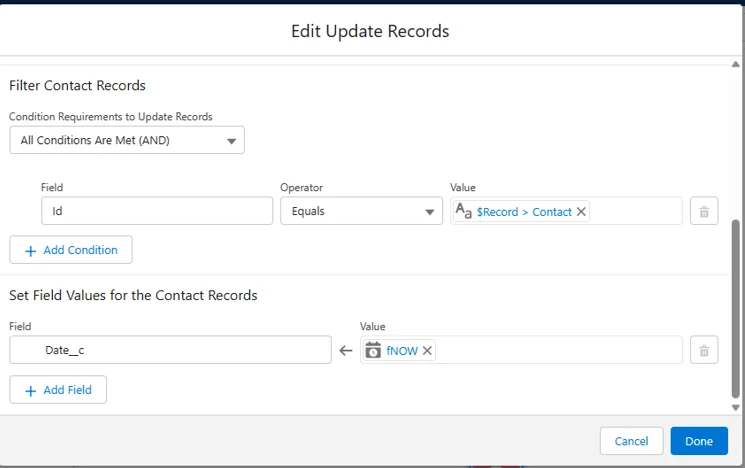
To resolve this Salesforce limitation, we recommend placing a simple Salesforce Flows in place which updates a custom field such as Contact.Last_SMS or Lead.Last_SMS whenever any SMS History record is created. At your discretion, you could also differentiator Incoming vs. outgoing by having fields such as Last_SMS_In and Last_SMS_Out but we usually find a single field to be sufficient.
Create a Flows on the SMS History such as the “SMS History – Master Updater Process” mentioned in previous sections. Then simply detect that the SMS History.Contact or SMS_History.Lead value is not null. Then update the respective records Last_SMS field with the SMS_History.Create_Date.
Now you can use the Last_SMS field in your Contact/Lead List View queries.
Triggered Texting to Internal Users
Some customers want to use the power of texting to switch out their old email alert systems to instead using Text Alerts to the internal users. In the scenario below, we see a use case for a New Lead text alert sent to the Lead.Owner’s mobile phone with a hyperlink to the Salesforce record so that he/she can open it quickly in Salesforce1.
Note that we are triggering the message with the Lead.Id so that we may use a Lead based template which merges in details about the lead and most importantly we set the Phone API field to get the value from the Lead.Owners Mobile phone field, i.e. Lead.Owner.User.MobilePhone. Thereby sending the LEAD details to the Owner’s personal cell phone.
Important note: Set the Related Object Id to Lead.OwnerId (a user id) so that the alert does not appear in the SMS History for the lead. Otherwise it looks like this is a message you texted to the customer.
Create a Master Send SMS Handler
If you anticipate creating using Method #1 for many different triggers you might consider adding an SMS_Template_Id lookup field to a Lead, Contact or any custom object. Then as shown below you can have numerous Flows that trigger outbound messages but all you will need to do is update the Contact.SMS_Template with whatever template you want to send. This centralized approach means that you won’t have to create the same Send SMS action whether that be Method #1 or Method #2 over and over again.
Of course, there will be many times when you will not want to use your Master Send SMS Handler such as when the outbound number needs to come from a different number or perhaps when you need to trigger an MMS.
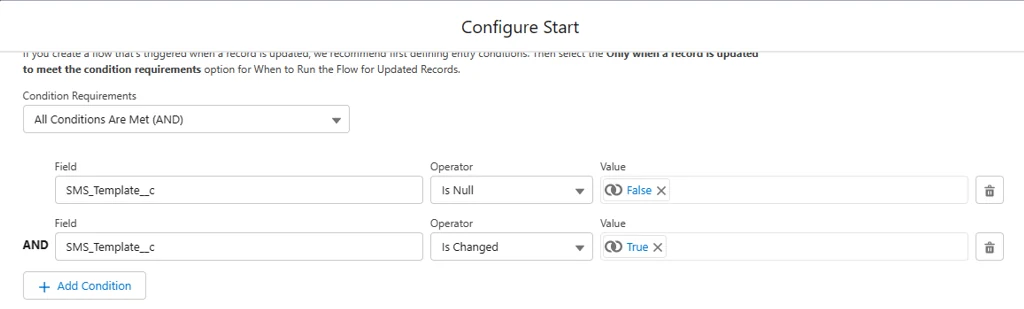
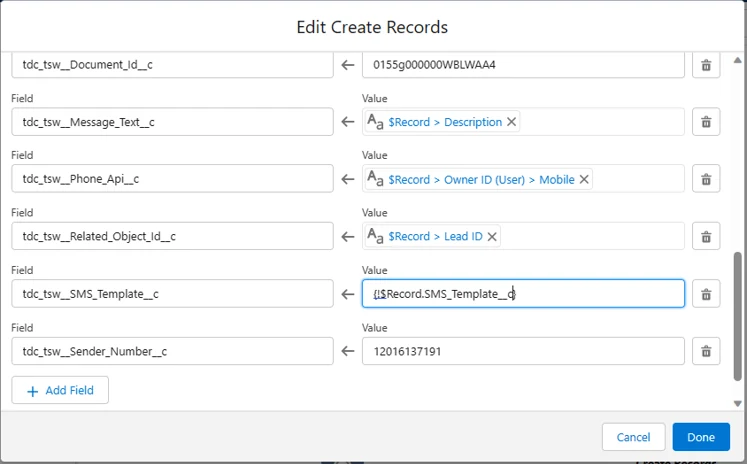
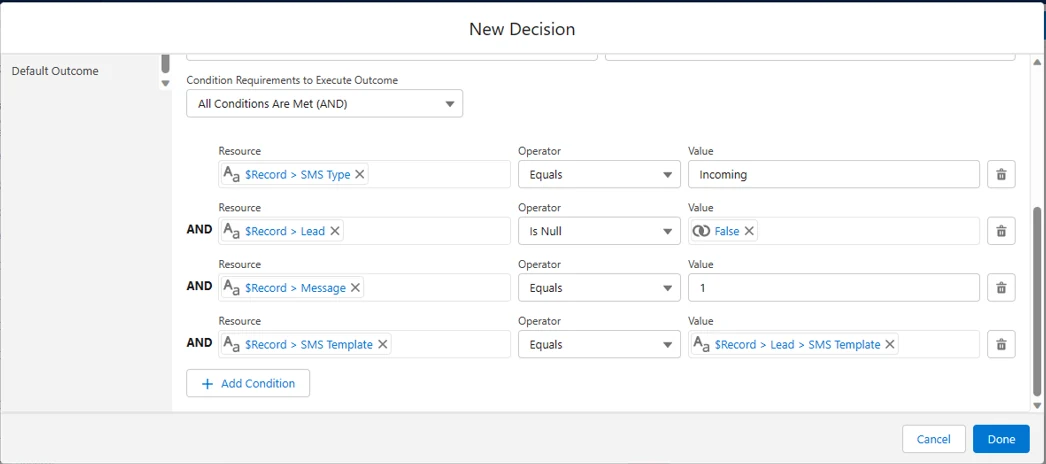
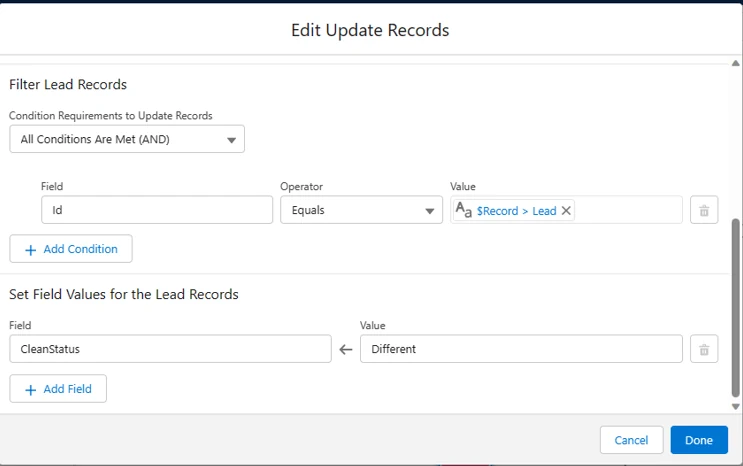
Where we have a iText with multiple answers and it needs to trigger a different template per response. It would be a hardship to write the APEX code for each possible answer over and over again. So instead, we just set the SMS_Template for the contact and let our other Flows do the work!
iTexts
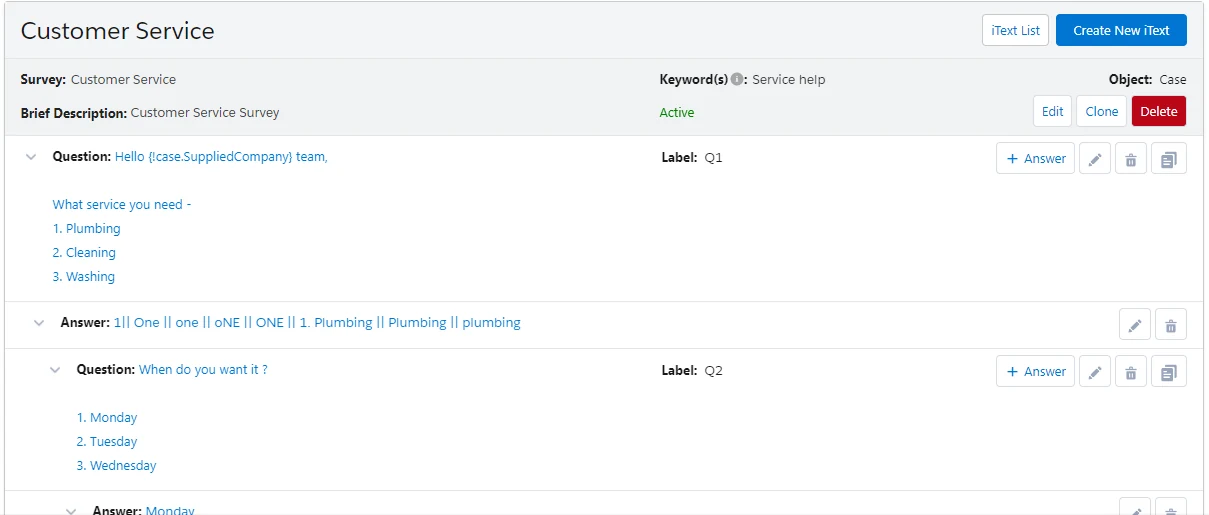
The 360SMS iText structure is a powerful feature that automates the entire Question/Answer dialog without the use of Flows or Templates. Answers and their related question are written to the SMS History like everything else in addition to being stored in a iText Response object for even greater reporting and automation potential. iText’s allow a question to have multiple answers which then branch to additional questions with their own multiple answers and as many branched questions/answers as your heart desires.
A iText can be triggered either via traditional Flowss using the methods described in Method #1 or Method #2 above or a iText can be triggered automatically by defining an inbound keyword.
iText’s work best when the question is presented with clear answer choices such as “Reply YES or NO” or with multiple choice answers where the call-to-action is to “Reply with a number” or “Reply with a letter or combination of letters.”
Lastly, iText replies can easily update field values in Salesforce objects or take other actions using Flowss on the SMS History or iText Response object to inspect the incoming answer to a specific question.
Using Salesforce Flows
The Salesforce Flow technology is worth a short discussion as it provides considerably more power than Flows, such as the ability to add complex business logic, use variables, lookup records, loop through records, delete records and more.
In the examples below we demonstrate receiving an email address via an Incoming SMS in response to a template which says “I don’t recognize your #, can I get your email address so I can look you up by email?”
In this workflow, we have a new unknown number writing into our Salesforce system. In a previous Flows we have created a new Lead record for this Incoming SMS and we start asking them questions to fill out the record such as Email, Name and Company. However, here we use a Flow called from a Flows to take the email address and perform a Record Lookup against the contact object. If we find a record, we will instead send back a template that says, “Found you
{!Contact.Name}!” and then proceed with the original keyword that started the whole process.
Figure 26 shows how a normal Flows can call a Flow passing in parameters that we gather from the SMS_History record. Figure 27 then shows the details of the flow where it:
1.Looks up the email from the Contacts object using the Get Records object of flows
2. If a contact is found it re-links all the SMS_History that got linked to the dummy lead record which was created when the SMS from the unknown record first came in.
3. Finally we can send the outbound SMS reply either via the same APEX methods as a Flows uses or in this case we use the technique where we only update the Contact.SMS_Template field which in turns triggers our Master SEND SMS Handler.