


Disclaimer
This document contains Confidential, Proprietary and Trade Secret Information (“Confidential Information”) of 360 Degree Cloud and may not be copied, distributed, duplicated, or otherwise reproduced in any manner without the prior written consent of 360 Degree Cloud.
While every attempt has been made to ensure that the information in this document is accurate and complete, some typographical errors or technical inaccuracies may exist. 360 Degree Cloud does not accept responsibility for any kind of loss resulting from the use of information contained in this document.
The information contained in this document is subject to change without notice.
The incorporation of the product attributes discussed in these materials into any release or upgrade of any 360 Degree Cloud software product—as well as the timing of any such release or upgrade is at the sole discretion of 360 Degree Cloud.
Introduction
360 SMS is an easily implemented integration of inbound and outbound Text Messaging (SMS) capabilities within Salesforce as well as MMS (sending pictures and files) and Ringless Voicemail.
The solution is the only 100% native Salesforce solution on the market, meaning that no data is stored outside of Salesforce. 3rd party SMS Aggregator messaging services are invoked from the Salesforce environment but the messages (SMS) and/or attachments (MMS) themselves are never on any servers outside of the customers own Salesforce org.
The solution installs just a few custom objects, buttons and VisualForce pages which the administrator adds to the Page Layouts of key objects such as Contact, Lead and/or Case. It also fully supports custom objects.
When first installing the application either after purchase or as an evaluation, one or more phone numbers are provided to facilitate the outbound and inbound text messaging.
When evaluating the solution, a free temporary phone number and free outbound SMS credits are issued for 7 days by default. From start to finish one can enable 360 SMS in Salesforce in just 10 minutes by pressing two buttons (Outgoing Setup/Incoming Setup) to automatically issue the new phone number and credits and then adding the Send SMS button and SMS History related list to your Contact or Lead page layout. That’s it! You should be texting in less than 10 minutes. Optionally, you can drag the SMS Conversation View Visualforce page to your Contact/Lead page layout to add even more value.
When purchasing, the customer may use their own phone numbers which are then “SMS Enabled” by 360 SMS through your provider.
This document provides a high level “How It Works” section, Basic Installation and Configuration Instructions and an Advanced Configuration section which covers some of the more innovative features that differentiate 360 SMS from other solutions.
How Does It Work?
Once you have configured the basic application, you can send an Outbound SMS either via the Send SMS button or via the Conversation View. Either method writes a record to the SMS History related list for the object. The messages are designated with Type = Outgoing or Type = Incoming.
Incoming messages automatically resolve to whatever objects are defined in the Object Setup. By default, the app is configured for Contacts and Leads and for common phone fields. The inbound number first matches to its preceding Outgoing. Only if that fails, such as with an unsolicited incoming message (one without a preceding outgoing message to the customer) does it then revert to matching to the designated fields defined in Object Setup and create an SMS History record of Type = Incoming. It automatically handles various phone formats.
NOTE: Storing both the Outgoing and Incoming in a single SMS History object is an important differentiator for 360 SMS as it makes reporting and automations significantly easier than with other SMS applications.
Installation Software/Hardware Requirements
360 SMS is a 100% Salesforce solution and thus requires no special hardware or other services to configure. It works on the following versions of Salesforce:
- Professional
- Developer
- Enterprise
- Performance
- Unlimited
The solution works in Salesforce Classic, Salesforce Lightning and Salesforce 1 automatically without any additional configuration.
Installation to your Salesforce Org
You may install the 360 SMS solution to your Production or Sandbox from the Salesforce AppExchange. Simply search “360 SMS” within the AppExchange and follow the simple instructions from there.
NOTE: As with most Salesforce Apps, we do recommend that when prompted, you choose the “Install for All Users” option. The application is still controlled by Salesforce User Licensing and Permission Sets but choosing the “Install for All Users” options just makes the security management a little easier down the road, either option works fine though.
Fig Installation in Salesforce Org
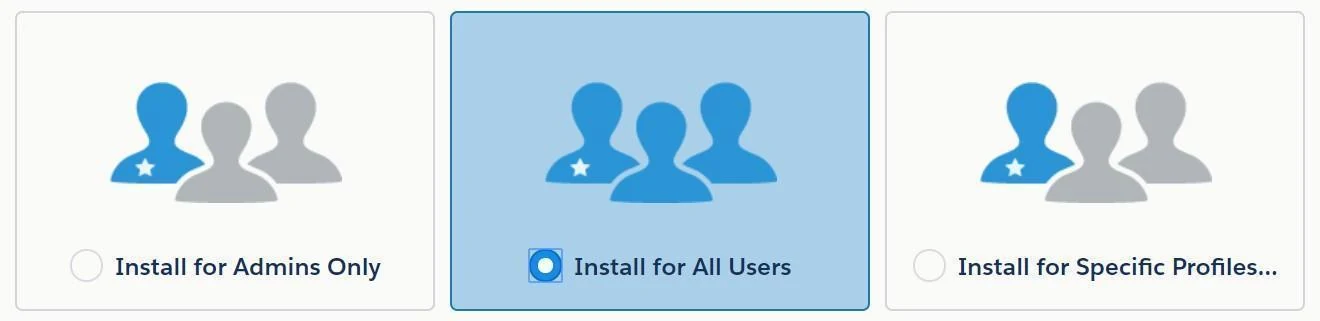
Once, Install for All Users is clicked, the below screen would appear.
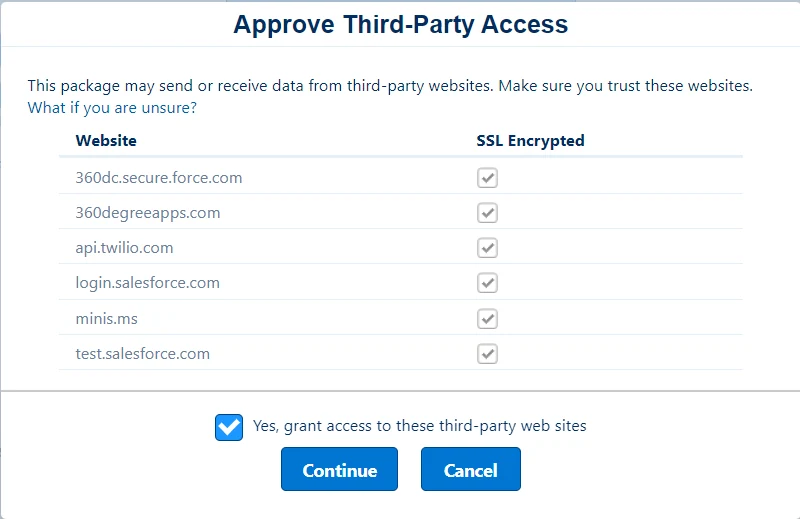
Fig Approve Third Party Access Completion
This Part may take a little time and thereafter the installed package can be viewed as per the below screenshots –
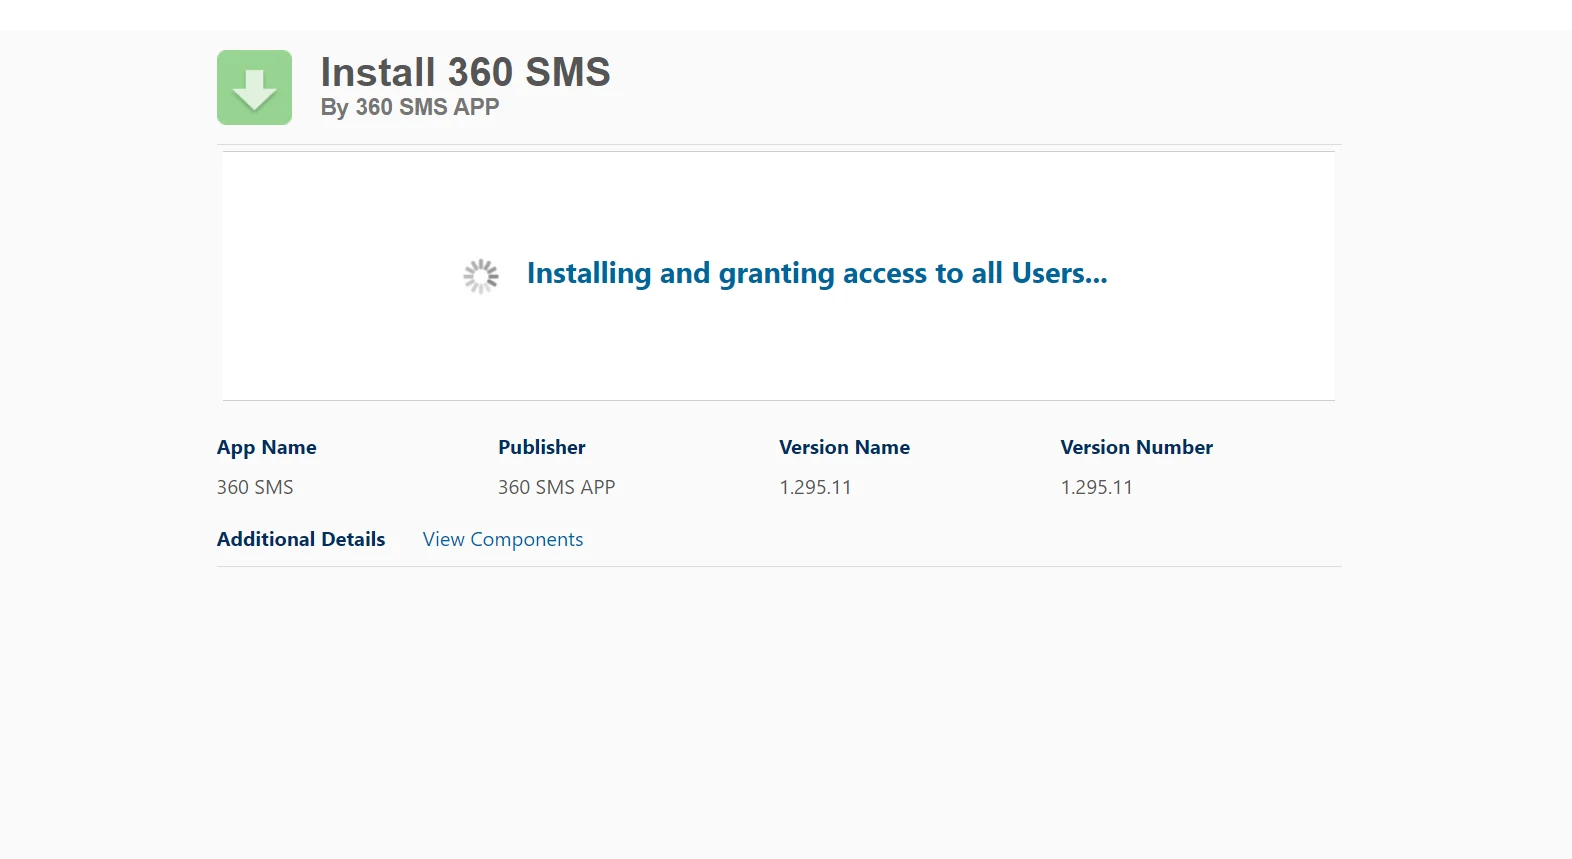
Fig Installation of Package
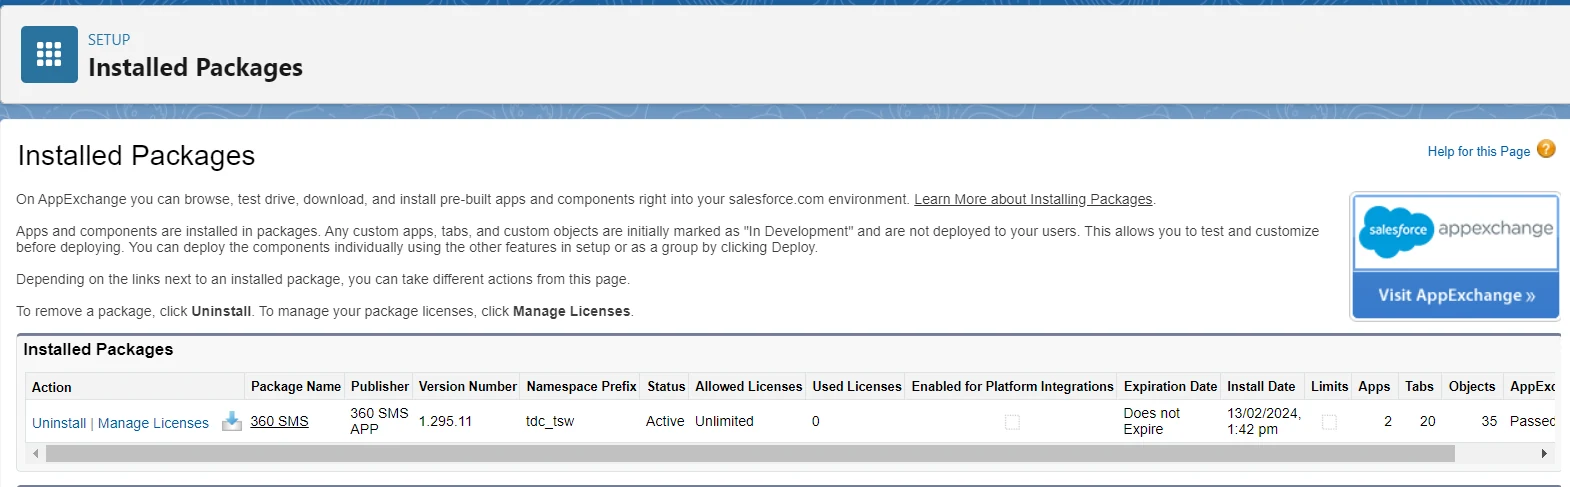
Fig Package is installed
Once the installation is completed, anyone can search in “QuickFind Box” which is displayed below –
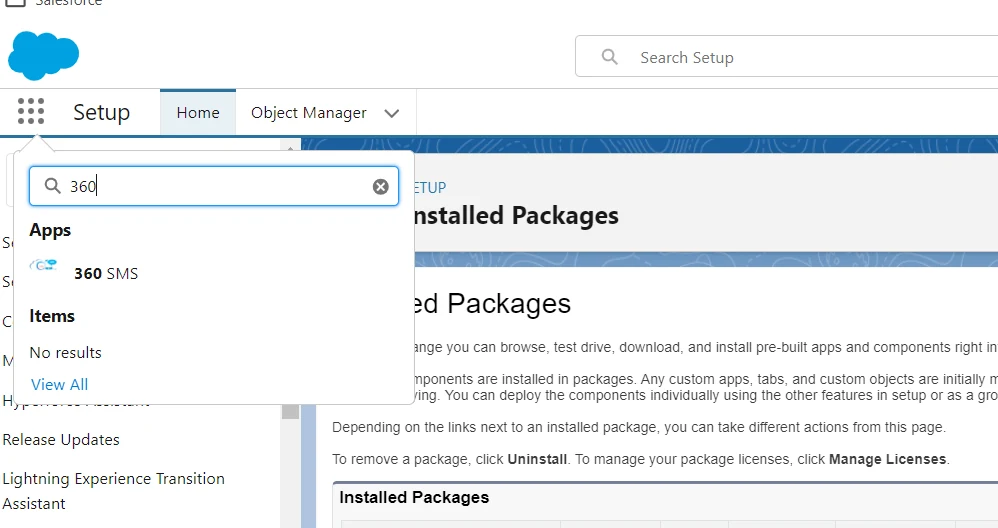
Fig Package installed can be found in QuickFind Box.
Basic & Trial Configuration
Within 5 minutes one can send and receive the first sms by following the basic configuration steps –
- Initialising the Phone number
- Add the Send SMS button to your page layout(s) and/or add the Conversation View to the page layout.
Verify Installation
You can verify that the application has been installed correctly as there will be a new “360 SMS” app in your applications list whether working from Classic or Lightning.
Fig- 360 SMS application from either Classic or Lightning
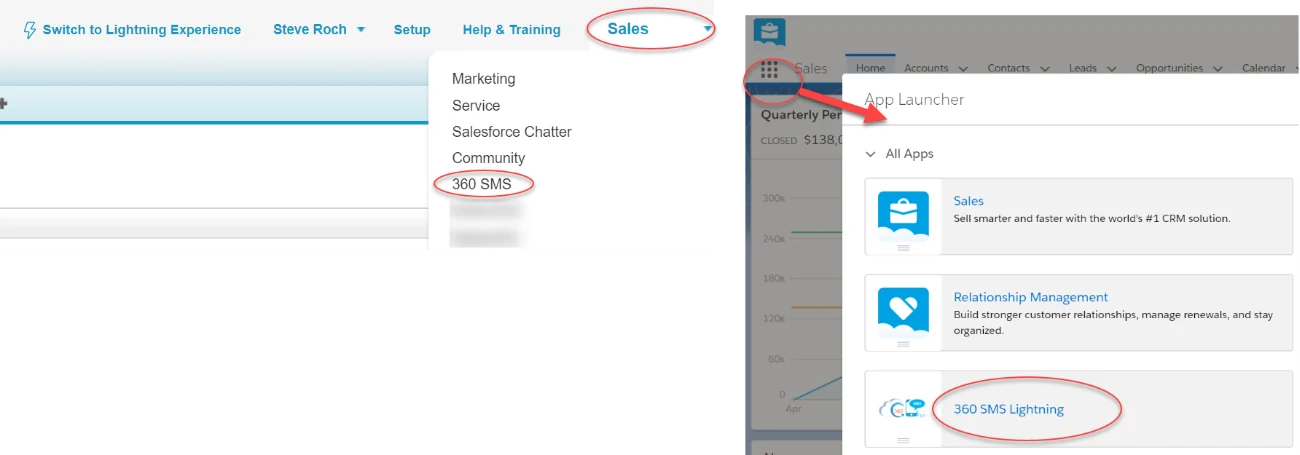
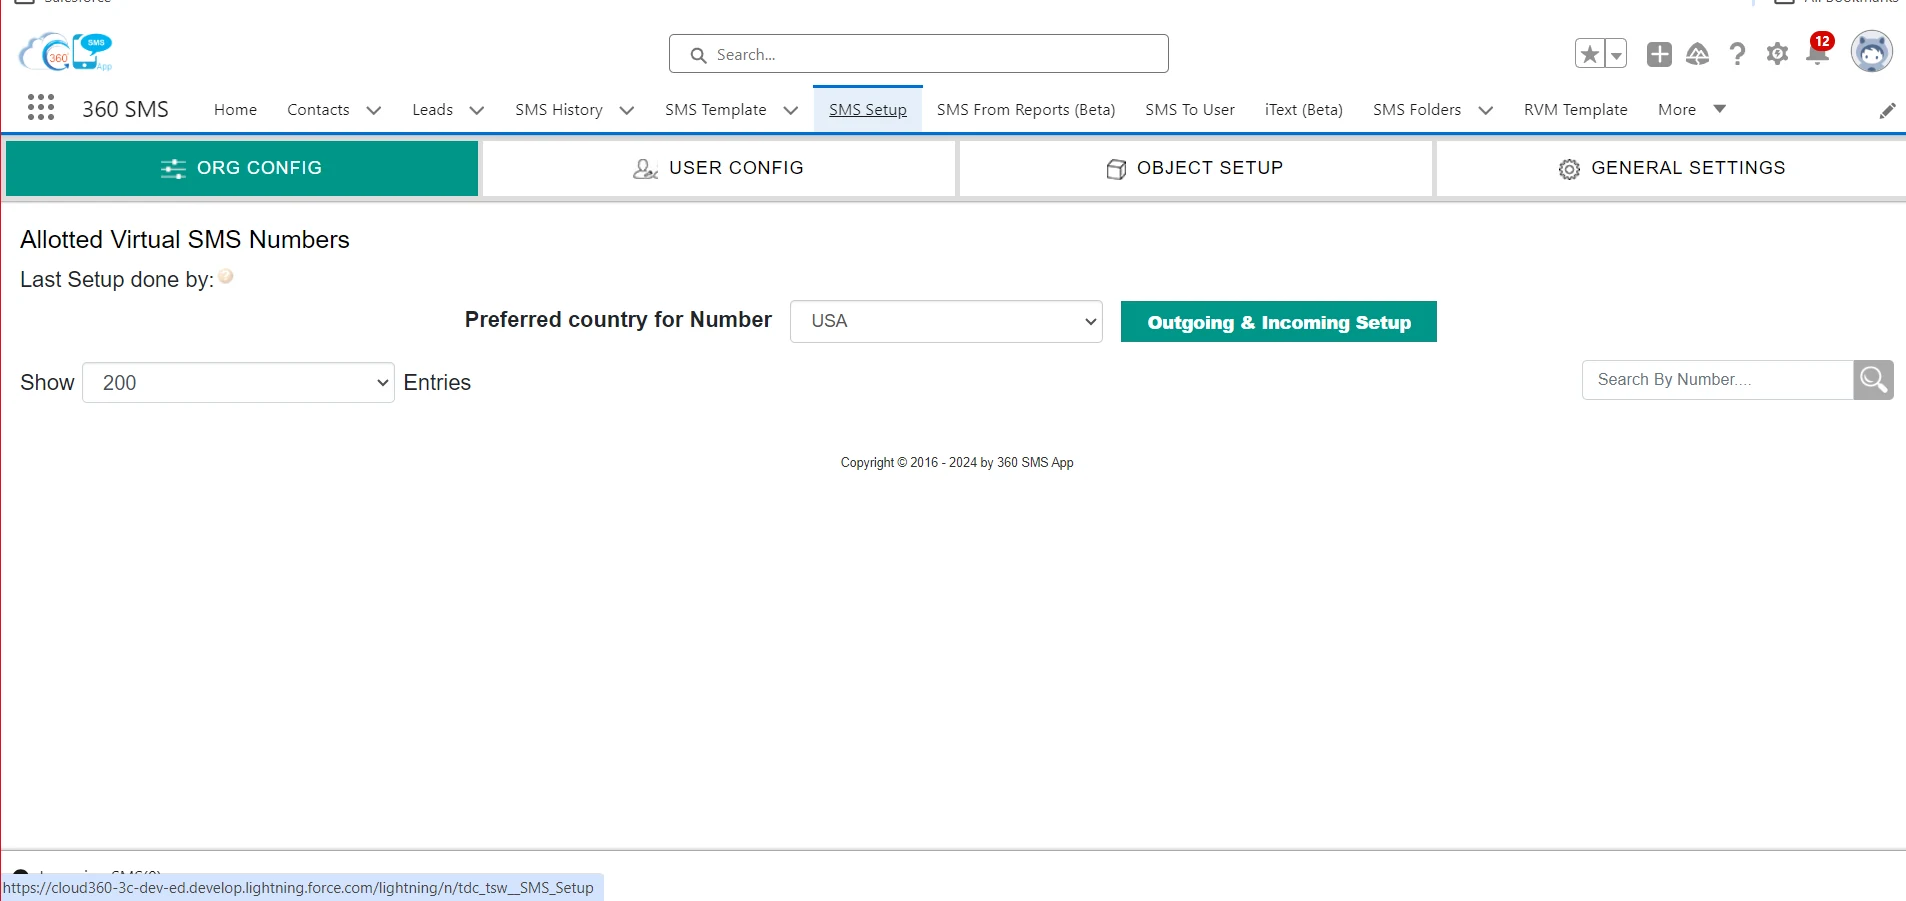
Fig 360 SMS App Setup Page
Initialize the App with a Phone Number
To send your first message, you must first establish an Outbound/Inbound phone number. During a Trial Evaluation a temporary number is automatically issued. Purchasers of the solution will have previously supplied their own phone numbers to be SMS Enabled or purchased new numbers.
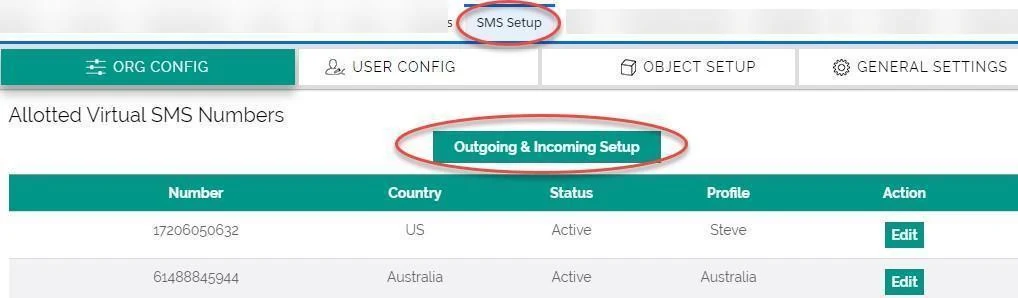
One must initialize the app to push the Phone Number(s) into your Salesforce Org with two easy steps:
- Navigate to the 360 SMS App
- Choose the SMS Setup tab
- Press the Outgoing Setup followed by the Incoming Setup. This initializes the number to your Salesforce org, no other input is required.
Fig Intialising the app with Phone Number
Developer Edition Note: Salesforce Developer Edition has special restrictions imposed by Salesforce and thus requires an email to sales@360DegreeApps.com in order to establish the phone number and credits, otherwise an error would be shown as per below.
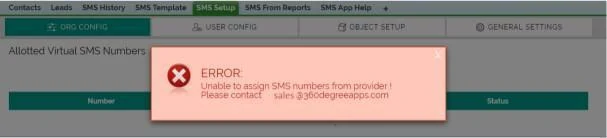
Fig Error Message
Configure Page Layouts
By default, the app comes completely configured for the Contact, Lead, Account, Opportunity, and Case objects. Refer to the Custom Objects section below for custom objects or other standard Salesforce objects.
Add Buttons, Related Lists and Opt-Out field
Repeat these instructions for each standard object that you want to send/receive text messages from.
- Edit the Page layout of the respective object.
- Add the Send SMS button(s)
- 360 SMS works for Classic, Lightning and Salesforce1 the buttons/actions are slightly different for Lightning and Salesforce1 and are dragged into their appropriate locations from the “Mobile & Lightning Actions”.
- Classic: Drag the button named tdc_tsw Send_SMS to your custom buttons section
- Lightning: as shown below, drag the Quick Action button named tdc_tsw Send_SMS_SF1 into the “Salesforce Mobile and Lightning Experience Actions” section.
- The only difference in these Send SMS buttons is whether they pop-up in dedicated pages or as Javascript pop-up windows but these named below are the best for Classic and Lightning/Salesforce1.
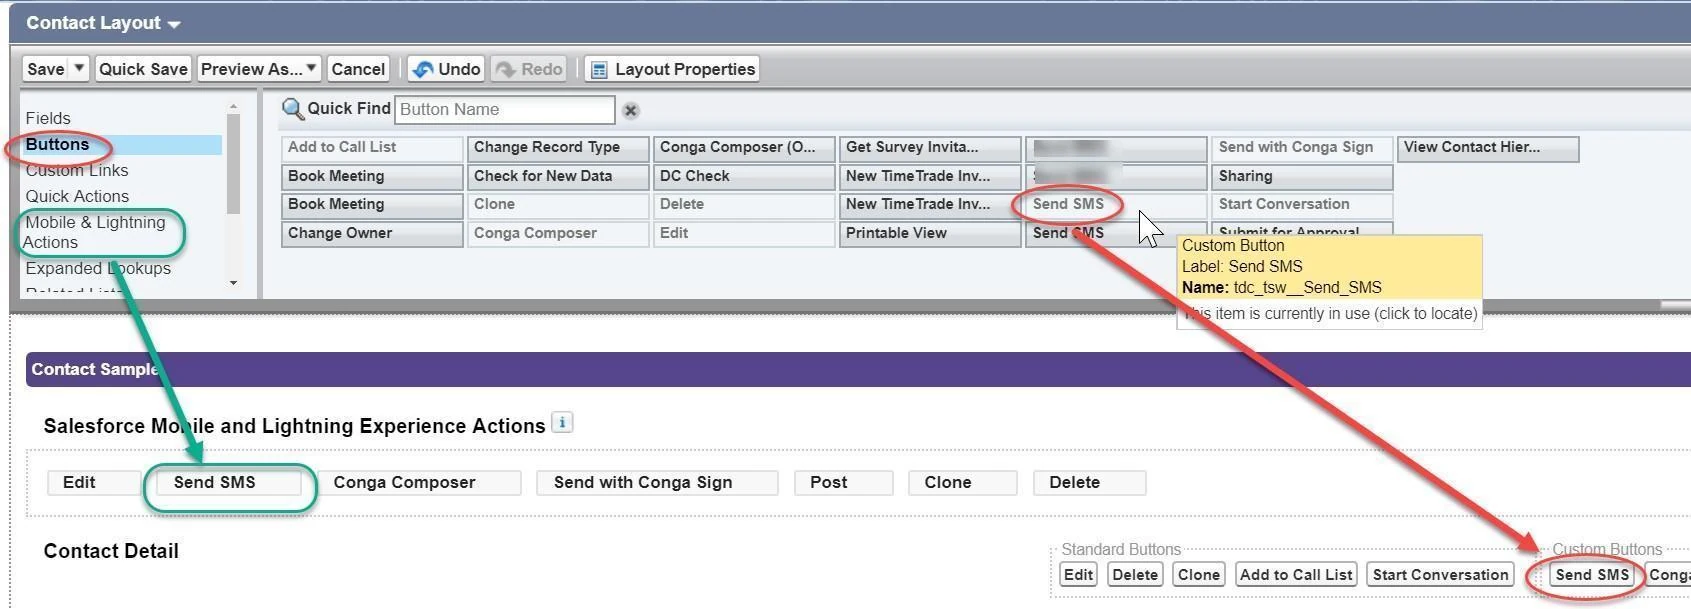
Fig- Drag Send SMS buttons onto Classic, Lightning and Salesforce1 locations
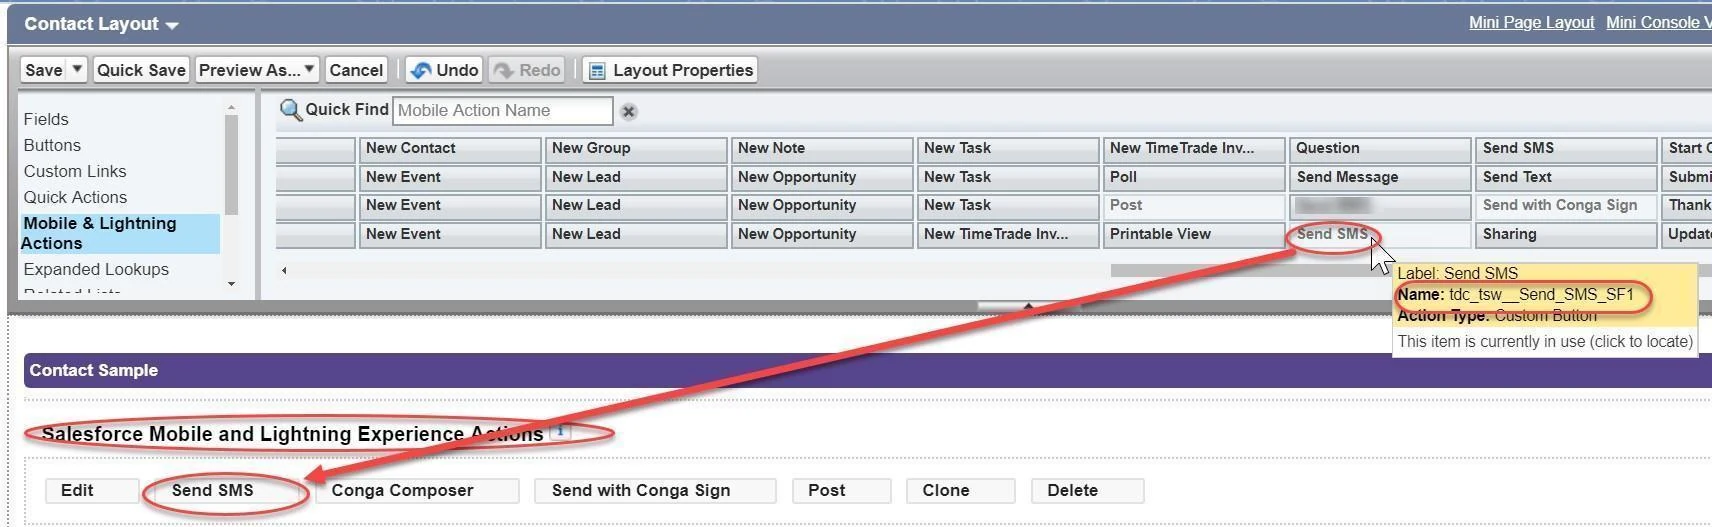
Fig Lightning & Salesforce1 button configuration
- Drag the SMS Opt Out field onto your page layout, this is optional. It controls the automatic Opt-Out features of 360 SMS.
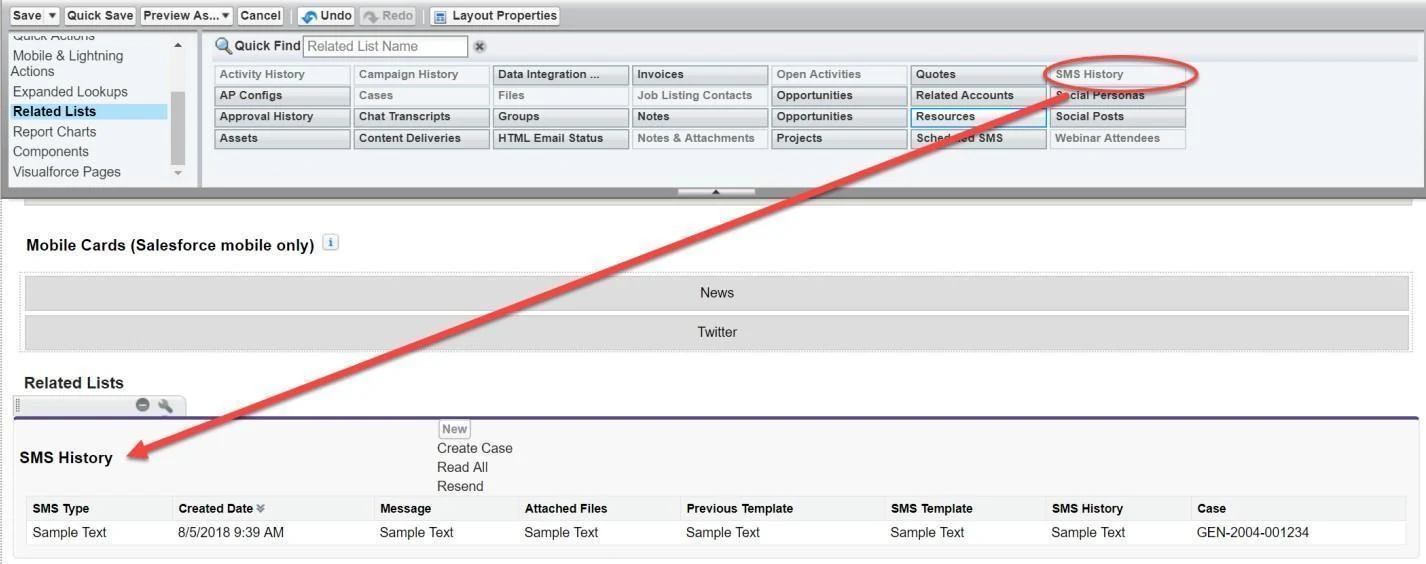
- As shown below, add the SMS History related list to your page layout (this is optional if you are planning to use the Conversation View but still useful for other reasons). Modify the fields displayed as you see fit. We recommend the fields shown below and setting the sort to Create Date Descending.
Fig- SMS History related list
Advanced Configuration
The below section would cover the configuration of 360 SMS and would it unique among other SMS Applications –
- Salesforce Communities
- Security and Licensing
- Salesforce Sites
Salesforce Communities
360SMS seamlessly integrates with Salesforce Communities for almost all its functionalities. The screenshots provided demonstrate that features like Incoming Alert, Send SMS buttons, and Conversation View function identically in Communities as they do in standard Salesforce. It’s hardly distinguishable from the screenshots that they are from a Communities page, requiring no additional effort.
The only functionality missing in Communities is Batch SMS from List Views due to Communities’ restrictions on custom buttons. However, the SMS from Reports feature is available for Communities if needed.
Additionally, as 360SMS is a native Salesforce app and all SMS History (In/Out) records are native Salesforce records, they adhere to the same sharing and security rules that make Communities powerful.
Fig – Communities Home Page allows placement of the Incoming Alert just like regular SF
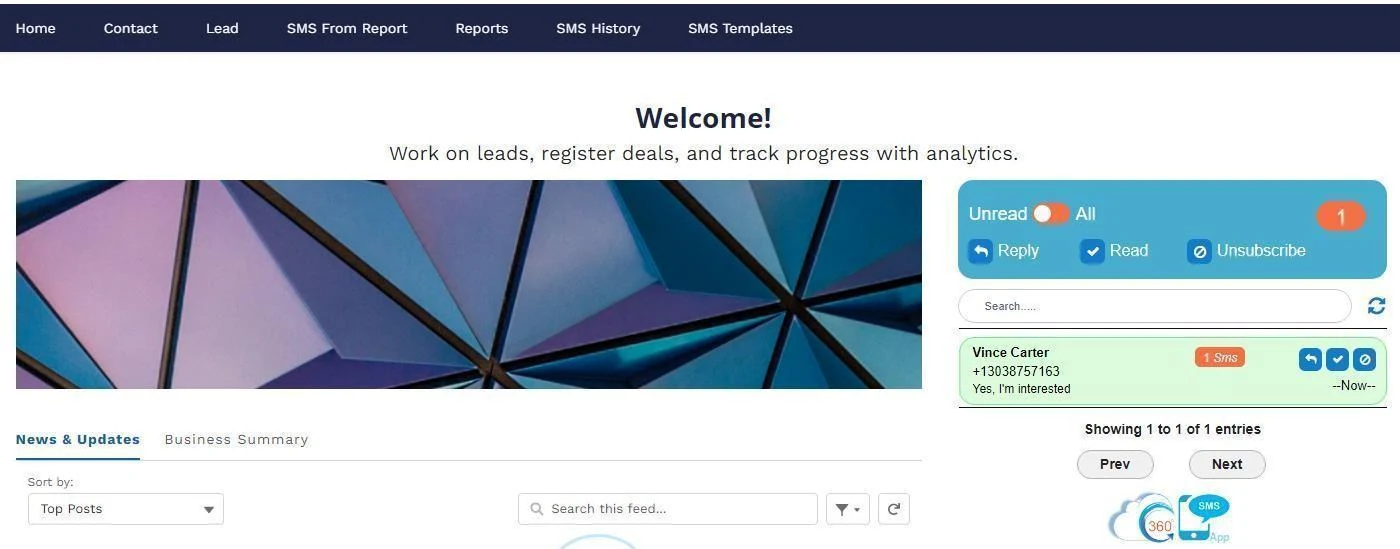
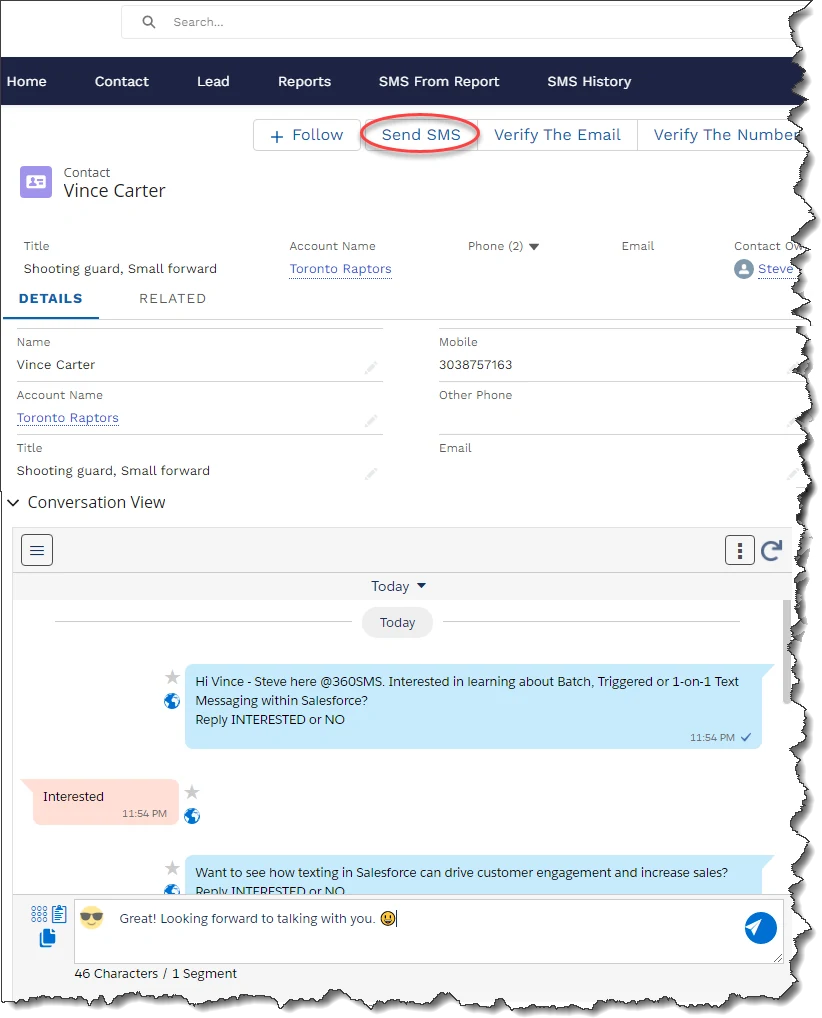
Fig- Communities page layout fully supports SMS buttons and Convo View
Security and Licensing
360 SMS utilizes standard Salesforce security and licensing to grant users access to the various objects, buttons and functionality required for texting.
There are three important steps for onboarding new users discussed below:
- Licensing – Users must be granted a 360SMS license, even if they are only performing actions that trigger an SMS without directly using the application’s buttons or interfaces.
- Permission Sets – Like most Salesforce apps, users need to be added to the SMS App Permission Set. If custom objects are being used, utilize the “SMS App Permission Set – Cloned”.
- User Config (Phone Number + User) – To enable outgoing SMS, users need to be added to the SMS User Configuration with their UserId and phone number combination. If there’s no association with a number, outgoing SMS won’t work, which is the most common reason for failed triggered SMS.
Licensing
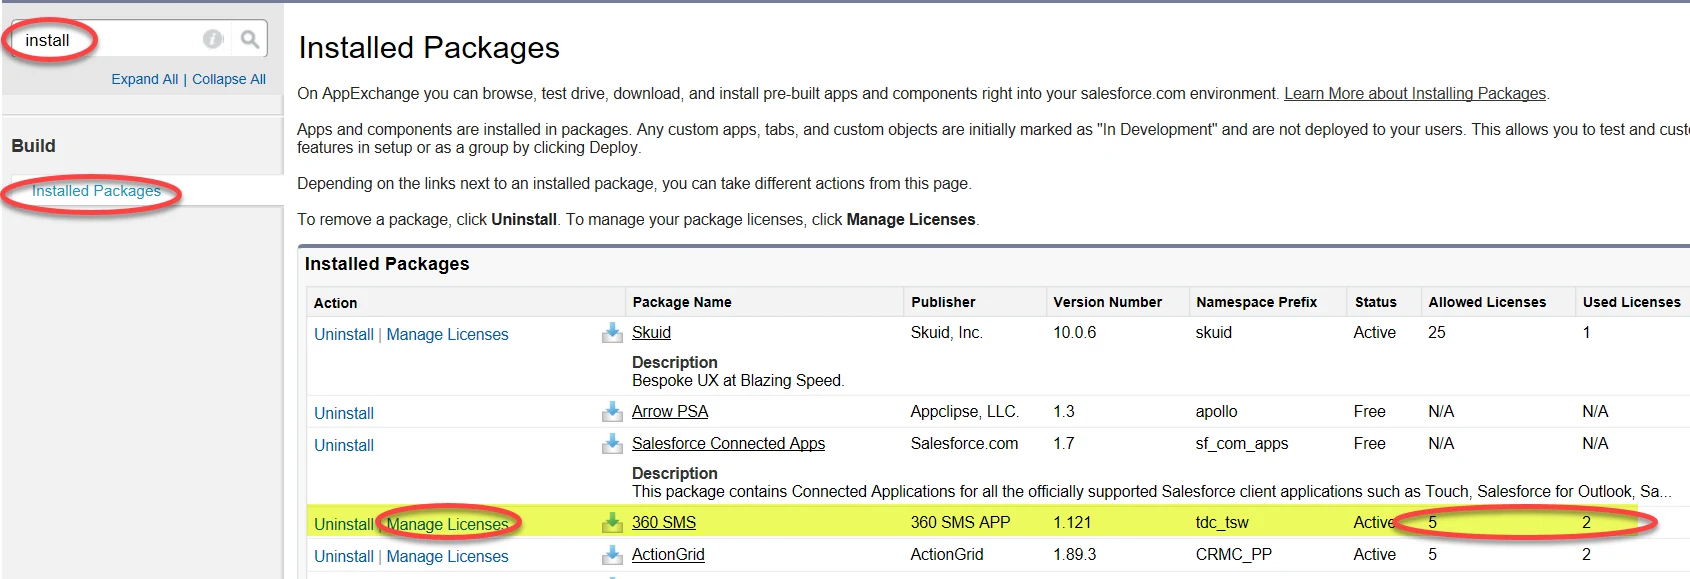
The application follows the standard licensing model common to most Salesforce Apps, where each user intending to send outbound SMS messages must have a license. This includes users who trigger actions resulting in SMS messages, as Salesforce relies on the context of the current user for these actions. Additionally, users must be licensed to access the Conversation View VisualForce page and the SMS_History related list.
Note – For trials or evaluations of 360 SMS, the application is licensed for unlimited users, eliminating the need to consider licensing during this period.
As with all managed and licensed Salesforce Apps, licensing is handled from the Installed Packages page within Salesforce Setup. To add users, simply navigate to the Manage Licenses section and follow the instructions.
Fig – License Management for 360 SMS
Permission Sets
The simplest security approach involves adding Users to the SMS App Permission Set created during installation. Since this is a managed permission set, it’s not editable except for adding Users.
If you’re creating additional Conversation View Visualforce Pages, consider duplicating this permission set and using the duplicate version instead. A duplicate permission set is necessary when using custom objects because Salesforce restricts modifications to the managed package permission set to add new custom object Conversation View VisualForce pages.
Therefore, as a best practice, when 360SMS configures your org, we always create a cloned permission set and typically add all Users since licensing will determine their final access.
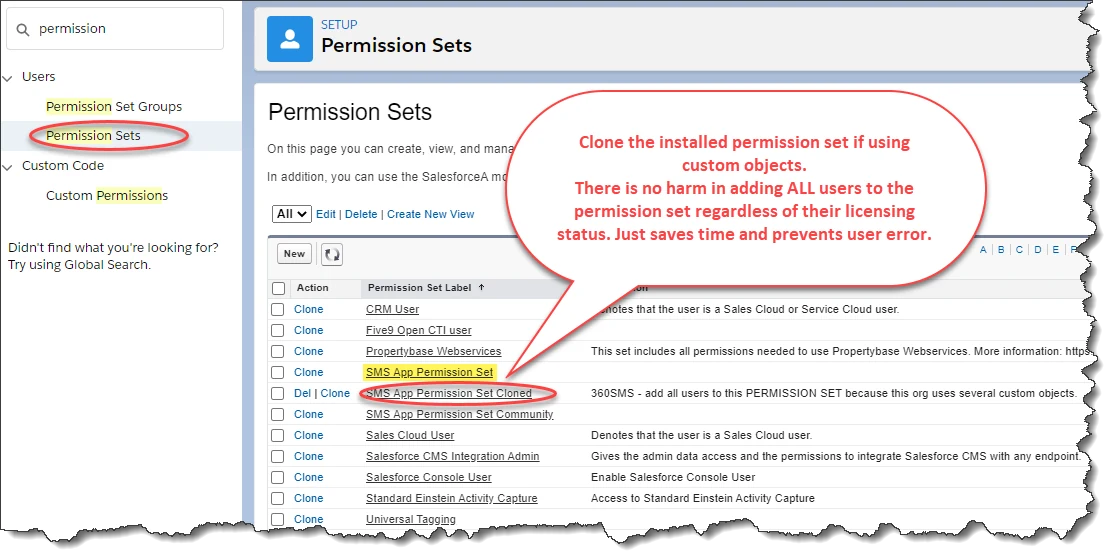
Fig Add Users to the SMS App Permission Set to grant them security to objects and functionality
User Configuration
Apart from security measures, users need to be set up in the 360 SMS User Configuration. Each user should be linked to one or more phone numbers. Some organizations opt for a single number that all users share, while others assign numbers to departments or individuals.
If a user is associated with multiple numbers, they are prompted to select a specific number for outbound messages from a picklist.
For additional information, refer to the SMS setup, which provides detailed explanations of user configuration.
Ways to Send One to One Message
The Send SMS button offers an alternative way to send SMS messages, accessible either from the record detail page layout or the List View (Batch SMS). These buttons are automatically added for standard objects and can also be created for custom objects.
The users can send SMS in multiple ways through 360 SMS –
- Sending One to One Messages from “Send SMS Button”
- Sending One to One Messages through “Conversation View”
- Sending One to One Messages through “Incoming Alert” Utility Bar
Sending One to One Messages From “Send SMS” Button
You can access the “Send SMS” button from the list view of a respective object or the detail page of the record. Once you click on the “Send SMS” button, the screen below will open.

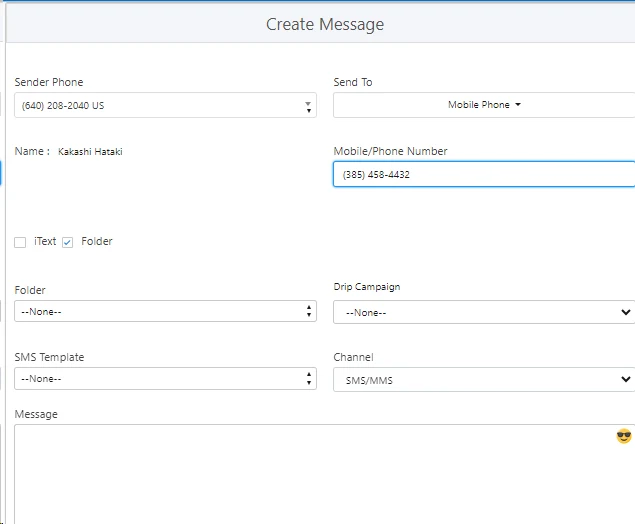
Fig- Sending One-to-One messages through Send SMS Button
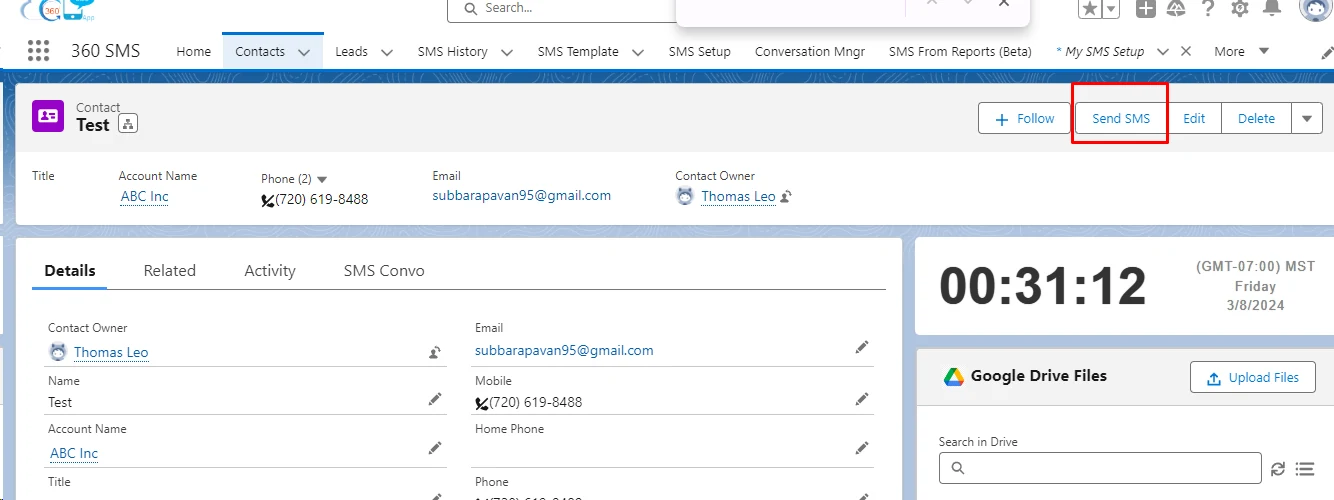
Fig Click Send SMS Button
Conversation View
360 SMS is excited to unveil the Conversation View, featuring an enhanced user interface designed for simplicity and ease of use. Additionally, these features include information hover for a convenient overview of SMS history fields. The application comes with a pre-configured Conversation View offering a phone-like display of the physical data.
The Convo View is a VisualForce page installed automatically for standard objects such as Lead, Contact, Account, Opportunity and Case. The below figure displays the complete Convo view.
Scroll down the contact page and you will see a conversation window. This is called the ‘Conversation View’. You can view the entire conversation (all the outgoing and incoming texts) with the contact on the Conversation View. It supports emojis and offers following features:
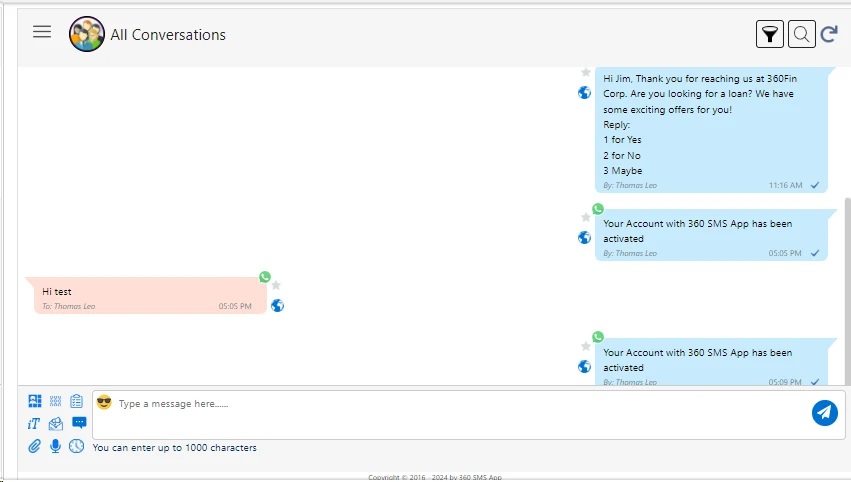
Fig Conversation View
- Incoming Messages are shown on the left side and outgoing messages are shown on the right side.
- The message can contain up to a maximum of 2000 characters.
- There is a filter option in the conversation view which is depicted in the below picture
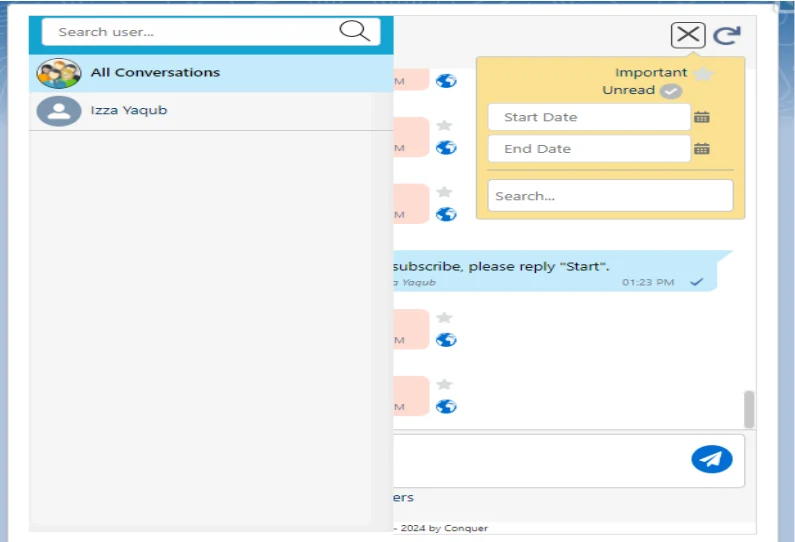
Fig Filter Option In Conversation View
- Search option: This feature can search for any message with a particular word which you remember in that message.
- Refresh option: It refreshes or updates the conversation. (However, one doesn’t need to use this option as the conversation automatically gets refreshed.)
- Filter option: You can put a filter on the date, so it will show you messages from that particular date onwards.
- Mark Important – If you have selected “Important” in the filter, then in the conversation view, it will display all messages marked as “Important” in the thread area.
- Mark Unread – If you have selected “Unread” in the filter, then in the conversation view, it will display all unread messages in the thread area.
- Start & End Date: To check the conversations between the start date and end date, the user needs to select the dates accordingly. In this option, users can select the Start and End date filters to display messages corresponding to the chosen Start date and End date.
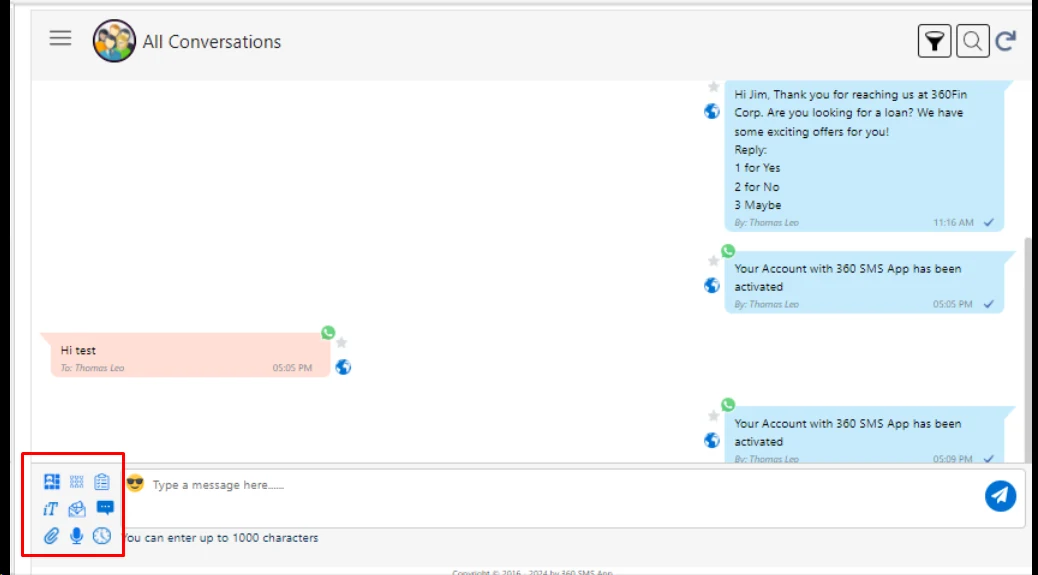
Fig- Feature List in Conversation View
- Sender Number: You can choose the number you want to use for sending the client message.
- Send To: You can choose which phone number you want to send the message to.
- Template: You can select any of your pre-created templates to send as a message.
- Channel: Select from the multiple number of channels that 360 SMS provides.
- Drip Campaign: Select from pre-created Drip Campaigns.
- iText: Select from any pre-created iTexts.
- Attachment: You can send attachments (files) via this features.
- Ringless Voicemail: You can send audio messages via this feature.
- Emojis : You can send emojis via this feature.
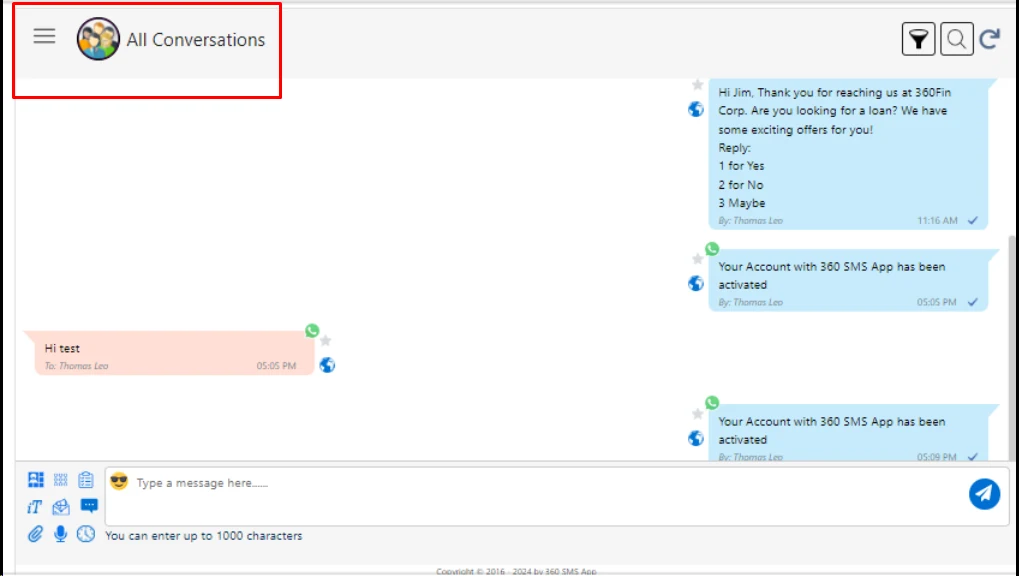
Fig All Conversation in Conversation View
- Conversations– In this feature, you will receive a list of users included in the conversation. If you want to check the conversation of a specific user, you just need to choose the user from the conversation list, and you are good to go! For example, you can choose “User” to see all conversations with that Lead.
- Delivery Status – 360 SMS updates the Delivery Status field in SMS History to “SENT” or “DELIVERED” once the Sites Configuration above is configured and licensed, enabling delivery reporting. Initially, when an outbound message is sent, the status is “Sent.” Subsequently, some providers report back with a status of “DELIVERED” or an Error Code, though not all. In the Conversation View, a double checkmark (✔✔) indicates a fully delivered message, a single check mark signifies it was sent but not confirmed as delivered, and a red exclamation indicates it was not delivered due to an error. This delivery status is derived from the SMS History record. For further details, refer to the SMS History section.
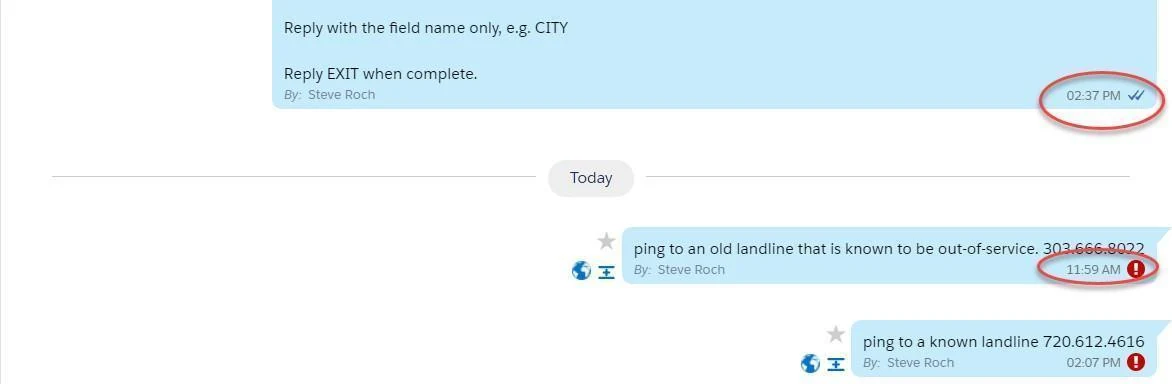
Fig Delivery status
Group Chats
Group chat capability is available within the conversational view module.
This feature is activated when sending text messages from any provider number to US numbers. A minimum of 2 participants is required, with a maximum limit of 5 users who can be added.
Requirements to create a group:
- Sender number
- To numbers (participants)
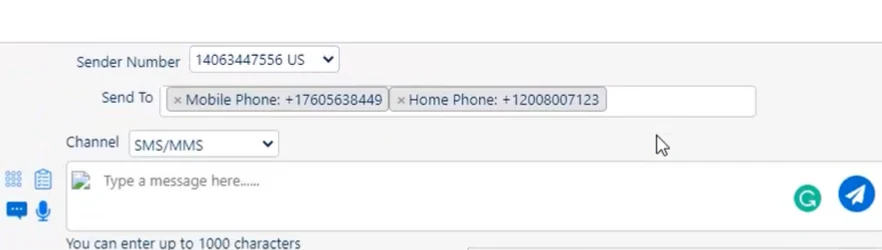
Enable Group Chat
To check the status of Group Chat enable/disable, follow the below steps:
Go to SMS Setup >> General Setting >> Navigate to “Setting For Conversation View” >> check the status if it enabled/disabled >> if this disabled then in that case please contact 360 Support team >> Once Enabled, you can now use Group Chat feature in 360 SMS App
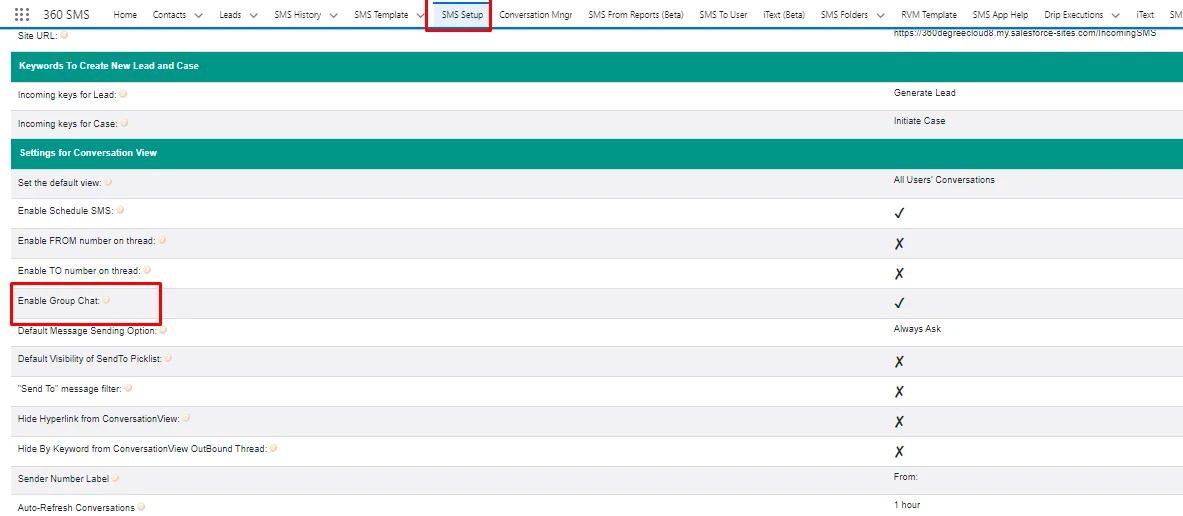
Fig Enable Group Chat in General Settings
The following details are provided in the details section of a group:
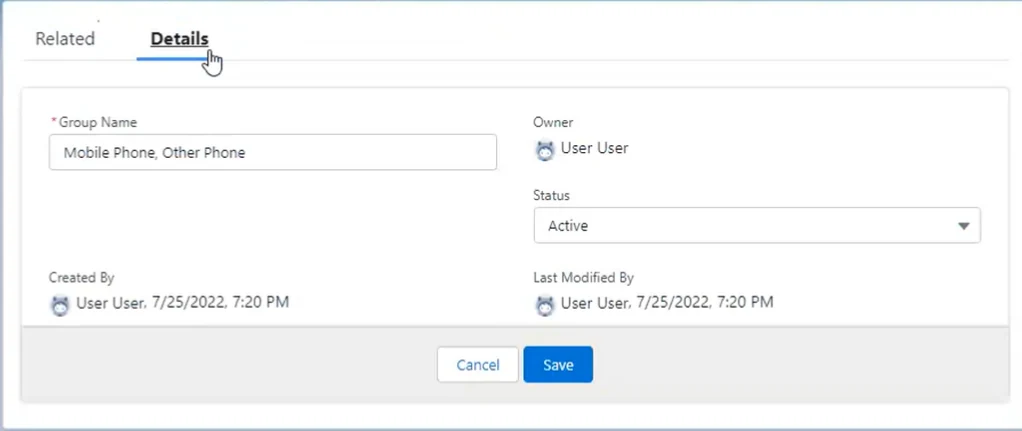
Fig Detail Section of a Group
Sending Group SMS
When you press send while sending a group message, you will get a pop up like the one in the image below:
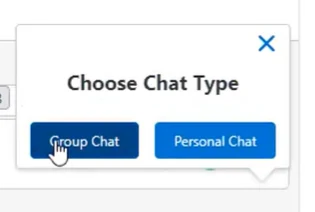
This option lets you decide whether you want to send the message individually to every number or in a group.
To edit this feature or to set it to group chat or personal chat, as per your choice.
You can go to settings and check for Default Message Sending Option. There you can select whether the default send option should be group chat, personal chat or always ask.


Fig Options for Group Chat
“Incoming Alert” Utility Bar
For details regarding the “Incoming Alert” Utility Bar – Refer to the section Incoming Alert Button.
Bulk Texting
Bulk Texting can be performed from three areas:
List View
Utilizing the “Send SMS” button(s) on the List View of any standard or custom object. Below are the steps in List view to send the SMS –
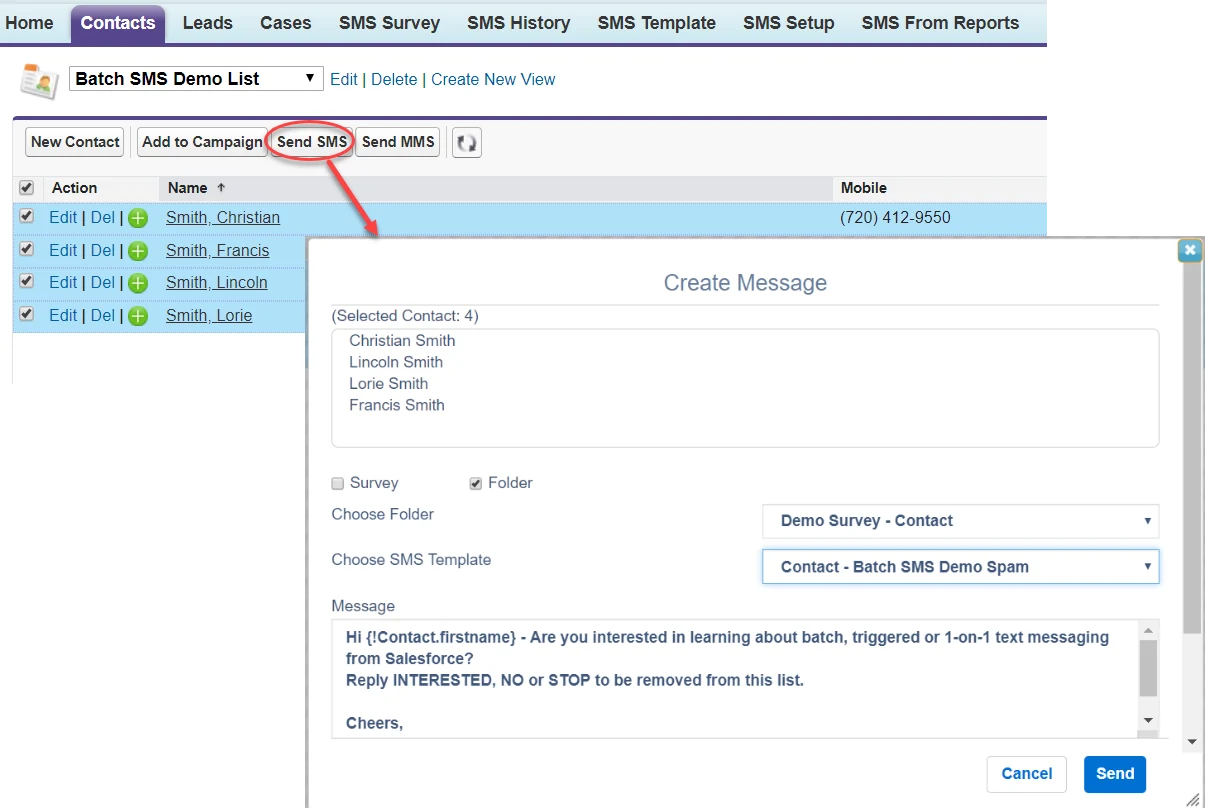
Fig Batch SMS from List View
- Click on the Contacts/ Leads object.
- List all your contacts based on the desired criteria by creating/choosing a view (E.g.: All Contacts)
- Select whichever contacts you want to send the SMS to.
- On the top right corner, click on the arrow and select ‘Send SMS’.
- Type the message or choose from templates.
- Schedule your messages and related owners. (Explained in detail at 8 and 9 respectively)
- Click on Send and your message will be sent.
Campaign
Through the Campaign object using the “Send SMS” button, sending messages to selected Campaign Members based on status. Below is the process for creating the Campaign.

Fig Create a new campaign
- Go to the ‘Campaigns’ object and select your Campaign. Or you can create a new campaign.
- Enter the details of the campaign as shown below.
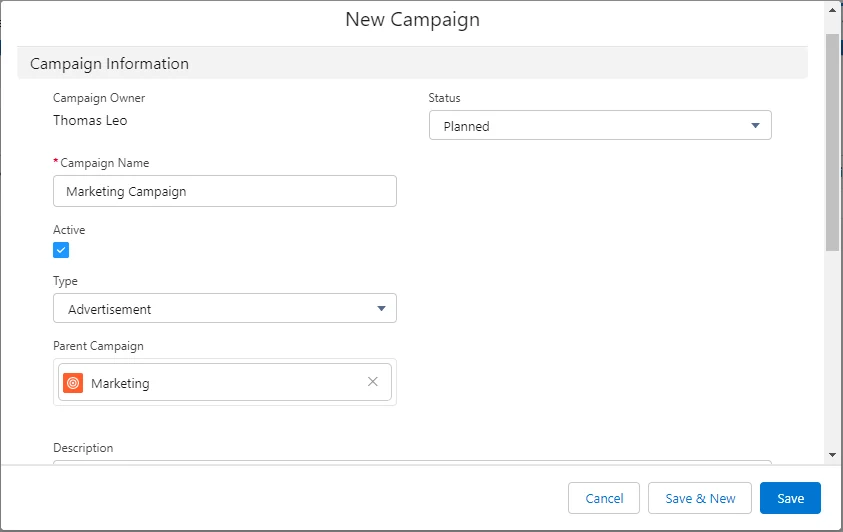
Fig Fill necessary information about the campaign
- Ensure that you have added members to the campaign through contacts or leads.
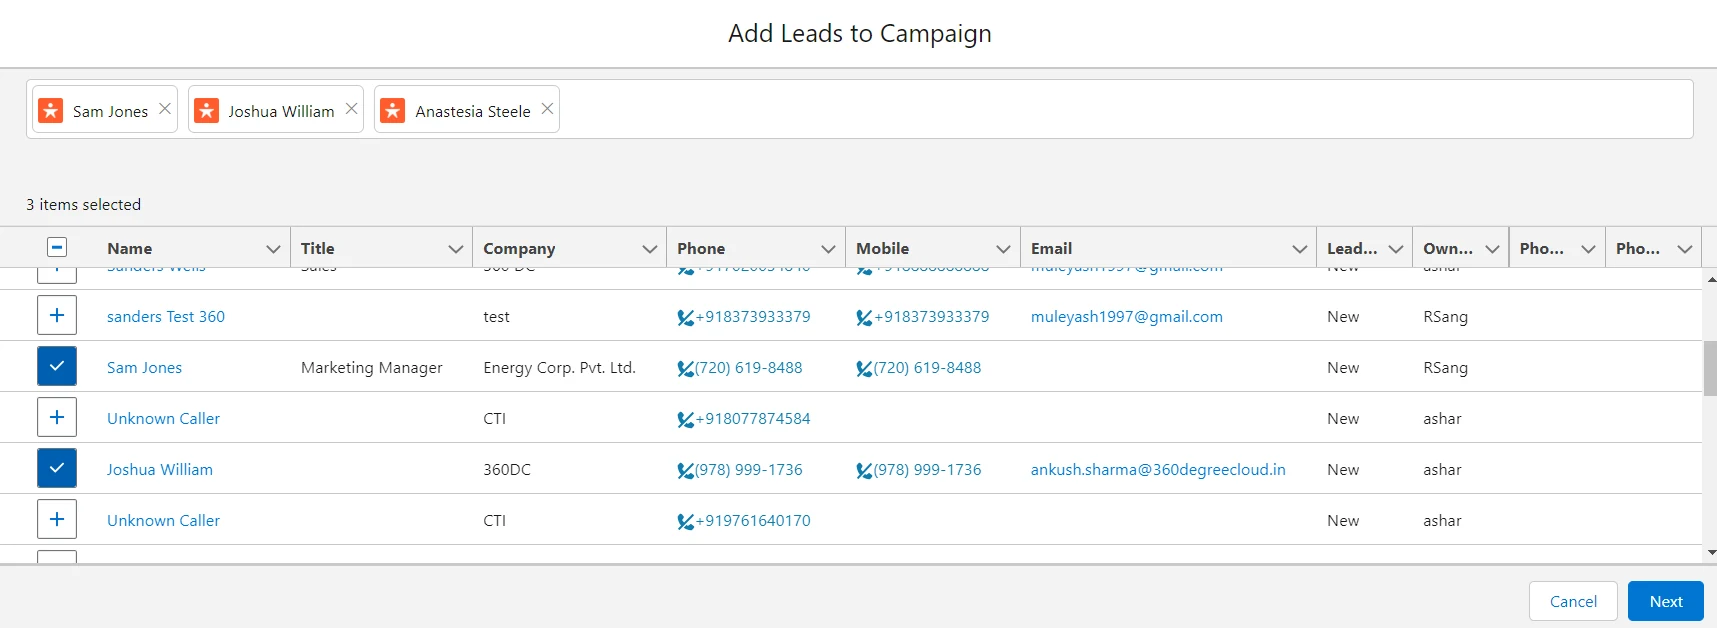
Fig Add members to the campaign
- Click on ‘Send SMS’ and the same message creation box will appear like the way in List View.
Sending SMS from Reports
- Search for a Report – Search the name of the report to which you need to send out messages.
- Selected Report (View Report) – Click on this link to view your selected report.
- Select Report Id Column– Select the column of the report consisting of the Id of the records. For e.g. – If the report is based on Leads, the name of the column consists of the Id’s of the Record. If you don’t have any such column on your record, click on the “View Report” link on “Selected Report” and further drag the column to your report.
- Enable Report running for more records – This is available only for Tabular types reports. If you want to send SMS more than 2K records of the report, you have to check this check box. Before it you have to follow few basic steps:
- Create a custom field on the object whose records are used in the report to send SMS. Field is created as follows:
Data Type: Auto Number
Field Label: Filter Number
Display Format: {000000}
Starting Number: 1
Generate Auto Number for existing records: True
Field Name: Filter_Number
-
- Use this field as a filter criteria as = ‘Filter Number’ greater than ‘0’.
- Add this field to the report column and make it Sorted by Ascending.
Note: If you have different more filters than use this filter criteria with ‘AND’ logic.
- Send SMS– Click on this button to send out a text message.
Batch Texting with 360 SMS provides three distinctive features for marketers sending texts on behalf of other Salesforce users
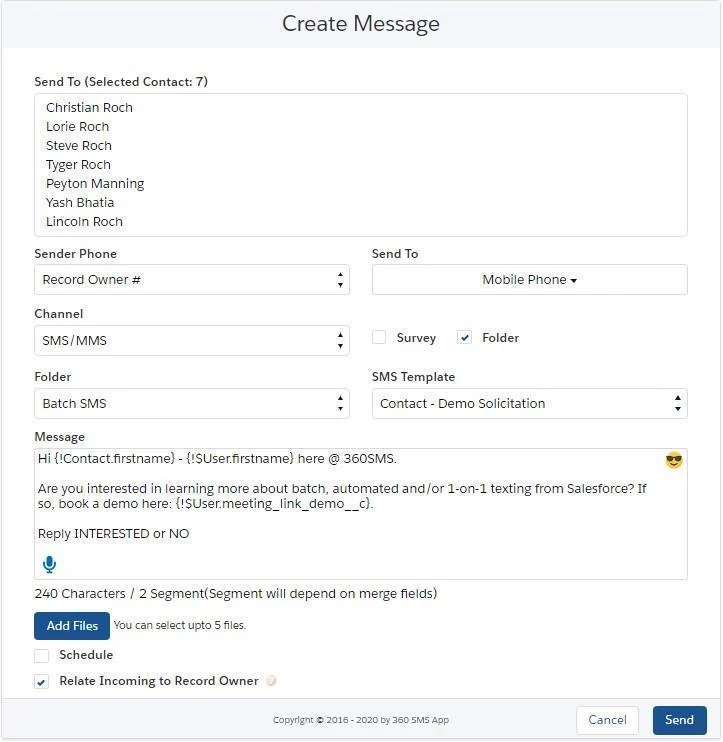
Relating Incoming to Record Owner
An additional batch texting feature designed for marketers enables a single user to send text messages in batches, with replies directed back to the respective record owner, such as Contact Owner or Lead Owner.
Fig Send SMS button from a list view (batch sms) or page layout (single)
Sticky Sender Number
360 SMS is the only SMS App that enables an Admin to establish business logic through a uniquely designated Sticky Sender. This setup permits the number to be designated by sales user, geography, territory, or any other required logic. Once the Sticky_Sender field is configured, both the Conversation View and the Send SMS buttons (Batch and Detail) will utilize this number instead of the user-defined Default SMS Number.
This minimizes errors in selecting the number from a pick list and ensures that customers receive messages from a consistent texting number, regardless of the Salesforce user initiating manual messages, batch sending, or triggering messages.
This feature is particularly valuable when marketers send batch SMS messages from a list of records, and each message must originate from the unique number of the Contact Owner. Unlike other SMS Apps, where marketers typically need to create separate lists or use complex process builders to meet this fundamental need.
Below is the screenshot where while sending the message, Sticky sender can be selected.
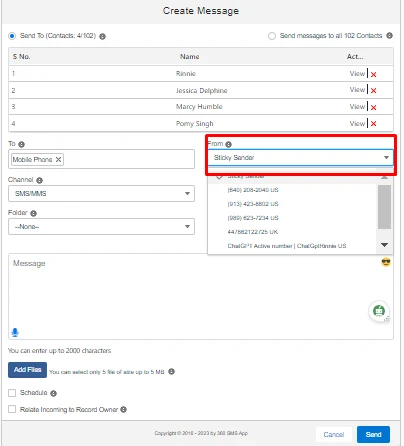
Fig create message with Sticky Sender
Batch Ringless Voicemail
360 SMS provides a Ringless Voicemail feature, available for separate purchase, which utilizes the same SMS interfaces. Instead of sending a text message, users select a voice recording file or create a new one on-the-fly. This functionality works for Single, Batch, and triggers.
To enable this feature, contact your support team, but no additional configuration is required once enabled.Users can access this feature from the Conversation View or the ‘Send SMS’ button.
How to send voicemails?
- Go to the conversation view of any lead or contact that you want to send ringless voicemail to.
- Click the three dots icon on the left side of the text message box, and then click the voice icon to send a voice message.
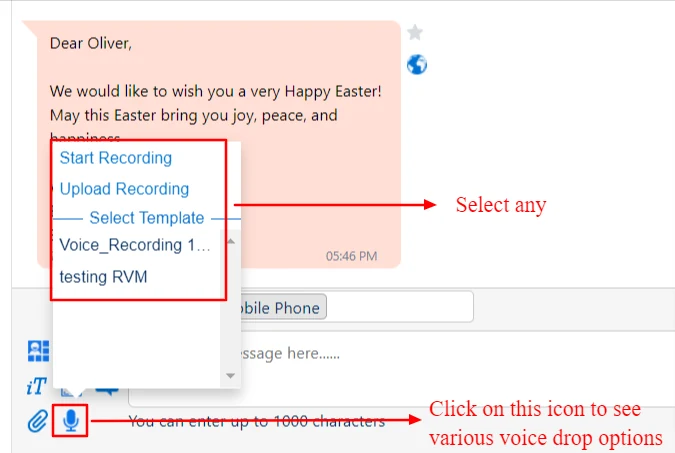
Fig 1: Conversation view
- Users can send voice messages in three ways.
- Start Recording– Users can instantly record a voice message in their own voice and send it to a prospect or customer.
- Upload Recording– Users can also select and upload any recording from their system to communicate with audiences.
- Templates– Users can build voice templates in advance and use those pre-built voice templates to communicate with audiences.
Scheduled SMS
Regardless of where it’s accessed, both the “Send SMS” button and the “Conversation view” provide the option to schedule SMS messages for a specific date and time, with the added feature of recurring scheduling. Scheduled SMS messages are conveniently displayed in the related records list. Furthermore, in the Conversation View, the next scheduled message is highlighted in yellow for easy identification.
Scheduling SMS in the 360 SMS app allows you to set specific dates and times for the text messages to be sent out automatically. This feature is useful for planning ahead and ensuring messages are delivered at a particular time.You can schedule SMS to be sent to individual recipients or groups, helping streamline communication workflows and improve efficiency.
Scheduling SMS messages is simple with the “Send Message” feature. You have three scheduling options: Schedule Once, Schedule Daily, or Schedule Monthly. See the screenshot below for a visual demonstration of how scheduling works.
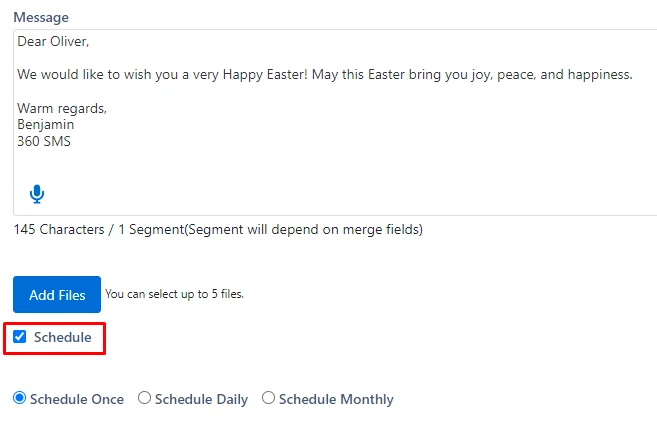
Fig Schedule Message option
Schedule Once – In this feature, you can schedule the message once daily. Simply choose the desired date for scheduling the message. Below is the screenshot of scheduling the message once.
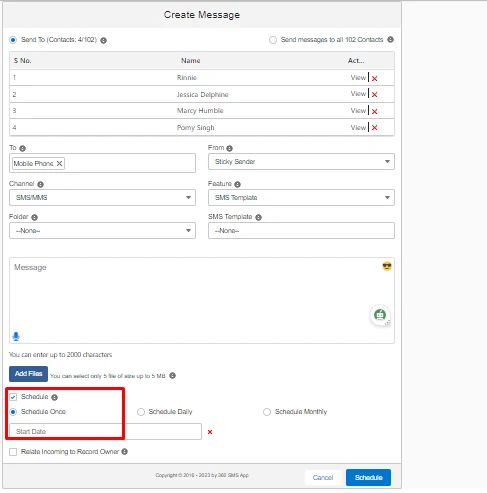
Fig Schedule Message once with Start Date
Schedule Daily – In this feature, messages will be scheduled on a daily basis. For instance, if there’s an upcoming event and we want to send daily reminders to encourage people to register, the daily scheduling option allows you to specify both the start and end dates for the reminders. Below is the screenshot of scheduling it daily.
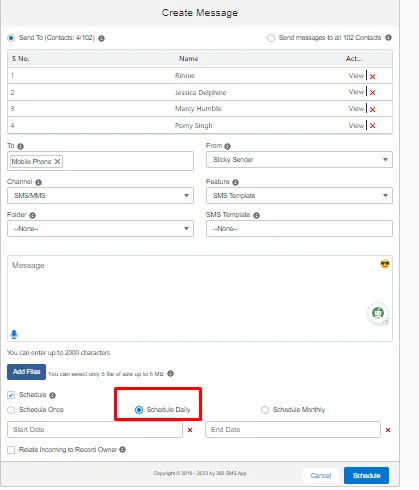
Fig Scheduling Message daily with Start and End Date
Schedule Monthly – With this functionality, messages can be scheduled monthly. For example, if you have to send reminders to your customers about pending EMIs for the upcoming month, you can effortlessly set it up using the ‘Schedule monthly’ option.
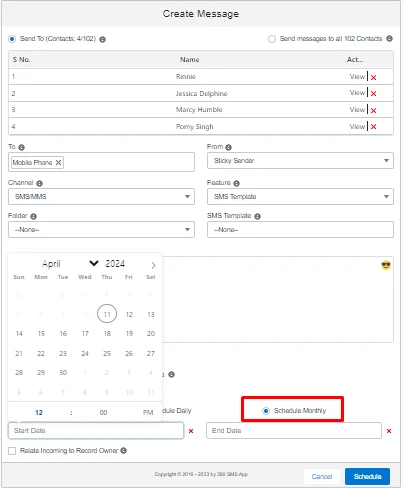
Fig Selecting the Start Date and End Date for scheduling Monthly
SMS History
The SMS History feature in the 360 SMS App allows users to conveniently track all outgoing, incoming, and unsent messages directly within the app. Users can access a comprehensive record of their SMS communications, including details such as message content, sender and recipient information, timestamps, and delivery status.
With SMS History, users can easily monitor the progress and status of their text messaging activities in real-time. Whether it’s reviewing sent messages for confirmation of delivery, accessing records of incoming messages for follow-up, or managing unsent messages for reattempt, this feature provides users with valuable insights and control over their SMS communications.
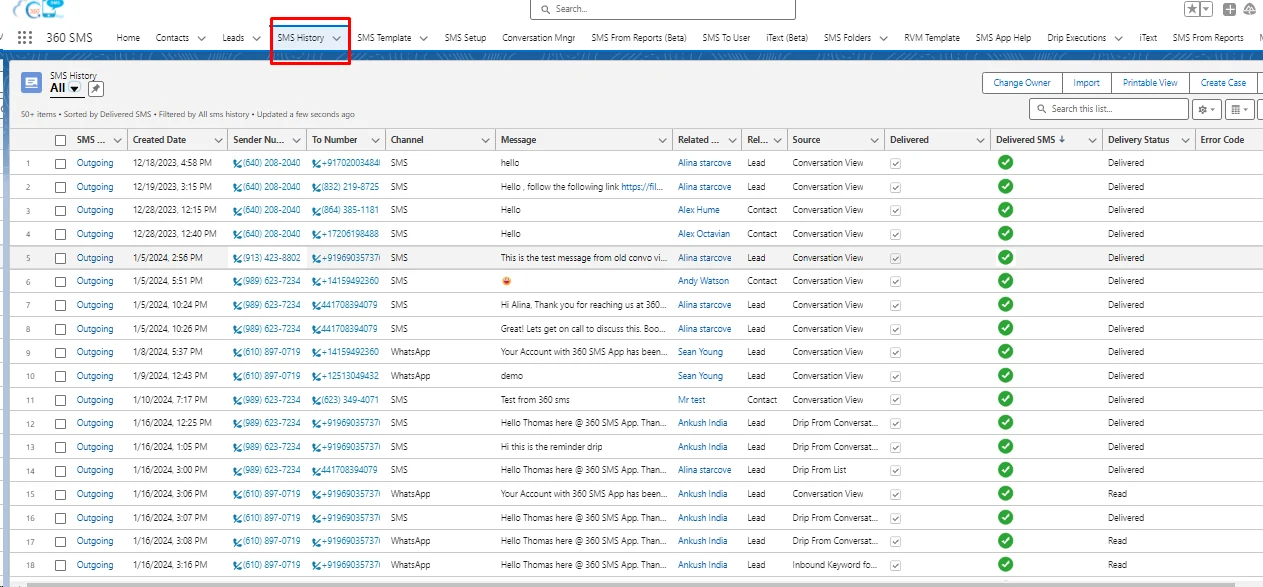
Fig SMS History details in 360 SMS App
If the record is opened, there will be detail field to the message –
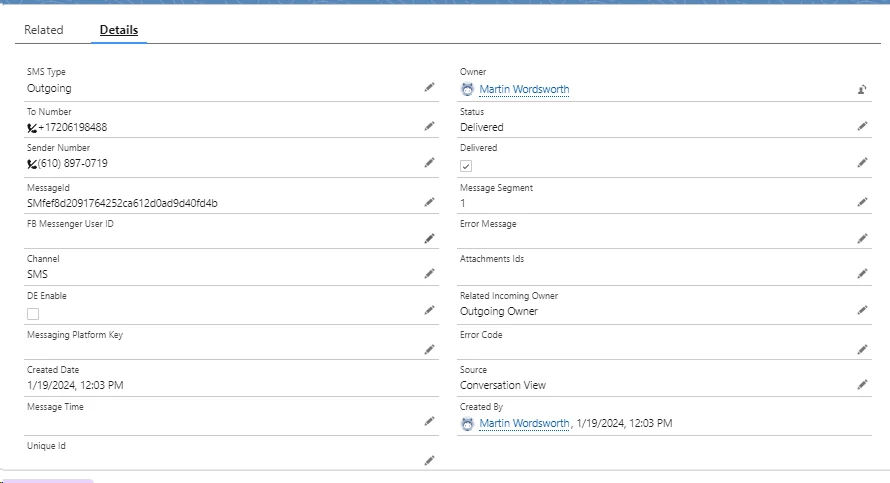
Fig Detail Record in SMS History
The screenshot above displays information such as whether the SMS is outgoing or incoming, when it was created, the sender’s number, the recipient’s number, the messaging channel, the message content, the related object, the source of the message generation, and the status of delivery. If the message wasn’t delivered, it also shows any error code associated with it.
Additionally, we have a section called “Message & Template” where users can add SMS templates, include survey questions with responses, and input specific URLs as shown in the screenshots below. Users also have the choice to edit the fields.
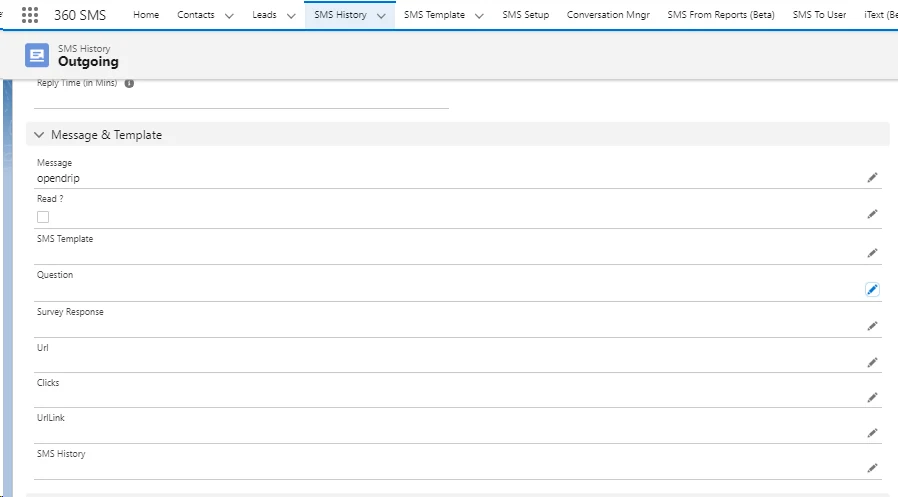
Fig Message & Template in SMS History
Linked Objects will capture messages associated with various fields such as Contact, Related Object, any lead, Related Record ID, and Sender Name.
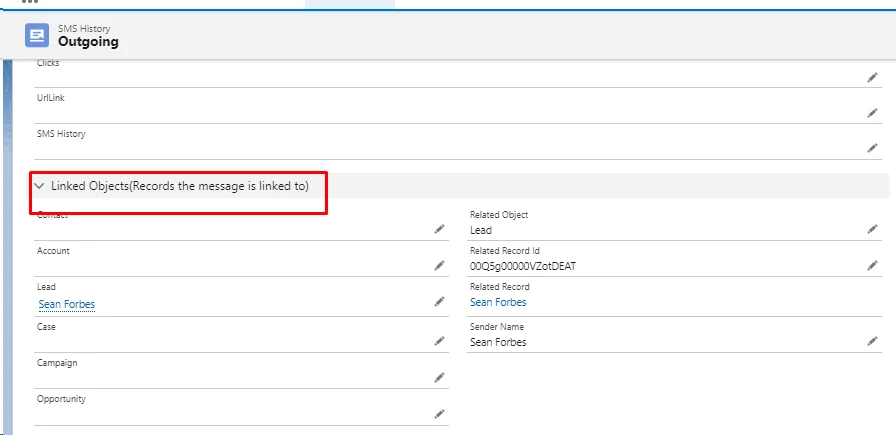
Fig Linked Objects in SMS History
MMS Multimedia Messaging Service (MMS) in Salesforce refers to the ability to send and receive text messages with multimedia attachments (e.g. images, videos, etc) in Salesforce. 360 SMS allows for both Outgoing and Incoming MMS. Attached files are stored natively in Salesforce in the SMS_History.Attached_Files field which uses the native Salesforce Document object.
User can send MMS by 360 SMS to someone with the help of following pointers:
- Create/Choose Contact
- Send SMS button
Create/Choose Contact:
To create a contact in Salesforce, follow these steps:
- Navigate to the Contacts tab in Salesforce.
- Click on the “New” button on the top right corner of the Contacts tab.
- Fill out the necessary information for the contact, including First Name, Last Name, and Email.
- Click on “Save” to create the new contact.
- You can also add additional information to the contact record, such as mailing address, phone number, and custom fields.
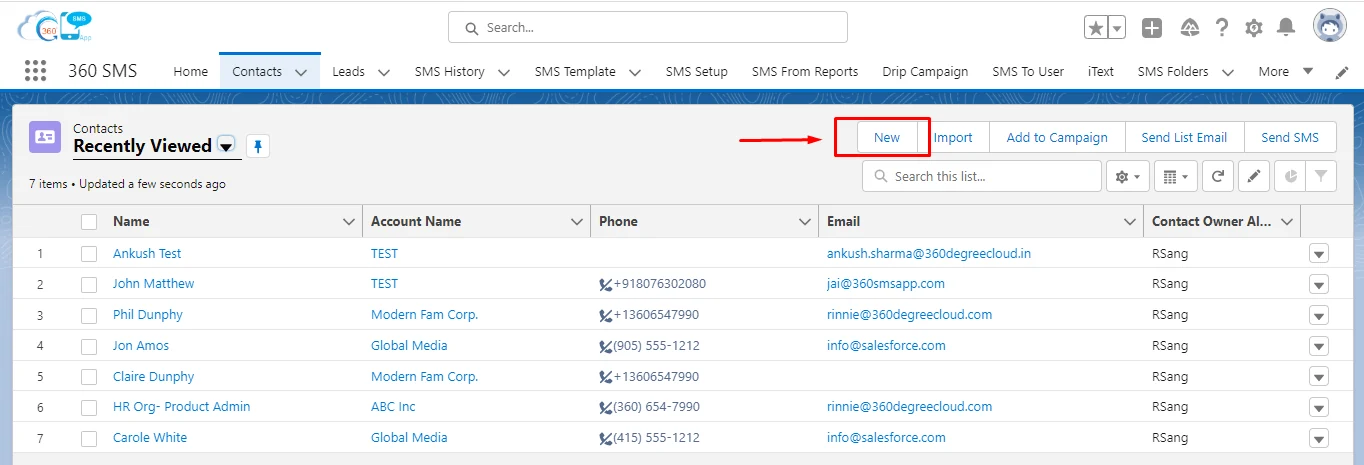
Figure- “New” Button to create new contact in Salesforce
The user can also choose an existing contact by clicking on the contact they want to choose.
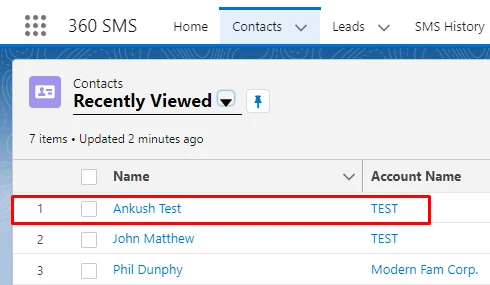
Figure- Choose Existing/created Contact
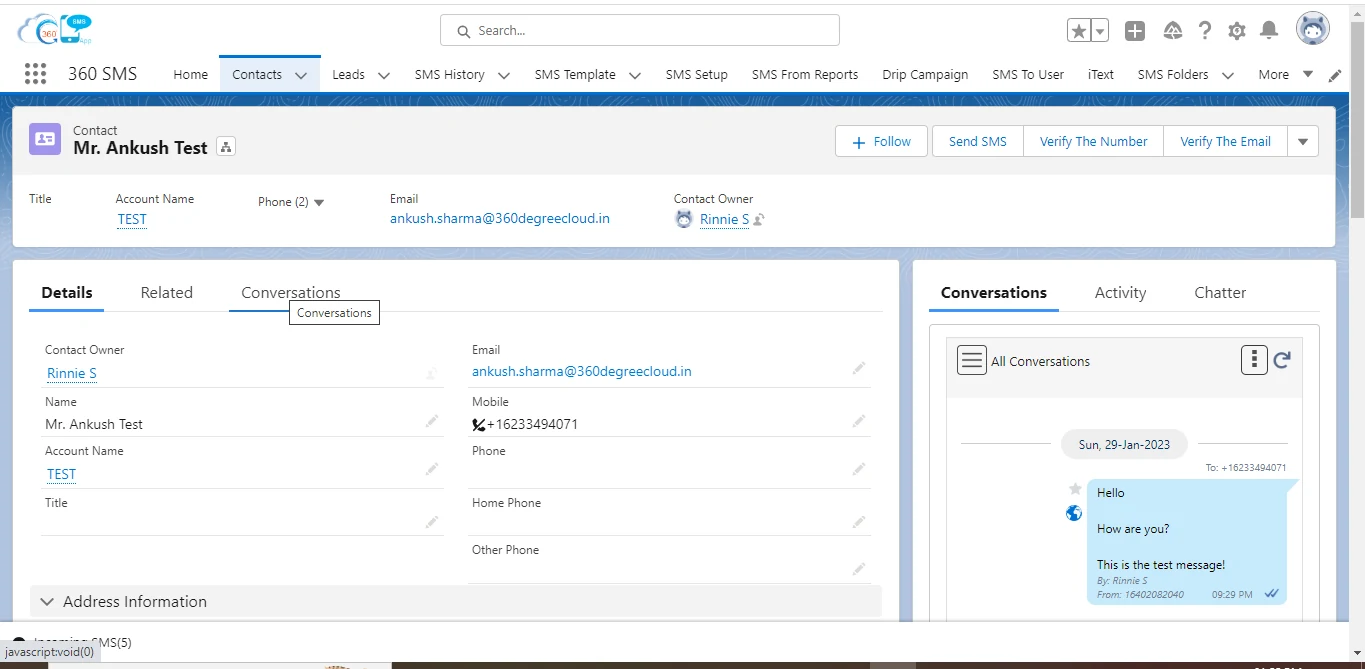
Figure- Contact window look like this
Send SMS Button:
- The Send SMS button in Salesforce is used to send a text message (SMS) to a contact directly from the Salesforce platform.
- With the help of this button, a user can create an SMS or MMS as per their requirement, and once the SMS or MMS is created, a conversation view will be displayed and the user can start messaging.

Figure- Send SMS button in Salesforce
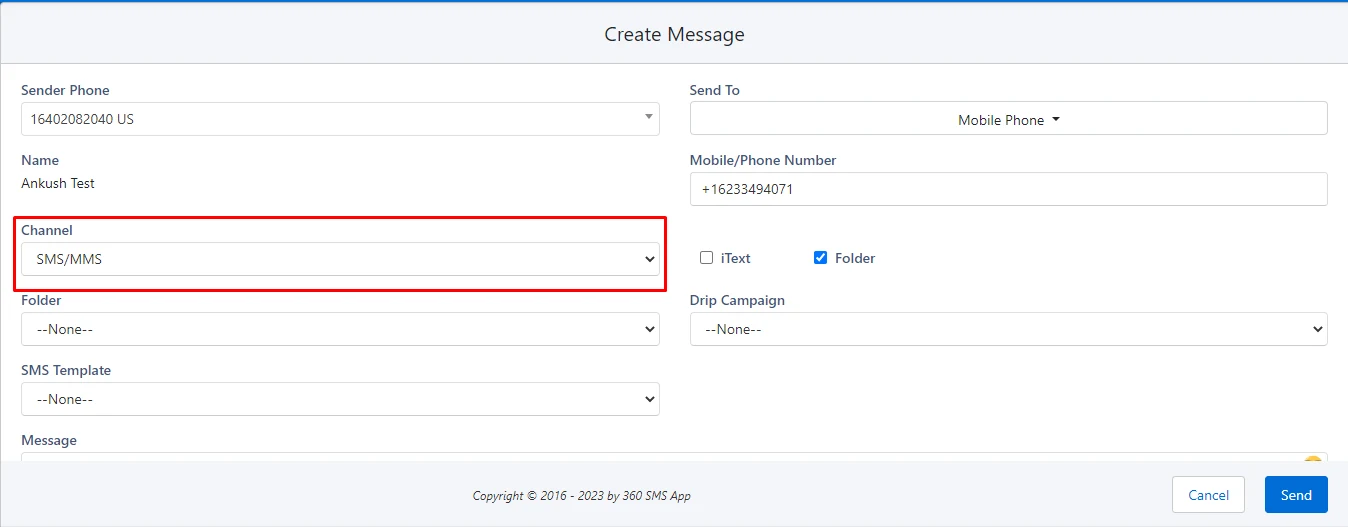
Figure- Channel selection should be SMS/MMS to send MMS
Delivery Status
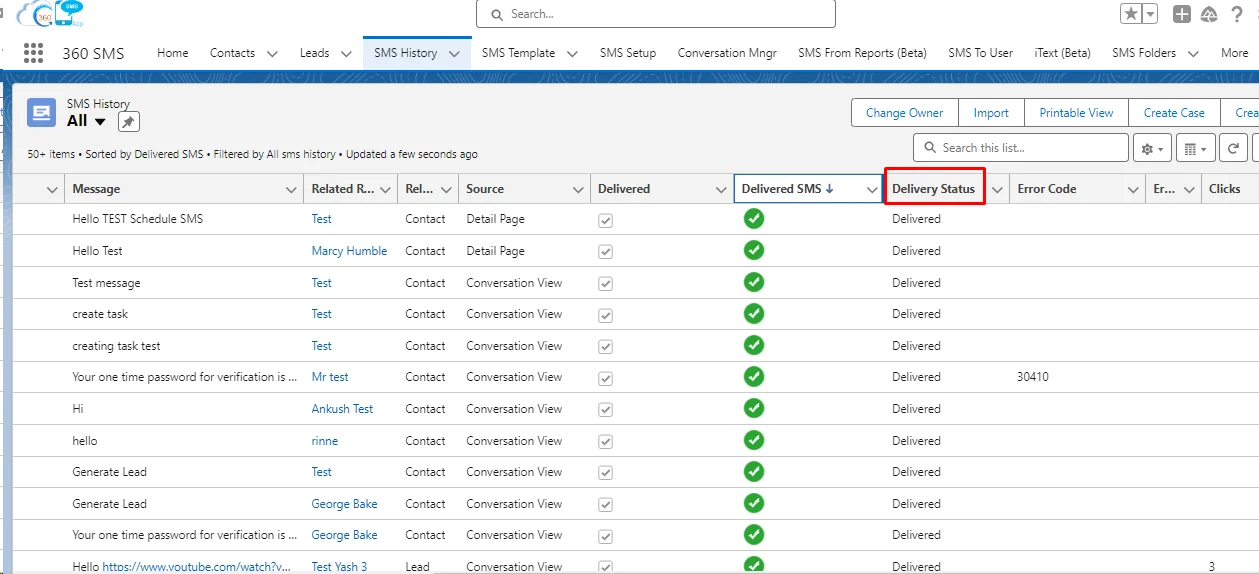
Fig Delivery Status in SMS HIstory
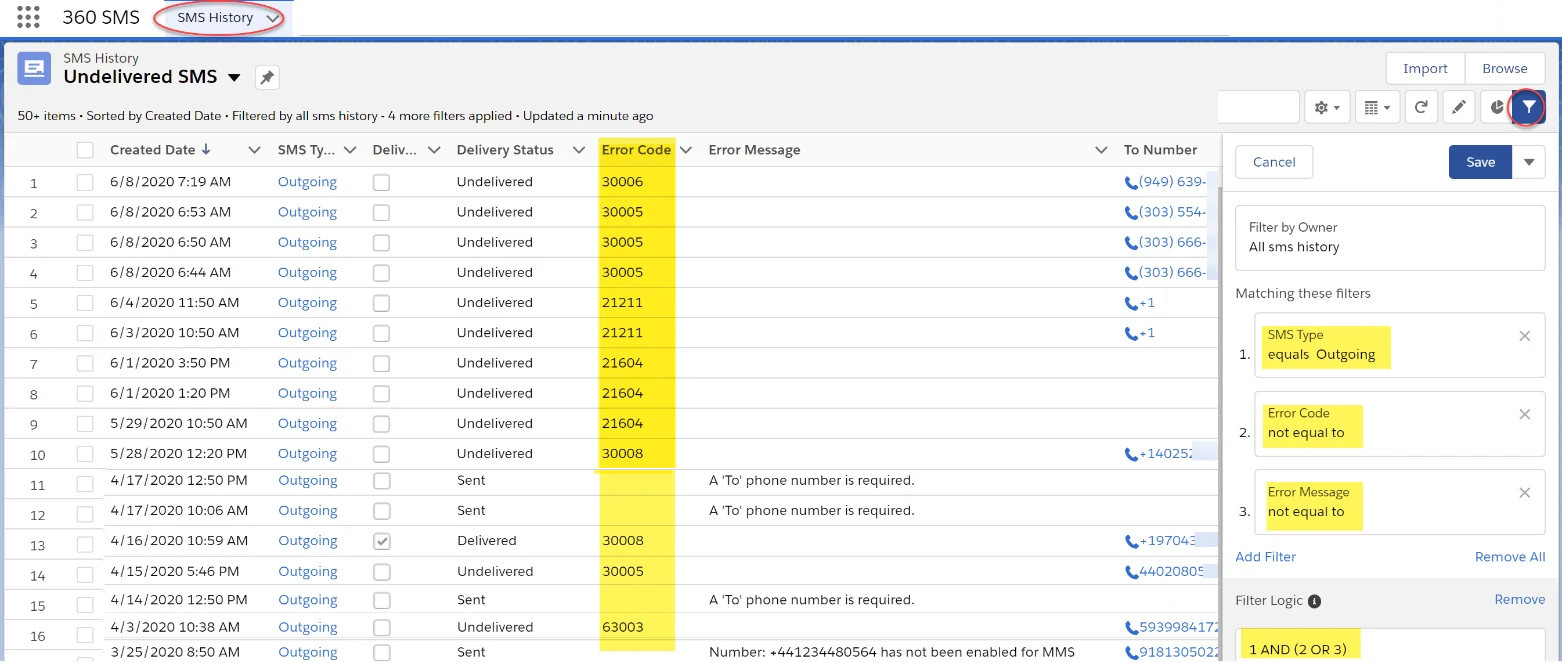
Fig – Error Code with Delivery Status
The platform logs error codes and/or accompanying error messages from texting aggregators in the SMS History record when a message fails to deliver.
SMS To User
SMS to User will enable 3 options –
For All Employees
For Selected Employees
For Specific Departments
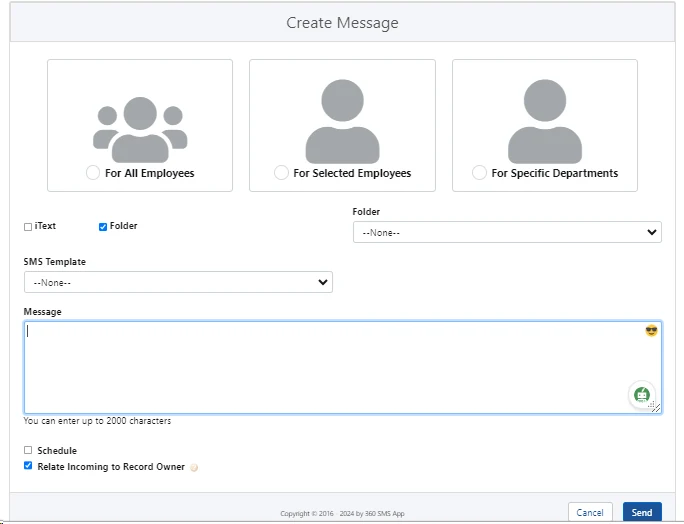
Fig SMS To User
In this feature, you can choose a folder, select an SMS template, schedule the SMS, and decide whether to relate it to the incoming record owner before sending the message.
Incoming Alerts
There are numerous ways to be alerted about incoming messages. First with a dashboard element that can be placed on:
- Salesforce Classic Dashboard
- Lightning Dashboard
- Lightning Utility Bar
- Salesforce Mobile Navigation Item
Secondly, an optional Sound Alert defaulted to ON in General Settings
Thirdly, via Automatic Incoming Notification email alerts. The criteria that is used for the Incoming Alert is as follows:
- SMS_History.Type = Incoming
- SMS_History.Owner = Current User (or if sharing rules option is enabled those records as well).
- SMS_History.Read = False (it hasn’t been marked as read already)
Classic Home Page component
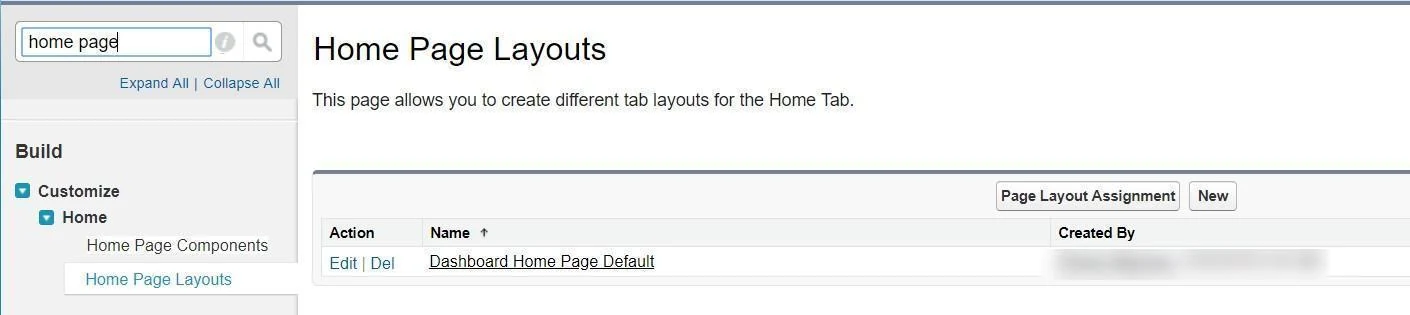
Fig SF Classic Homepage Layouts
- Salesforce Setup -> Search on the term “Home Page” and edit the Home Page Layout
- Enable the Incoming Alert component
- Press Next and arrange your Narrow Components with the Incoming Alert on top if items in the “Narrow Components” section can display on all Salesforce pages when the User Interface setting for Side Panels is enabled. Go to Settings, then search “User Interface” and turn on Show Custom Sidebar Components on All Pages.
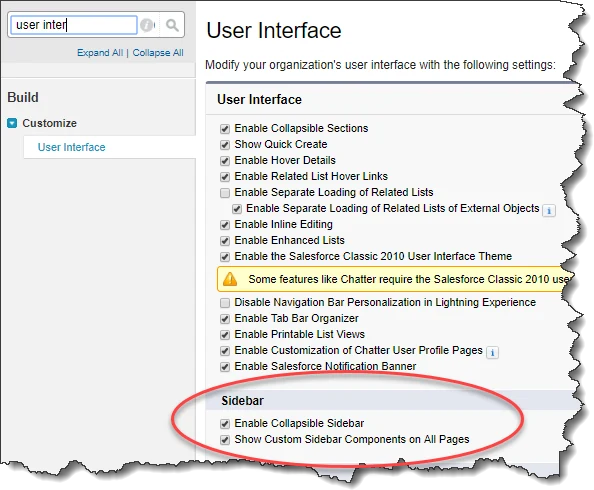
FigTurn on Sidebar Components to see the Inbound Alert on all pages
Lightning Home Page Component
With Lightning, the dashboards are modified via the Lightning AppBuilder.
- Salesforce Settings –> search Lightning AppBuilder or while on the actual dashboard choose Edit Page which will open the Lightning AppBuilder for that page.
- Choose whichever dashboard you want
- Choose the VisualForce component and drag it into the desired location
- The Incoming SMS dashboard component is named Incoming_Alert_SLDS, and sets its height to at least 500 pixels.
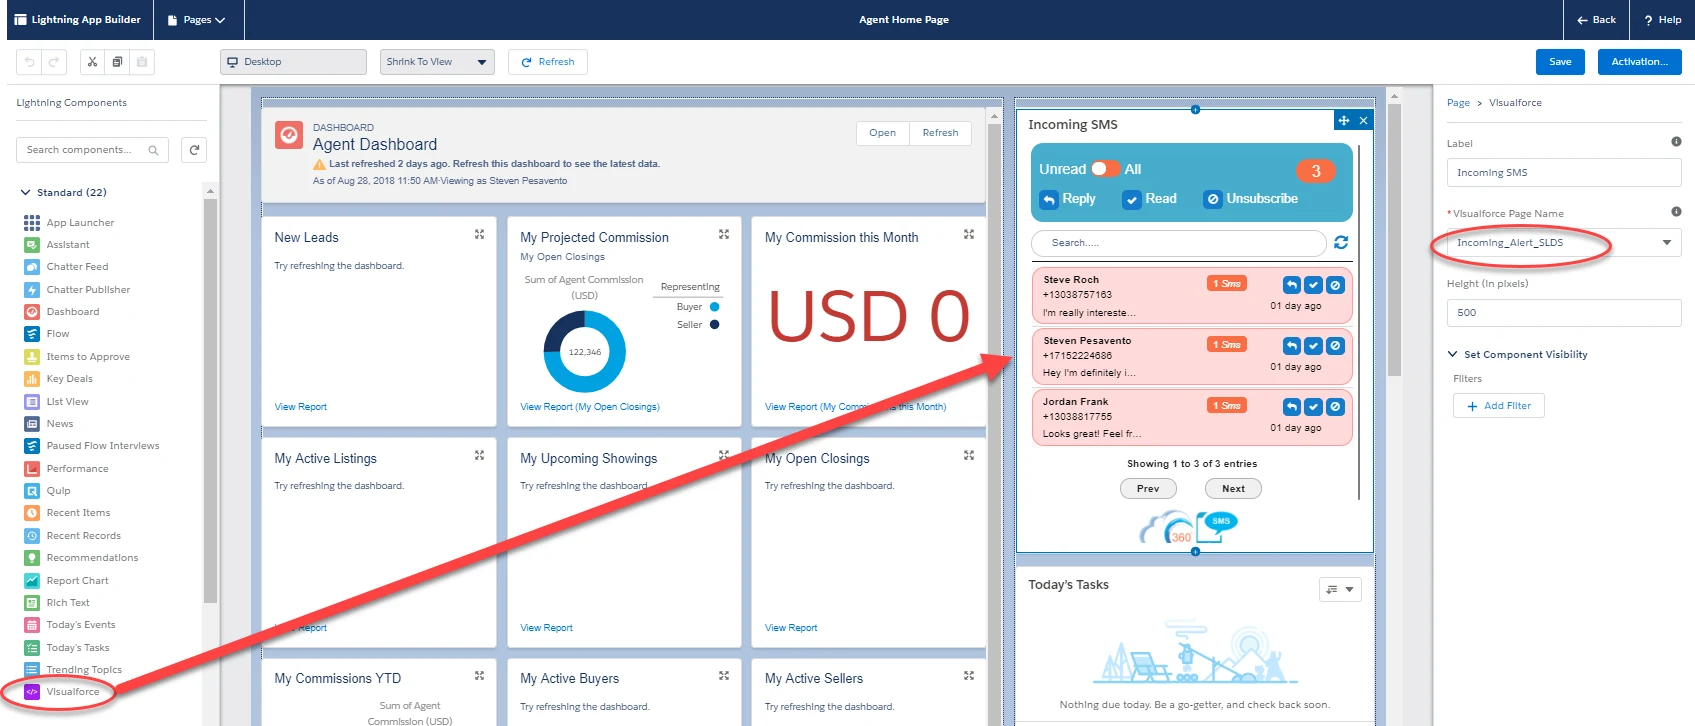
Fig SF Lightning Homepage Layouts
Link Tracking
Link Tracking is a feature in the 360 SMS App that allows the users to check the activity of the links included in the text messages.This will display the number of times the recipient has clicked on the specific link under globe icon presented in the conversation thread.
Enable Link Tracking
To check the status of Link Tracking enable/disable, follow the below steps:
Go to SMS Setup >> General Setting >> Navigate to “Link Tracking” section >> check the status if it enabled/disabled >> if this disabled then in that case please contact to 360 Support team >> Once Enabled, you can now use Link tracking feature in 360 SMS App
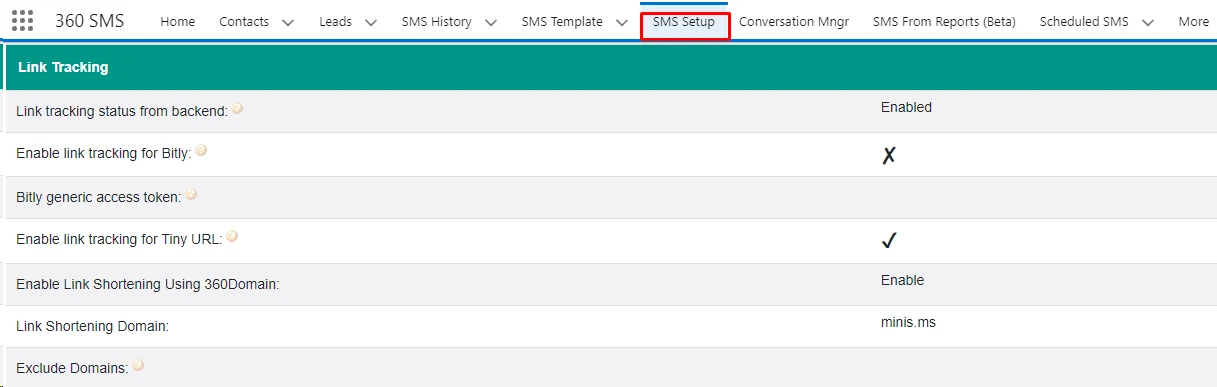
Fig Link Tracking options in General Settings under SMS Setup tab, to enable the link tracking features in the 360 SMS app, please contact 360 support team
Link Tracking status from backend – All the click throughs are tracked in native Salesforce and thus reportable and triggered. This feature is marked as Enabled which is done in the backend by writing a mail to 360 Support team
Link Tracking in Different URLs (Bitly, Tiny and 360 Domain)
The Link tracking feature in the 360 SMS app works with Bitly, Tiny, and mini.ms URLs. It keeps track of how many times the link is clicked by the end user. You can see the number of clicks on the globe icon located on the left side of the chat thread area (as shown in figure).
Please contact 360 Support team to configure the URLs for Link tracking feature
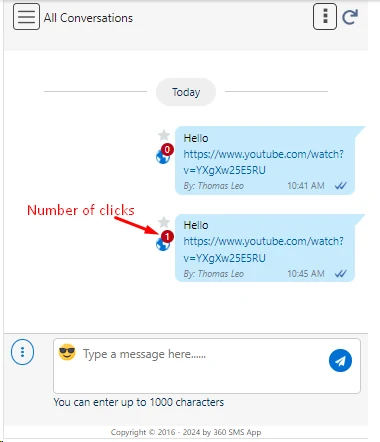
Fig– Link Tracking- Number of clicks presented in red color in globe icon
360 SMS has automatic hyperlink conversion to Bitly™ or TinyURL™ shortened links. Automatic Link Shortening is highly useful when used in conjunction with the 360SMS Link Tracking feature as it has several powerful features:
It shortens the link reducing your total message length. The customer sees only the short link while the Salesforce user sees the full friendly link that was sent.
It disguises the rather long and cryptic link that is otherwise sent when hyperlink tracking is enabled. Here’s an example of a trackable but non-Bitly shortened link: https://www.youtube.com/watch?v=YXgXw25E5RU = https://minis.ms/er2IoF
MOST IMPORTANTLY, the links are unique to each outbound SMS, greatly improving deliverability with Batch SMS because it tricks the providers looking to Content Block messages that are all the same. More on using hyperlinks to increase deliverability here: Batch Texting and Compliance Best Practices.
Link Shortening Domain – In this, the link will get shortened by the domain like- Bitly, Tiny and minis.ms.
Exclude Domains – Users can choose to exclude certain domains from link shortening, meaning those domains won’t be included in the shortened links.
Note –
- Link tracking is supported in the SpeedBoosting feature for “SMS From Reports”.
- Currently, WhatsApp approved templates do not support Link tracking and Link shortening feature.
Link Tracking in SMS History
When you click on the globe icon this will redirect you to the SMS History tab under which you get the information like Url, clicks, first click (date and time) in “Related” tab, as shown in below figure-
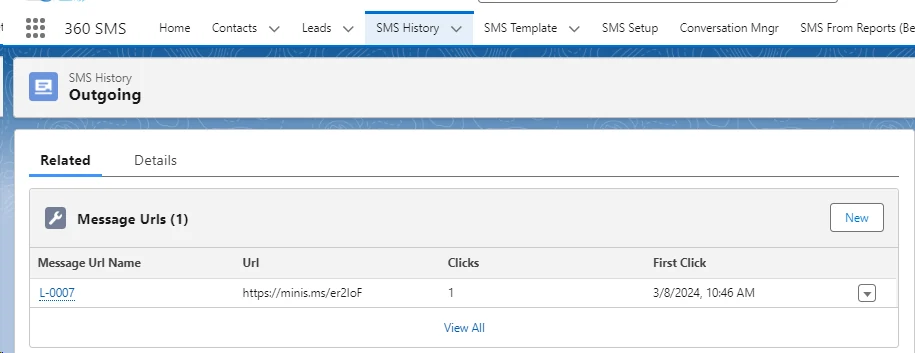
Fig- Link tracking in SMS History
SMS Templates
360 SMS offers comprehensive SMS Templates for individual texting, batch texting, and programmatic triggered texting through Process Builders/Flows. The merge tag syntax closely resembles Salesforce Email Templates, enabling users to easily copy and paste existing email templates if preferred.
Unique to the 360 SMS application, templates can be categorized by:
- Folders – It is used for easier management and selection from the Send SMS dialog
- Channels – Select the specific channels where you want to utilize this template.
- Status – Those of type Automation do not show in the picklist but are available for process builders.
- Generate Merge Fields – Merge Fields act as placeholders in messages. When sending the message, the merge fields are replaced with Salesforce data from the recipient’s record(s). Select a Salesforce object and its associated field, and our app will automatically create a merge field. Utilize these merge tags in the template body to customize your messages.
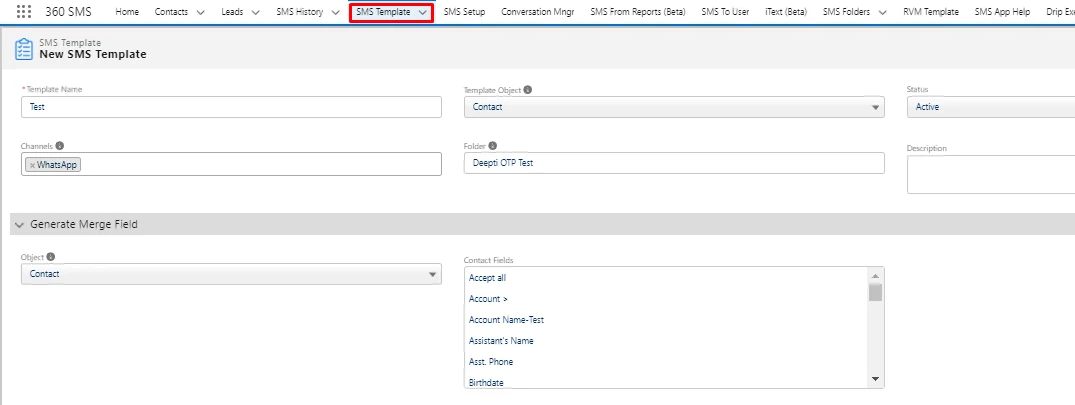
Fig 360 SMS Templates filling the details
- Chat GPT Question – Enter your question or requirement, and ChatGPT will suggest a template based on your input.
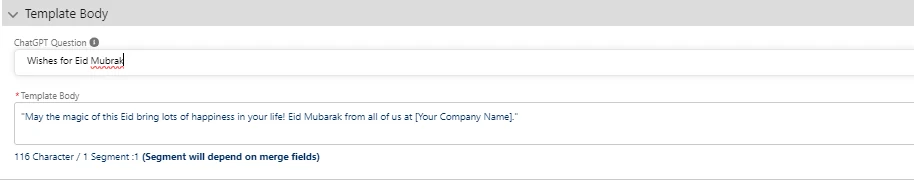
Fig SMS Template with Chat GPT Question
Incoming Alert Utility Item
The bottom left corner bar displaying the count of incoming messages is called the ‘Utility Bar’. It presents “All incoming messages”, and “Unread” messages in real-time. The number of entries shown in the first page is 5 , and if you want to search more entries for the guide, you need to click on Next option.
Unread messages are distinguished by three different colors: green, red, and yellow, indicating the time elapsed since the last action was taken on each message. These color codes aid in distinguishing between recent and older messages. Additionally, the color codes can be customized at the backend to specify time intervals in minutes, hours, or days, catering to the specific needs of the customer. For example:
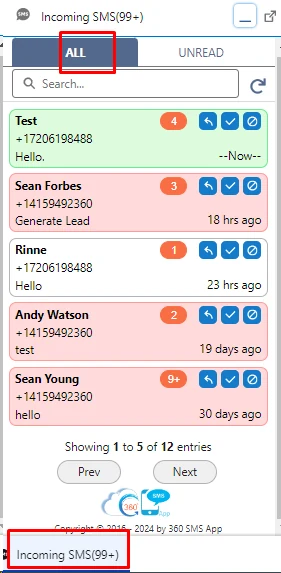
Fig Incoming Alert SideBar Button
-
-
-
- Green: The Green color indicates the most recent message and you haven’t taken any action.
- Yellow: The yellow color indicates the message is not read and you haven’t taken any action for the past 2 hours.
- Red: The red color indicates the message which is unread and you haven’t taken any action for more than 1 day.
-
-
There are 3 buttons along with each message from which you can take action. Below is the screenshot to depict the same.
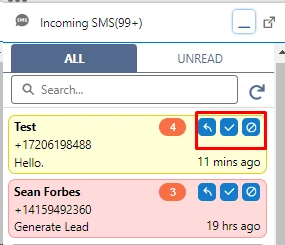
Fig Options in the Incoming SMS Alert button
- Read Option – This feature marks the message as read without opening it.
- Reply Option – This feature would reply directly from the Utility Bar without opening the Contact/Lead records.
- Unsubscribe Option – This option will unsubscribe the user if they are no longer interested in receiving the messages.
- Search Option – This feature will allow the user to search the messages either from the number or from the name.
- Refresh option – This feature will refresh the page when clicked.
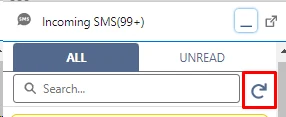
Fig Search and Refresh Option
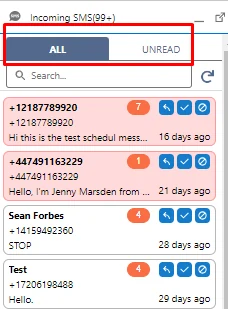
Fig All and Unread option
- All Option – This option will show the number of messages whether incoming, outgoing, read, or unread on the ‘Utility Bar’.
- Unread Option – It shows the unread incoming messages received in real time.
Group Incoming Alerts
Note–
- Once the “Group incoming alert” value is set in the General Settings, the user should click on the “Outgoing/Incoming” button in the Org Config sub-tab to enable Push Topic Notifications for the respective organization. (Push Topic – If you wish to receive incoming notifications in multiple Salesforce instances and notify all users associated with those instances simultaneously.)
- If it’s not functioning properly, you should verify the access at the profile level for the “Push Topics” Object.
What is Group Incoming Alerts?
“Group Incoming Alerts” describes a functionality where incoming messages, or alerts get directed to a designated group of users or personnel within a company.
This ensures that pertinent data reaches the relevant team or department promptly for timely handling and response. This approach is frequently employed alongside queues to efficiently handle and prioritize incoming information or alerts.
Conditions Based
The main purpose of this functionality is to show the incoming records. We need to show our incoming records to users. For this, we have few conditions –
- Number-based: When a number is shared to multiple users, all of them are capable of receiving incoming alerts associated with that number.
- Queue/ Public Group Based – If we create a Queue or Public Group within the Salesforce Org and select multiple users, all these chosen users will receive incoming alerts within their organization.
- Both – This condition encompasses both number-based and Queue/Public Group-based criteria for distributing incoming alerts.
Functionality of Group Incoming Alerts
To enable messaging functionality on Group Incoming Alerts, follow these steps:
Navigate to the SMS Setup bar >> Go to the General Settings >> Click to Edit Button >> Under “Settings for Incoming Alert Slidebar” section go to Group Incoming Alert >> Choose the option accordingly for Group incoming alert, user get three options- Number- Based Sharing, Queue/Public group based and Both >> Click to “Save” Button


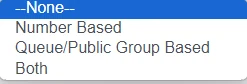
Fig 1: Group Incoming Alert Settings
- Number- Based Setting – We can customize the group incoming alert based on our specific needs. We can choose either a number-based condition, a queue-based condition, a public-based condition, or a combination of these. Let’s go with the number-based condition as shown in the screenshot below and save it.

Fig 2: Number Based Settings
- Go to the User Config field – In this case, when we use a number-based condition, one number is assigned to multiple users. When an incoming message arrives, it will notify multiple users.
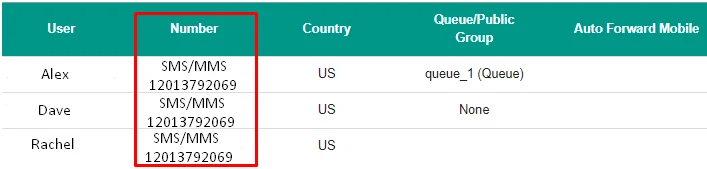
Fig 3: User Config
- Edit the Group Incoming Alert – “Select the ‘Group Incoming Alert’ to be based on a Queue or Public Group, and save it. We will also create the Queue for this purpose.”

Fig 4: Number Based Settings
In case of “ALL USERS” in user config:
If we assign any number to ‘ALL USERS’ under ‘Select Users’ on the ‘User Config’ page, then all users will see the group alert icon and incoming alerts along with the incoming message when you enable the group alert and select ‘number based’ in ‘Group Incoming Alert.
- Creating a Queue :
Navigate to the Gear Icon >> Go to the “Setup” >> Search for “Queue” >>Click “New” Button
Below screenshot shows how to create the new Queue. After naming them, we will select the SMS History to know the data and then select the users. After selecting the user, click on the save button.
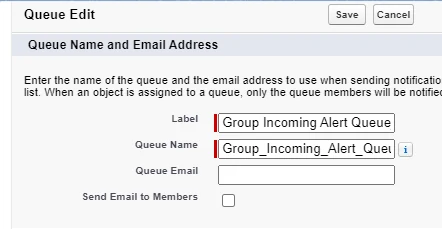
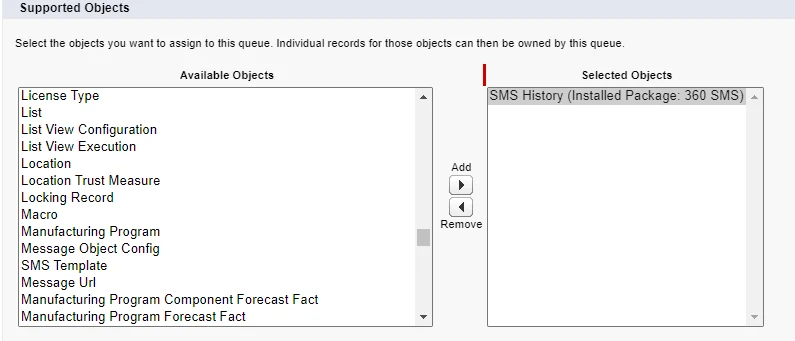
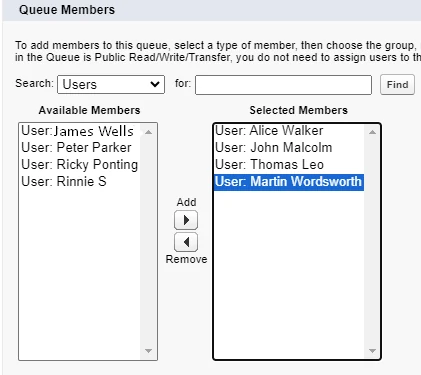
Fig 5: Creating a Queue.
- After creating the new queue, proceed to create the new record. In the User Configuration, click the “New” button and create the record.
Navigate to the SMS Setup Tab >> Go to the User Config >> Click to New Button >> create New Record >>
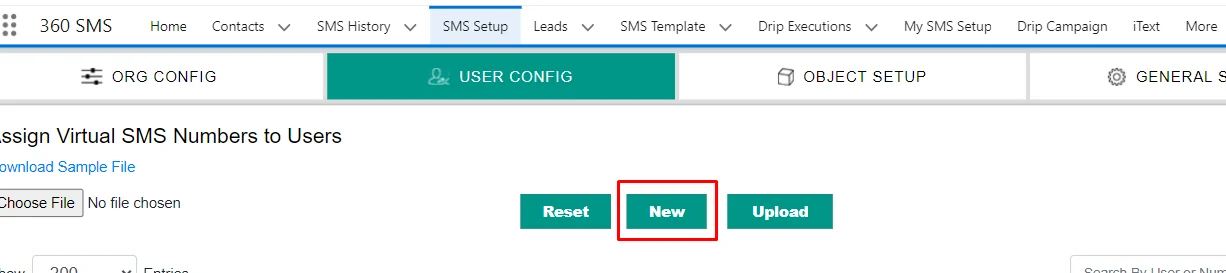
Fig 6: Queue Assignment
Following this, we will associate the new record with the Queue we have created.

Fig 7: Queue Assignment
Incoming would be coming from different users, and we can see the notification when the incoming would come. Below is the screenshot for the incoming alerts.
For example –
We have a number, 12013792069, assigned to Alex as the primary user. This number is also shared with two other users, Dave and Rachel. Whenever there is an incoming message to this number, all three users – Alex, Dave, and Rachel – will be notified.
Number- Based

Fig 7: Number Based
Queue-Based

Fig 8: Queue Based
- Creating Public Groups – Public groups function similarly to Queues in Salesforce. When we create a Queue/Public group in the Salesforce Org, all the users we select will receive notifications for new alerts as they come in. Below is a screenshot showing where you can find the public group.
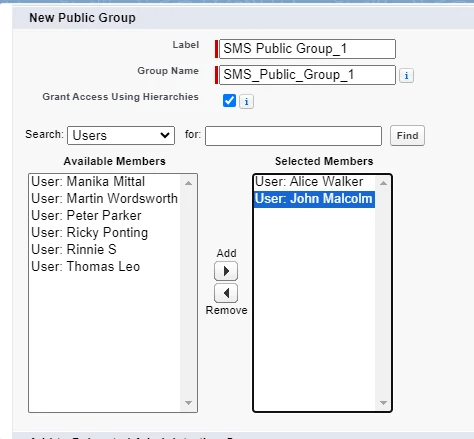
Fig 9: Public Group Creation
“Now, if we want to change the condition from ‘Queue’ to a ‘Public group,’ we can navigate to the user, edit the user’s information, and then update the record.”
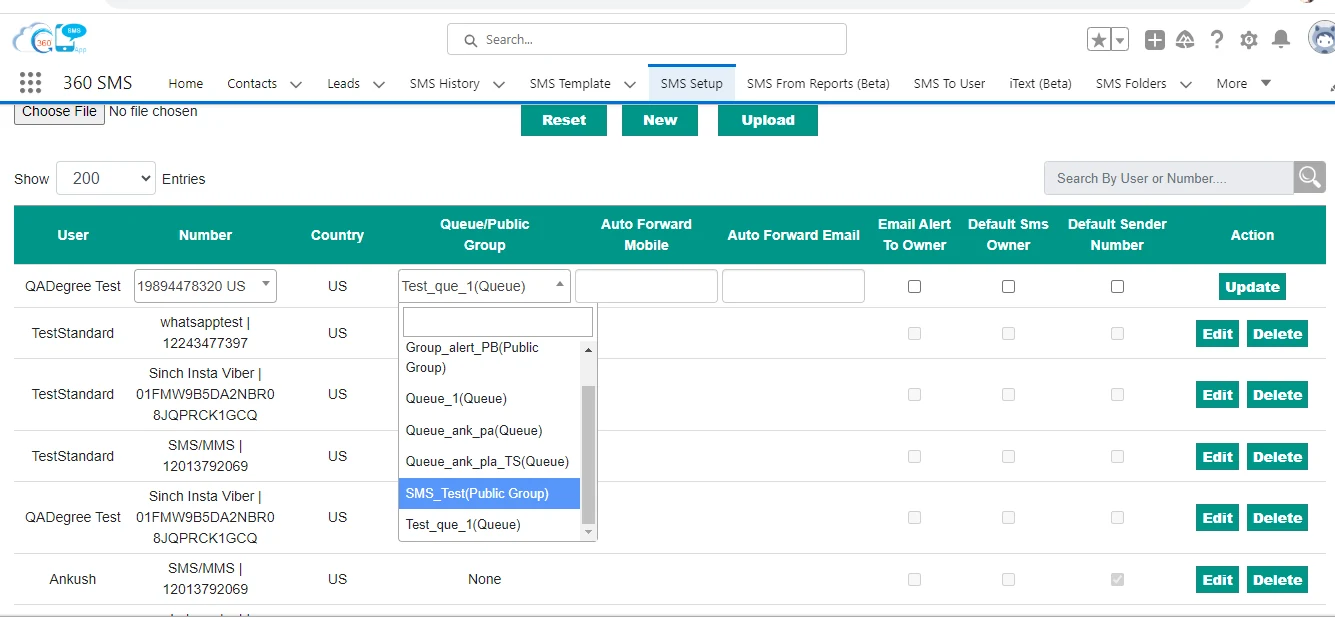
Fig 10: Public Group Assignment
Incoming would be coming from different users, and we can see the notification when the incoming would come. Below is the screenshot for the incoming alerts.
- For Both Public and Queue Settings – Here we will go to the general setting, and change the group incoming alert to both.

Fig 11: Queue & Public Group General Settings
The process for both Public and Queue settings will be the same as the processes we previously followed separately for Number-based and Queue/Public-based settings.
Enable Sharing for incoming messages checkbox-
The purpose of ‘Enable Sharing for Incoming Messages’ checkbox is to facilitate standard private or public sharing configurations. When the sharing settings are configured as private or public and this checkbox is activated, incoming messages are displayed to all users covered by the sharing rules.
For a Sharing Rule set to Public: Anyone with access to the SMS history object will be able to view incoming messages.
For a Sharing Rule set to Private: In this scenario, if a sharing rule is established, users with whom the record is shared according to that rule will have visibility into incoming messages or alerts.
Note- It’s important to note that you can only select either the Group incoming alert or the Enable Sharing for incoming messages checkbox at one time. They do not work together simultaneously. If you select both, it can create a contradiction between functionalities. Therefore, we recommend using only one functionality at a time from the options mentioned above.
Multi Conversation View Utility Bar
Note – In the Multi Conversation View, there is a limitation on the number of open conversation chats, with a maximum restriction of six.
Multi-convo view in an SMS (Short Message Service) app refers to a feature that allows users to simultaneously view and manage multiple conversations or text message threads within the application interface. This feature enables users to navigate and respond to various conversations in a single view.
How to set up a Multi Conversation View?
To set the Multi Conversation View, follow the below steps.
Navigate to Gear Icon>> Click on Setup>> Now Search App Manager In Quick Find Box>> Select 360 SMS>> Click on Edit>> Select Utility Items (Desktop Only)>>Click on “Add Utility Item Button”>> Search for Multi Conversation view and select it>> Click on the Save Button.
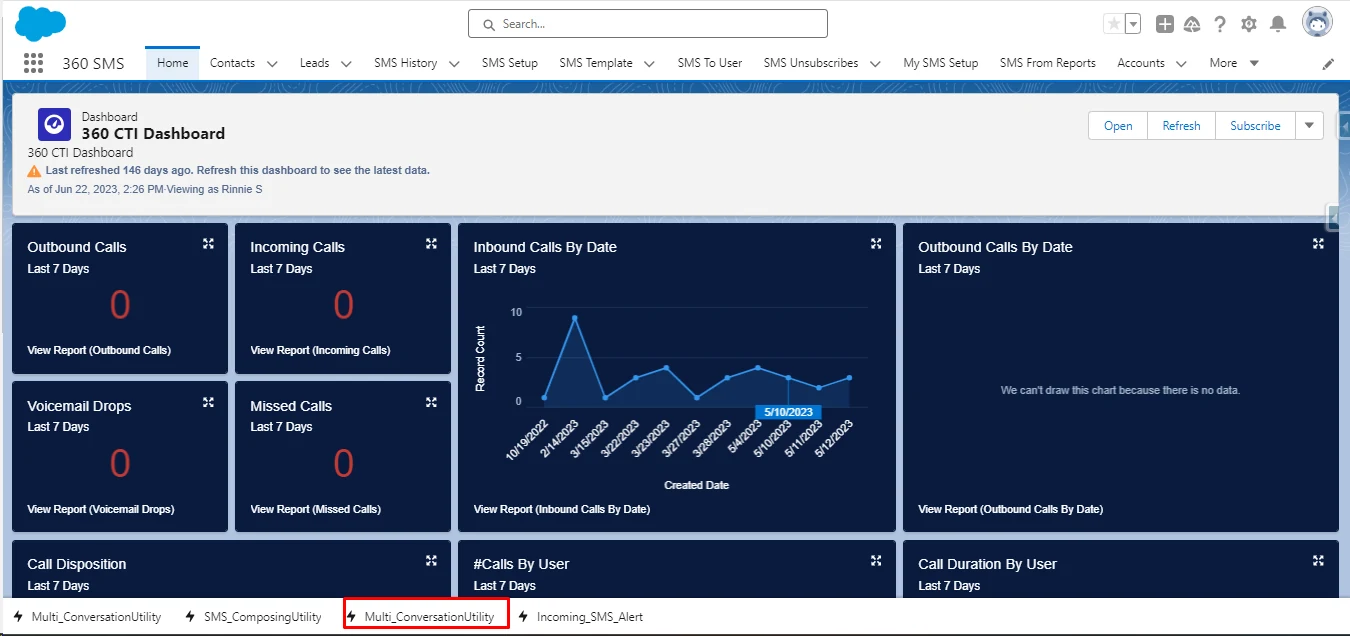
Fig Multi Conversation View in 360 SMS
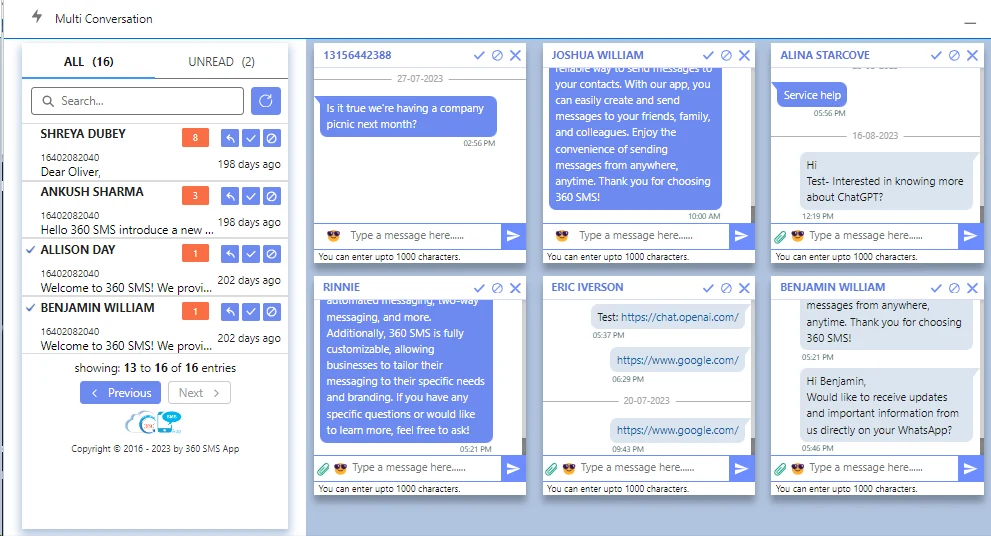
Fig – Maximum 6 Conversation view
SMS Setup
In this there are 4 tabs which will explain in detail all the functionalities of 360 SMS applications.
- Org Config
- User Config
- Object Setup
- General Setting
Fig SMS Setup with 4 tabs
Org Config
The SMS numbers are stored in the ORG CONFIG tab. Whenever a new number is assigned to your organization or for other backend configured features, you will need to press the Outgoing & Incoming Setup button. This action will require the Admin User Credentials to be entered, allowing the number to be added to your organization and to receive incoming SMS messages.
IMPORTANT Large Org Alert: Please get in touch with your Sales Representative or email support@360degreeapps.com to activate an option that enables your developers to INITIATE the creation of User Configuration rows. This applies when adding new users based on different fields in your user table. This feature complements the standard IMPORT options available for the User Config.
Additionally, there are options available during the import process where you can configure custom settings to automatically license users and include them in a specified permission set.
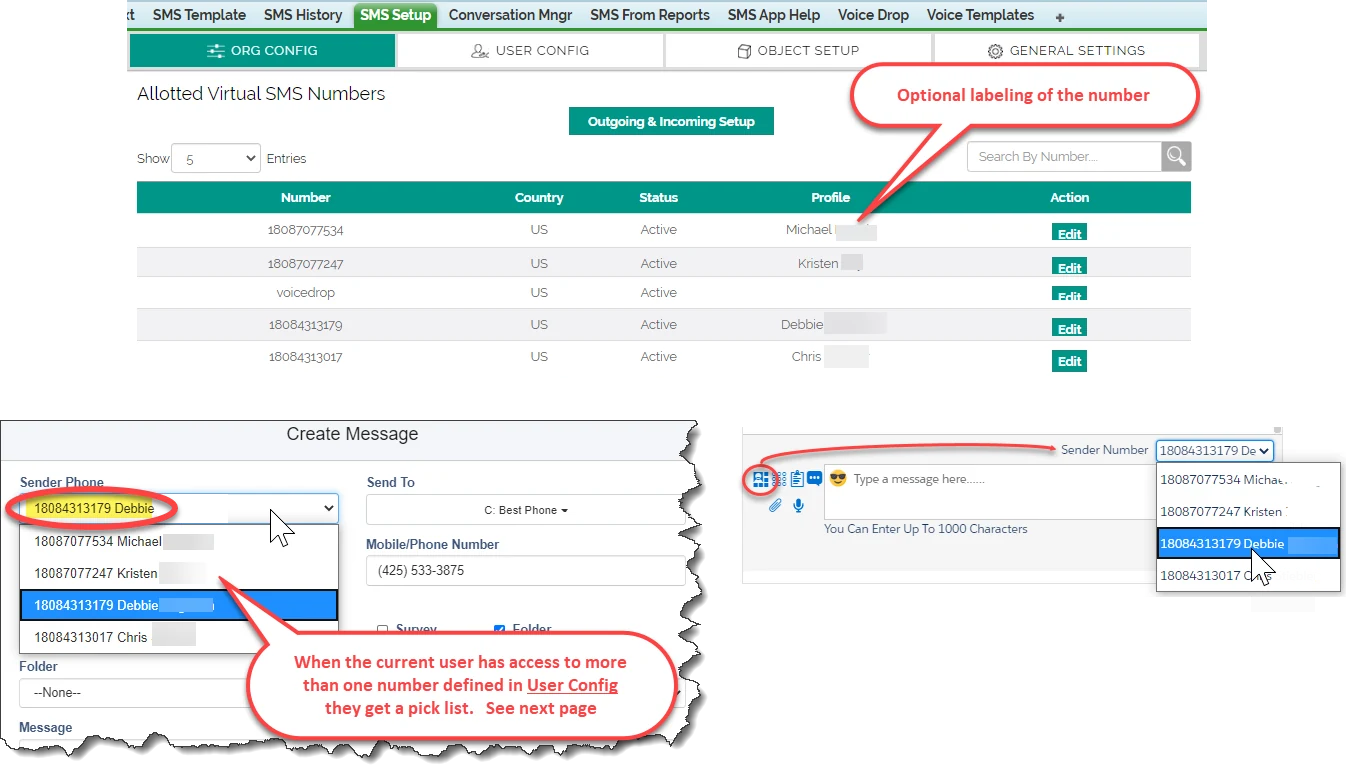
Fig Org Config where label can be added to the number to identify
User Config
The user config is a feature where the user is added to the SMS configuration which is UserId + Phone number combination. The Sender Number pick list is controlled solely by the User Config. Below is the screenshot of the user config page –
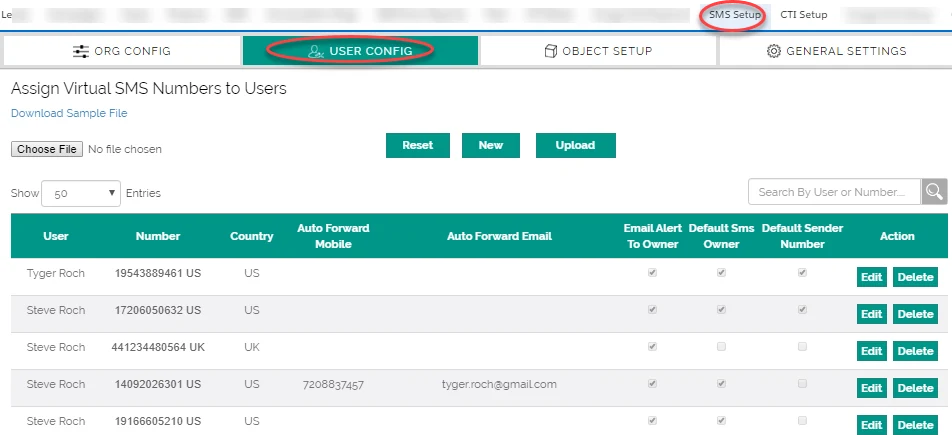
Fig – User Configuration assigns numbers to each user and defines Alerts and SMS_History Ownership
Choose File -This feature likely allows users to upload or select a file from their device or system for configuring SMS settings. It could be used for tasks such as importing contact lists, uploading custom message templates, or configuring specific settings related to SMS messaging.
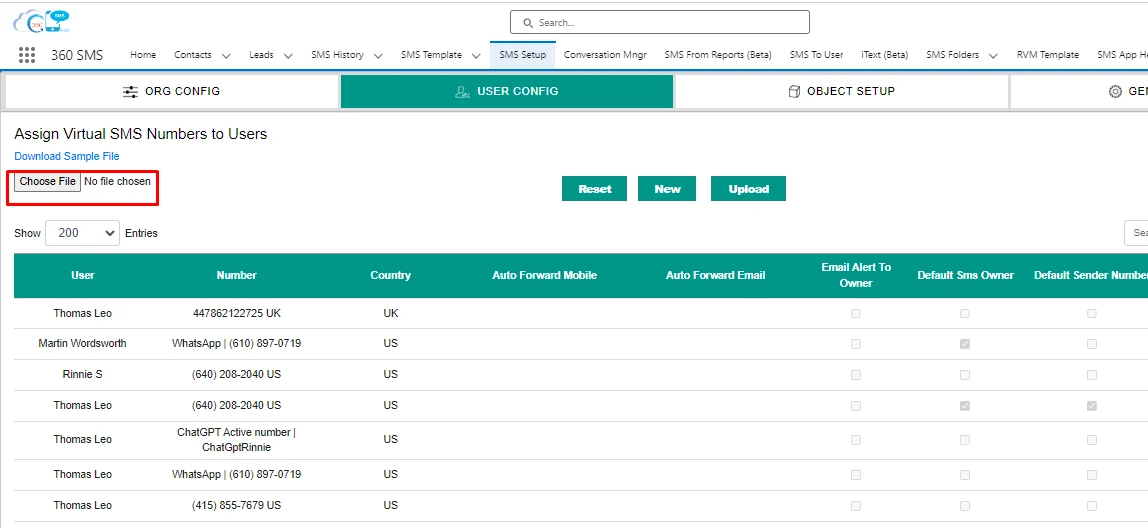
Fig Choose File field in User Configuration
User Configuration Options explained
|
Option |
Definition |
|---|---|
|
User |
The Salesforce User. A single user may be related to multiple numbers in which case they will see a picklist of numbers to SEND SMS from, when sending outbound SMS. |
|
Number |
An SMS Enabled number purchased or ported from an existing Landline to have its SMS Path enabled. Multiple users may be related to a single number and vice versa. |
|
Country |
Different numbers must be used for different countries (USA/Canada are the same). Phone number costs and the cost of outbound SMS messages vary greatly by country. |
|
Auto Forward Mobile |
Enables forwarding of inbound messages to a personal mobile number, although replies cannot be sent from the personal number. This practice is not advised, as it also displays the forwarded SMS in the Conversation View. |
|
Auto Forward to Email |
Allows inbound messages to be forwarded to an alternate email address other than the owner. Note that the Email Alert To Owner option already emails the owner so this is only for someone else. |
|
Email Alert To Owner |
When enabled a pre-defined (and customizable) email alert is sent to the SMS_History.Owner displaying the actual text message plus hyperlinks to the related Salesforce records. Utilizes a standard Salesforce Email Template which can be modified if desired. Review the “Reply to Email Alert” section to learn how users can reply to the alert to send an outbound SMS reply. Great for phone users that don’t want to use Salesforce1 to reply. |
|
Default SMS Owner |
Resolves the SMS_History.Owner to this user when an Incoming message arrives without a previous Outbound message. Ownership rules are also governed by the preceding Outbound message or by the parent Objects owner field. Only one user per number can be designated as the Default SMS Owner. |
|
Default Sender Number |
In a multi-number situation, it can be advantageous to designate the default number for the user that has access to multiple numbers. Note that 360SMS also has a Record Based Sender Number where one creates a formula field named Sticky_Sender c and if that field exists it uses that sender number. |
|
Action |
In this option, there is an option where the record can either be deleted or edited. |
Object Setup
Incoming messages are automatically directed to the objects specified in the Object Setup. By default, the app is set up for Contacts and Leads, along with common phone fields. Initially, incoming messages are matched with their preceding outgoing messages. If this matching fails, such as in the case of unsolicited incoming messages, the app resorts to matching with the designated fields outlined in the Object Setup.
Subsequently, it generates an SMS History record labeled as “Incoming.” The app also automatically manages different phone formats.
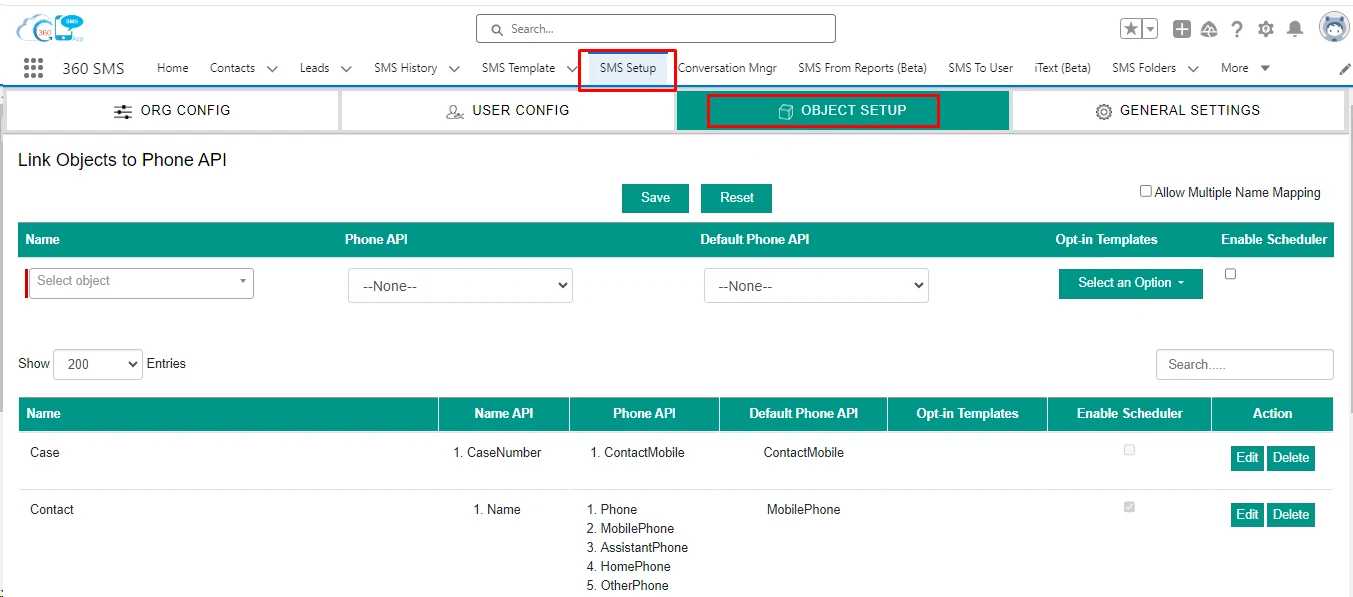
Fig Object Setup
Allow Multiple Name Mapping
By default, the Send To field in a batch SMS from a particular object is the object’s NAME field. Especially with custom Objects and objects that act as a bridge such as a Job_Applicant object (ContactId + JobId), we often see a useless auto-number being used for the Objects NAME field. Allow Multiple Name Mapping allows one to choose fields other than the object’s NAME field so that a more useful display of fields appears in the Send To.

Fig Allow Multiple Name Mapping
Object Setup Options explained
|
Option |
Definition |
|---|---|
|
Name |
The name of the object must be defined to enable outbound/inbound SMS to and from that object, |
|
Phone API |
The Phone API pick list displays formula fields of type TEXT and fields of type PHONE. |
|
Default Phone API |
The Default Phone API pick list displays the same name as the Phone API.. |
|
Enable Scheduler |
The scheduler can be enabled for the particular object if the user wish to schedule it |
|
Action |
In this option, there is an option where the record can either be deleted or edited. |
General Settings
Below is the complete list of general settings in SMS Setup-
|
Owner Details |
||
|---|---|---|
|
SMS App Owner Name: |
Thomas Leo |
The service user that all alerts and automated processes will run under, i.e. the Created By User. Defaults to the user that installed the app. |
|
Subscription Keywords |
||
|
Re-Subscribe Keywords: |
Start,Subs |
Automatic Opt-Out handling. Incoming SMS with these keywords sets the Object.SMS_Opt_Out to False. |
|
Unsubscribe Keywords: |
Stop,Unsubscribe |
Automatic Opt-Out handling. Incoming SMS with these keywords sets the Object.SMS_Opt_Out to True. Note that the STOP keyword unsubscribes the number at the Provider Level as well regardless of the Salesforce SMS_Opt_Out field value. Only the customer himself can re-enable themselves with the START keyword. |
|
Spam Keywords |
Incoming SMS with these keywords will set the SMS History source as Spam |
|
|
Blacklisted Numbers |
Incoming SMS with these Numbers will not be received. |
|
|
Compliance Mechanism |
||
|
Compliance Mechanism: |
Record wise |
Select Type of Compliance Mechanism.. |
|
Sub Type: |
Sender-Number wise |
Select Sub Type of Compliance Mechanism. |
|
Select Field |
Select User Specified Field for Opt-Out/Opt-In |
|
|
Opt In/Opt Out field preference |
SMS Opt Out and SMS Opt In must have boolean return type |
|
|
Opt-In type record required for sending SMS |
When this option is selected the Opt-In type record is required to Send SMS. |
|
|
Org-Wide Compliance |
When “Subtype” is anything but “Org-wide”, and the first option is selected, then the app will not consider the value of org-wide checkbox on the Unsubscribe record. If second option is selected, then app will consider the same. |
|
|
OTP Generator |
||
|
Number of digits for OTP |
Specify the number of digits you want in your OTP. Eg: 1234/ 12345/ 123456 |
|
|
OTP Format |
Specify your OTP format. Eg: A12B/ 1234 base on number of OTP digits you select |
|
|
Note: Remember to add “{!360_OTP}” in your ‘SMS Template’ content to add OTP. |
||
|
Scheduled SMS Preference |
||
|
Scheduled SMS Preference |
It allows you to edit the “Scheduled SMS” record before the message has been sent. |
|
|
Disable “Schedule in Real time” Process Builder |
x |
If enabled,Then the automated text will be sent out by scheduled Job instead of “Schedule in Real time” Process builder. Its only work for future Scheduled Sms created records. |
|
Real time Scheduling |
0 |
Schedule Sms will send immediate if the difference between schedule time and current time is less than Real time scheduling value |
|
SMS Delivery Report Settings |
||
|
Site URL: |
https://360degreecloud8.my.salesforce-sites.com/IncomingSMS |
Although not required, Salesforce Sites technology is used to update the SMS_History.DeliveryStatus and is required for Link Clickthrough Tracking as well. See documentation for Sites configuration. |
|
Keywords To Create New Lead and Case |
||
|
Incoming keys for Lead |
Generate Lead |
When you get the incoming message with the keyword mentioned here, a Lead would be created. |
|
Incoming keys for Case |
Initiate Case |
When you get the incoming message with the keyword mentioned here, a Case would be created. |
|
Settings for Conversation View |
||
|
Set the default view |
All Users’ Conversations |
Select the initial view for conversations: ‘All Users’ or only the current logged-in user. Options: All Users Current User |
|
Enable Schedule SMS |
When this checkbox is true Schedule SMS button will be visible on Conversation View |
|
|
Enable FROM number on thread |
When this checkbox is true From Number will be visible on Conversation View chat. |
|
|
Enable Group Chat |
If enabled, you can have the option for group chatting from a conversation view. |
|
|
Default Message Sending Option |
Always Ask |
Default message sending option when multiple SendTo values and group chat enabled number is selected |
|
Default Visibility of SendTo Picklist |
When this checkbox is true sendTo picklist will be default visible on Conversation View. |
|
|
“Send To” message filter |
Display messages based on “Send To” numbers selected in the Conversation View. You can view messages from multiple “Send To” numbers together, in one view, on Conversation View. |
|
|
Hide Hyperlink from ConversationView: |
If the history records relates to Multiple Record and this checkbox is true then the other records hyperlink is not visible on Sms Thread Of Conversation View . |
|
|
Hide By Keyword from ConversationView OutBound Thread |
If the checkbox is true than By keyword is not visible on Outbound thread |
|
|
Sender Number Label |
Customize Sender Numbers labels for better context and Organization in Conversation View |
|
|
Auto-Refresh Conversations |
Auto-Refresh Conversations helps you choose a time interval for the conversation view to refresh itself. It saves you from manually refreshing and shows you the latest conversations automatically |
|
|
Enable/Disable/Hide Interface Element |
||
|
iText Picklist: |
Enable |
Enable: iText Picklist will be visible. Disabled: iText Picklist will be visible but will remain disabled. Hide: iText Picklist will not be visible. |
|
Template Button/Picklist |
Enable |
Enable: Template Button/Picklist will be visible. Disabled: Template Button/Picklist will be visible but will remain disabled. Hide: Template Button/Picklist will not be visible. |
|
Template Folder Picklist: |
Enable |
Enable: Template Folder Picklist will be visible. Disabled: Template Folder Picklist will be visible but will remain disabled. Hide: Template Folder Picklist will not be visible. |
|
Schedule SMS Button |
Enable |
Enable: Schedule SMS Button will be visible. Disabled: Schedule SMS Button will be visible but will remain disabled. Hide: Schedule SMS Button Picklist will not be visible. |
|
Emoji Button |
Enable |
Enable: Emoji Button will be visible. Disabled: Emoji Button will be visible but will remain disabled. Hide: Emoji Button will not be visible. |
|
Drip Campaign |
Enable |
Enable: Drip Campaign will be visible. Disabled: Drip Campaign will be visible but will remain disabled. Hide: Drip Campaign will not be visible. |
|
Ringless Voicemail |
Enable |
Enable: Ringless Voice Mail will be visible. Disabled: Ringless Voice Mail will be visible but will remain disabled. Hide: Ringless Voice Mail will not be visible. |
|
Channel Button |
Enable |
Channel Button will be visible. Disabled: Channel Button will be visible but will remain disabled. Hide: Channel Button will not be visible. |
|
Attachment Button |
Enable |
Enable: Attachment Button will be visible. Disabled: Attachment Button will be visible but will remain disabled. Hide: Attachment Button will not be visible. |
|
Mark Incoming as Read |
Enable |
If there are unread incoming messages and an outgoing message is sent, then all those unread incoming messages prior to that outgoing message will be marked as Read. |
|
Settings for Incoming Alert SideBar |
||
|
Default View: |
Unread Messages |
Controls whether all inbound messages are displayed in the Side Panel Alert or just UnRead Messages. |
|
Incoming Alert Color Changes to Yellow in: |
60 mins |
Controls the time duration at which the Inbound message will change colors |
|
Incoming Alert Color Changes to Red in: |
120 mins |
Controls the time duration at which the Inbound message will change colors |
|
Incoming Sidebar Automatic Refresh Time: |
30 sec |
Controls how often the Side Bar will poll and refresh itself looking for new incoming messages or changing colors of existing messages. |
|
Enable Company Logo in Sidebar: |
✔ |
When enabled works in conjunction with the “Selected Logo” option to allow one to use their company logo in the Side Panel rather than the default 360SMS logo. |
|
Selected Logo |
SMS App Logo |
Define the logo that will be used in the side panel. |
|
Enable Audio on Incoming Message: |
✔ |
When enabled, plays a chime sound on the device when an incoming message arrives. |
|
Select Audio Channel |
Both |
In Which device the audio will play. |
|
Enable Sharing for Incoming Messages: |
✘ |
When enabled, allows the SideBar to show more than just messages for the current user and instead utilizes pre-defined Salesforce Sharing Rules setup for the SMS History object. |
|
Group Incoming Alert |
None |
Group Incoming Alerts allows simultaneous incoming alerts for multiple users, Queues, and/or Public Groups on assigned number(s). Number-based assignments ensure that when a number is assigned to multiple users, all of them receive incoming alerts on that number. Queue/Public Group-based assignments, when a number is assigned to a user who is a member of a Queue/ Public Group, all the members of that Queue/ Public Group receive incoming alerts. Both When a number is assigned to multiple users, including those who are part of a Queue or Public Group, all users and associated Queue/Public Group members receive alerts for incoming messages on that number. |
|
Show unsubs message on Incoming alert or not |
✘ |
When enabled, it allows the sideBar to show all the Incomings with Unsubscribe keywords text . |
|
Enable Reply These options control the Reply button on the side panel. |
Enable Read These options control the Read button on the side panel. |
Enable unsubscribe These options control the Unsubscribe button on the side panel. |
General Settings continued
|
Email To SMS |
||
|---|---|---|
|
Email Service Address: |
sms_incoming@r- ojuzidkfmxk9w7ng4c48epxcsfd 99ubw30a312go088t4f85a.f4- 4iqrieao.na59.apex.salesforce. com |
When a Salesforce Email Service is configured this setting allows the Incoming Alert Email Notification to be replied to, which then sends the reply as an Outbound SMS to the customer, negating the need to login to Salesforce to reply to the customer. See documentation on setting up the email service. |
|
Enable Dark Hour |
||
|
Enable Dark Hour for Automation: |
✘ |
When enabled, no triggered or scheduled outbound messages will go out during the time range. This is useful to give the appearance that the triggered messages are being sent from a real person rather than automation. |
|
Enabled Holidays: |
✘ |
When enabled, no triggered or scheduled outbound messages will go out during the time range. This is useful to give the appearance that the triggered messages are being sent from a real person rather than automation.. |
|
Time Range: |
Business Hour |
When enabled, no triggered or scheduled outbound messages will go out during the time range. This is useful to give the appearance that the triggered messages are being sent from a real person rather than automation. |
|
Sending Time(Next Day): |
9 AM |
Sets the time at which all messages stopped during the dark hours will then be sent on the following day. |
|
Link Tracking |
||
|
Link Tracking Status From Backend: |
Enabled |
Hyperlink Click Tracking is enabled in the back-end by writing to Sales@360degreeapps.com requesting it to be enabled. You will then be sent instructions for the additional configuration required. All clickthrough’s are tracked in native Salesforce and thus reportable and triggerable. |
|
Enable Link Tracking For Bitly: |
✔ |
When enabled and when you have a Bit.Ly account, the hyperlink sent in an outbound message will be automatically transformed to a short bitly link on its way out. Thus, the customer only sees the short link, but internally you see the long link. |
|
Bitly Generic Access Token: |
***************** *** |
After setting up a Bit.Ly account, Bit.Ly supplies an API token which we use to facilitate the back and forth translation of the Bit.Ly link into friendly looking hyperlinks. You can use a free Bitly account for most purposes but note that bitly does have 1,000 api calls per hour limit that could impact batch texters, requiring upgrading to their paid accounts |
|
Enable link tracking for Tiny URL |
✔ |
When enabled and when you have a Tiny URL account, the hyperlink sent in an outbound message will be automatically transformed to a short Tiny URL link on its way out. Thus, the customer only sees the short link, but internally you see the long link. |
|
Enable Link Shortening Using 360 Domain |
Enable |
|
|
Link Shortening Domain: |
minis.ms |
|
|
Exclude Domains: |
calendly.com,google. com |
Define a comma separated list of domains that should be excluded from link shortening. |
|
Enable Pardot |
||
|
Pardot enabled: |
Disabled |
Show Pardot status whether enabled or disabled. |
|
Message Setting |
||
|
Restrict SMS composing: |
None |
Restrict Template Editing locks down the Send SMS message box after a template has been chosen but still allows free-form messages. Restrict Message Composing locks down the Send SMS message box completely, only allowing the use of Templates. |
|
Owner for known Incoming with Messages: |
Parent Record Owner |
All outgoing SMS history will be set to current SF User or Parent Record Owner – Parent Record Owner is useful for when you want the replies to come to the record owner rather than the SF user that triggered or sent the message. |
|
Owner for known Incoming without Messages |
Parent Record Owner |
Incoming messages that come in without a previous outgoing can resolve to the Record Owner or the Default app owner. Normally an incoming owner will be derived from the outgoing owner. |
|
Create task while sending SMS |
✔ |
When the checkbox is Checked it creates a Salesforce Task record for the Outgoing. The task is linked to the Contact/Lead record or whatever record the outgoing messages is linked to. |
|
Create task while Incoming |
✘ |
When the checkbox is Checked it creates a Salesforce Task record for the Incoming. The task is linked to the Contact/Lead record or whatever record the incoming messages is linked to. |
|
Task Creation Type |
Default |
In case of One Day only one task will be created in a whole day but in case of ‘Default’ every time a new task will be created for each Incoming and Outgoing . For One Day configuration please Refer to ‘Task Creation Type’ section of SMS Help Tab |
|
Specify Task’s Subject |
Specify Task’s Subject in Case of One Day |
|
|
Frequent Messaging |
Disable |
Frequent Messaging whether enabled or disabled. |
|
Frequent Messaging time |
15 mins |
Frequent Messaging enabled for certain time interval. |
|
Create task while Auto-forwarding emails |
✔ |
When the Auto-Forwarding Email feature is enabled this feature also creates a Salesforce Task record for the notification email sent to the auto-forwarded contact. The task is linked to the Contact/Lead record or whatever record the incoming messages is linked to. |
|
Create task in Async Mode |
✘ |
Please note that the asynchronous mode is designed to run for a single messaging transition only |
|
Relate Incoming with last Outgoing |
✔ |
Use this important setting to relate all Incoming messages with the preceding Outbound message. Used for Incoming SMS_History.Owner notification, linking the inbound to the record that the Outbound was linked to (such as a Case) and highly useful when processing Inbound keywords to make sure that the answer to a question is in context to the question (template) being asked. |
|
Relate Outgoing with last Incoming |
Enable |
Use this important setting to relate all Outbound messages with the incoming message. |
|
Show Related Incoming to Record Owner |
✘ |
Controls whether the “Relate Incoming to Record Owner” checkbox displays on various “Send SMS” pop-up dialog boxes. |
|
Enable User Signature |
✘ |
When enabled, appends a defined signature or opt-out language to the bottom of every outbound SMS. |
|
Enable Reply from User |
✘ |
When enabled, a reply code will be appended to the bottom of auto forwarded outbound SMS. |
|
Omni Channel Configuration for SMS routing |
||
|
Enable omni channel for Incoming SMS routing |
✘ |
Check this to enable Incoming SMS for routing through Omni channel |
|
Queue name |
None |
Select the Queue , you want to use to route the Incoming SMS |
|
Send text on accept event |
✘ |
Check this if you want to send an automated text while accepting ‘Incoming SMS’ |
|
SMS template for accept event |
SMS Template which will be used while sending automated SMS on Accepting ‘Incoming SMS’ |
|
|
Send text on end chat event: |
✘ |
Check this if you want to send an automated text while ending Conversation |
|
Object configuration |
Case |
Object whose record will be created while accepting an unknown Incoming SMS |
|
Disable Service Console Close Button |
✘ |
disables the Service Console Close tab button |
|
Link Unknown Incoming SMS |
||
|
Create Object and link unknown Incoming SMS |
✔ |
Check this if you want to enable Object Configuration |
|
Object to create for unknown Incoming SMS: |
Lead |
Select Object type to create related record for unknown inbound SMS |
|
Run Scheduler to update the Delivery Status checkbox |
||
|
Run scheduler to Delivery Status checkbox of previous day: |
Run |
Run Scheduler for Delivery Status of previous day |
|
Character size limit For Send SMS Page |
||
|
Character size limit |
Character Size limit should be between 0-2000 |
|
General Settings Continued
|
Settings for Lead Convert Action |
||
|---|---|---|
|
Enable Trigger/Scheduler to relate SMS records to converted Contact/Account/Opportunity: |
✔ |
When Leads are converted this feature allows any previous and unsent Scheduled SMS records to re-attach themselves to the Contact that is created in the Lead Conversion process. |
|
Run scheduler in Admin context to relate SMS records: |
Daily Run |
Select the picklist value and run the scheduler in admin context to relate SMS records to converted Contact/Account/Opportunity |
|
Convert/Delete sent Scheduled SMS records |
Delete |
Either delete or convert the sent Scheduled SMS records of Lead to respective objects (Account, Contacts, Opportunity) on lead conversion. |
|
Action on Unsent Scheduled SMS records |
Delete |
Delete the unsent schedule SMS records of a lead after the lead conversion. |
|
SF1 Push Notification Setup |
||
|
SF1 push notification plugin |
Disabled |
Install SF1 push notification plugin by writing to Sales@360SMSApp.com requesting it to be enabled. You will then be sent instructions for the additional configuration required. |
|
VCF File |
||
|
VCF File |
✘ |
When the checkbox is checked the MMS file will Send through the site. |
|
Chat GPT Setting |
||
|---|---|---|
|
Enable ChatGPT(Beta) |
✔ |
If this option is enabled, the ChatGPT feature will be activated in Salesforce. This will allow ChatGPT to suggest template content and reply suggestions based on the recent messages received on Conversation View and the Incoming SMS Alert Utility Bar. |
|
Enable for SMS Template |
✔ |
When enabled, ChatGPT Will be enabled for SMS Template |
|
Enable for Conversation View |
✘ |
When enabled, chatGPT will be enabled on Conversation view. |
|
Enable for Incoming SMS Alert Utility |
✘ |
When enabled, chatGPT will be enabled on SMS ALert Utility. |
|
Enable Channel Restriction for User Setup |
||
|
Enable Channel Restriction For User Setup |
✘ |
When checkbox enabled Supported Channels can be restricted for users on User Setup. |
|
Email Alert |
||
|
Message URL email Alert |
✘ |
When checkbox checked Email Alert sent to the Owner of SF Record whenever Link is clicked. |
|
Notification for Bulk SMS Fail |
||
|
Notification for Bulk SMS Fail% |
50 |
Specifies the percentage for Bulk SMS Fail |
|
Enable Custom Notification |
✘ |
This would help to enable the custom notification |
|
Custom Notification |
Specifies the name of the Developer |
|
|
Verify the Phone Settings |
||
|
Country Code |
+1 |
Enter country code to verify number for eg. enter +1 for USA. |
|
Re-Verify Number |
No |
If you want to Re-verify a phone number again, select Yes. Note: Credits will be used. |
|
Default/Multiple |
If you want to verify multiple phones then select Multiple, otherwise default. |
|
|
Enable VTPwhile Sending SMS |
✘ |
If you want verify phone when we are sending the sms |
|
Setting to AutoSelect SMS from Report Column Section |
||
|
When checkbox checked SMS From Report Column Section will be autoselected |
||
|
Message Limit Enabled/ Disabled |
||
|
Controls whether message limit is applicable or not |
||
|
Enterprise Scheduling |
||
|
Enable Enterprise Scheduling |
Run. |
|
|
Setting to Enable Speed Booster |
||
|
Enable Speed Booster |
Enabled |
|
|
Add Required Wording |
||
|
Initial Message Wording |
Disable Controls whether to send initial message wording or Not. |
|
|
Wording Content |
Add wording content which will send while sending SMS |
|
|
Add Wording On |
Setting will decide when to add wording |
|
iText((Intelligent Texting w/ Surveys/Chatbots)
360 SMS offers powerful Intelligent Texting capabilities through iText, allowing one to define an entire automatic Question/Answer/Response flow without needing a developer.
iText, also known as Survey here, is the only ‘ZERO-CODE’ chatbot designer in Salesforce. It uses fully configurable decision trees in Salesforce and sets up dynamic, response-triggered actions & data capture, in minutes.
An iText differs from an SMS Template in that it anticipates a response and based on the defined answers it sends the next defined question or response to offer unlimited capabilities. The feature is especially useful with Batch Texting. The answer data can also drive infinite actions such as updating Salesforce fields, creating tasks, alerting users, and more.
Create a new iText
Creating a new iText and configuring its questions and answers in iText is pretty easy.
- Click on the iText object (as shown below).
- Users can view the list of all previously created iTexts. They can also delete them by clicking Delete iText.
- To create a new iText, click Create New iText (as shown below) on the top right corner of the page.
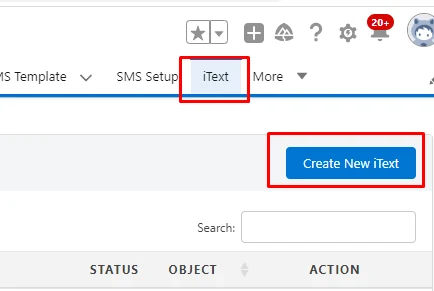
Fig : Create New iText
User needs to fill the necessary details (as shown in figure):
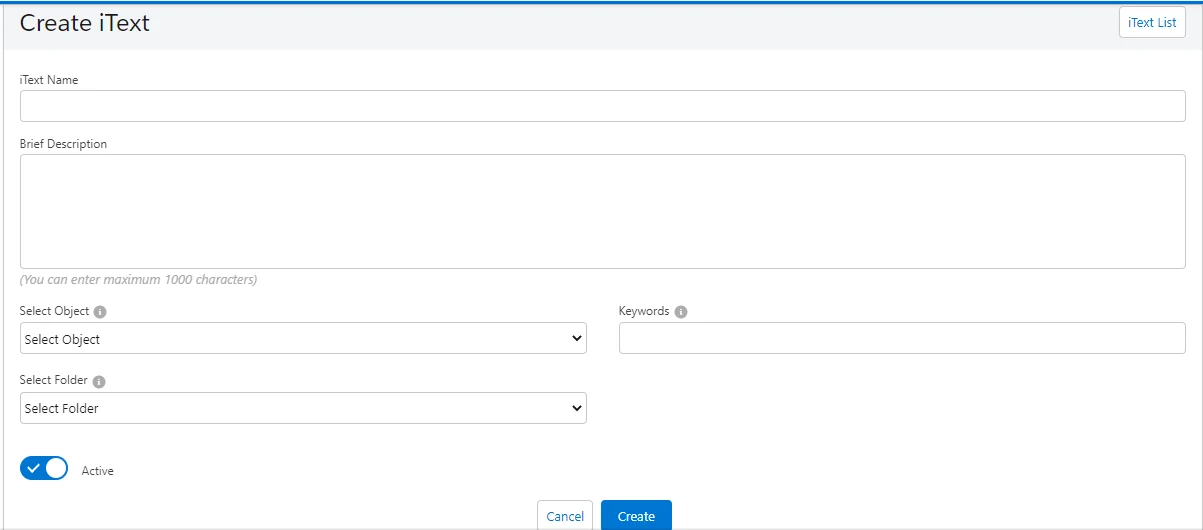
Fig : Add details
- iText Name- This is for defining a iText name.
- Brief Description– In this section, users can add a brief description of a iText to specify the purpose of a iText, or when a iText will be triggered.
- Select Object– Select the Salesforce object over which a user wants to run a iText. It supports all standard and custom objects.
- Keywords– Here, users can add Keywords and their synonyms (comma or double pipe || separated) for keyword-triggered conversations by the clients. Clients can text one of these keywords and initiate the iText. 360 SMS iText functionality is smart and does not allow the repetition of the keyword in other iText.
Note– Users can create unique keywords for each iText, and each keyword must be distinct from others.
- Status– Toggles the status between Active or Inactive for a iText.
Note– The status toggle is by default active - iText List– This button is used to go back to the list of existing iText.
After filling in all the details, click Create. When users click Create, a Survey will be created, and users can add questions by clicking Question, as shown below.

Fig – Add questions
As the user clicks on the Question button, a box appears to create a question, as shown below.
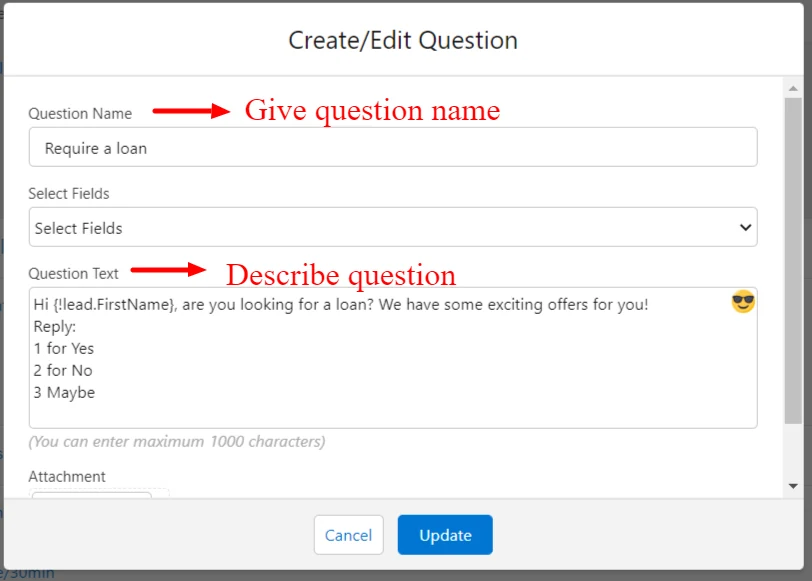
Fig- Add question details
Here users can add:
- Question Name – This is for adding the name or label of the question,
for example – “Require a loan.”
- Question Text – Here, users can add the question text to be prompted. Questions aren’t really questions, as much as they are ‘prompts’ for further responses to move ahead in the automated interaction. It also supports emojis.
- Select Fields: Users can personalize all questions using the Merge Fields. There is no need for knowing the code or formula. User has to select the required field and the app automatically creates a formula for it. For instance “{!lead.FirstName}” picks first name of the Lead (as shown in figure):
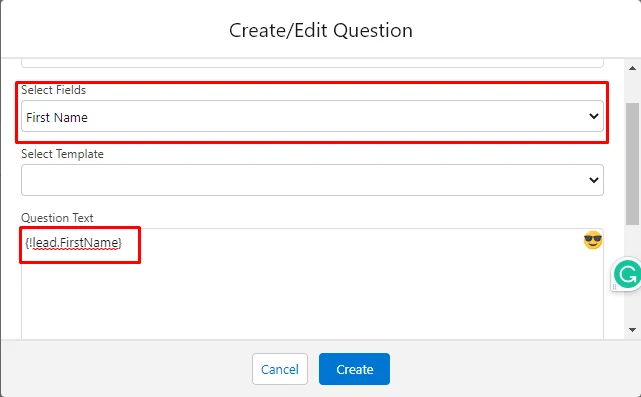
Fig- Select Fields
- Attachment – This is to add attachments to a message. You can add one attachment for one answer of up to 2.26 MB.
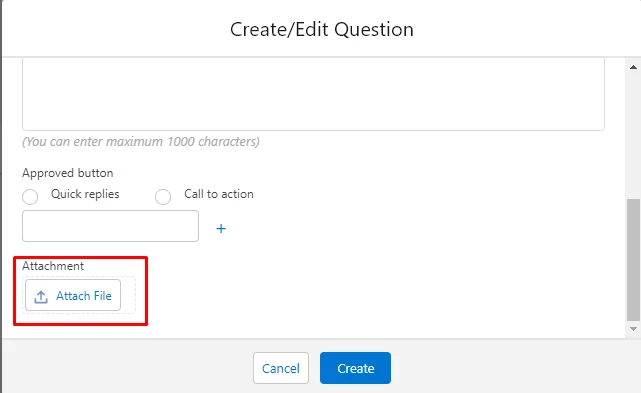
Fig- Attachment
After filling in all the details, click Create. After clicking the Create button, the iText will appear with the added question.
Users can add an expected answer or a choice to the question by clicking Answer, as shown below.
Add Answer

Fig- Add Answer
As a user clicks on the Answer, a box will appear for adding an answer choice, as shown below. Each answer choice can also include acceptable synonyms separated by a double pipe (‘||’).
Click Create after entering your answer choices.
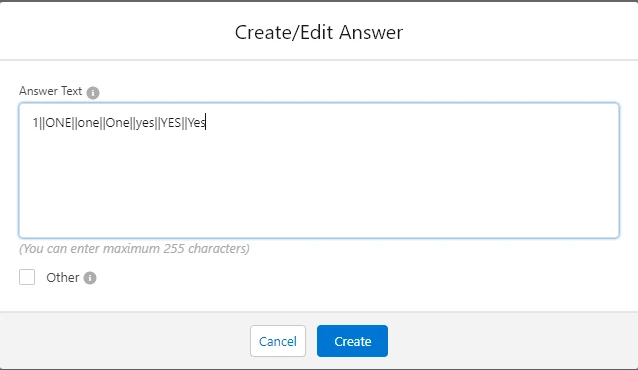
Fig -Create/Edit Answer
After clicking Create, the iText will appear with all answer choices a user has added.
Users can dynamically add new questions they want to trigger with each incoming response or expected Answer by clicking on the Question button next to an Answer, Users need to click on the Question button against each answer to assign a new question to every answer. Users can edit or delete an answer using the ‘pen’ or ‘bin’ icons.

Fig Edit and Delete Question
Quick Replies and Call to Action Button
If the template’s body is approved for Quick Replies, the WhatsApp message containing the respective template will include a Quick Replies button. Users can create up to three buttons within a Quick Reply. Alternatively, for Call to Action, users can add up to two buttons. These functionalities are applicable when using iText for template generation.
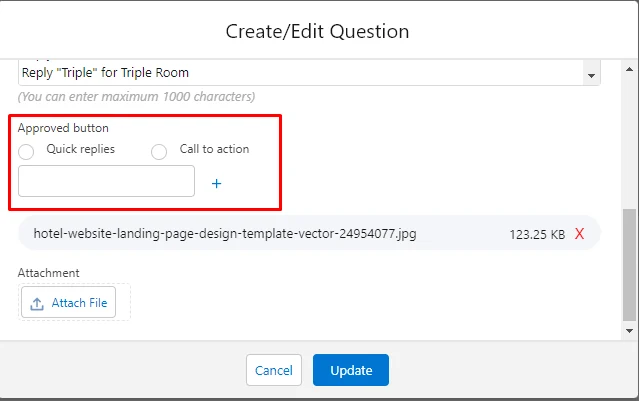
Fig Quick replies and Call to action
Note – Users can select a maximum of 3 quick reply buttons and 2 call-to-action buttons per answer.
Exceptions
360 SMS iText provides the capability to handle the responses which aren’t included in the user’s answer text. Users can select the Other option which can be enabled on for an open ended Question like taking in feedback.
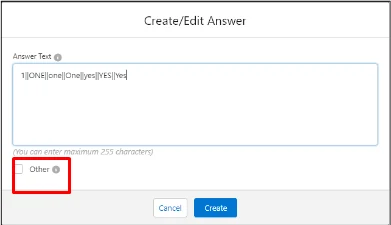
Fig Others Option in iText
iText AI
The iText Automated Response Feature, exclusively provided with the 360SMS Salesforce Application, enhances your Salesforce org’s ability to send automated responses based on the replies received from end users. In this updated version, we have implemented an AI-driven approach to streamline the process. With this new functionality, Salesforce agents will no longer need to define specific keywords for each response, making it more intuitive and efficient.
Please note that iText AI will only work when ChatGPT is enabled within the agents’ Salesforce account.
Getting Started:
To make the most of the AI-powered iText feature, follow these steps:
Click here to learn how to create a new iText.
The keywords for the first option. These needed to be added in order to add flexibility to user response.
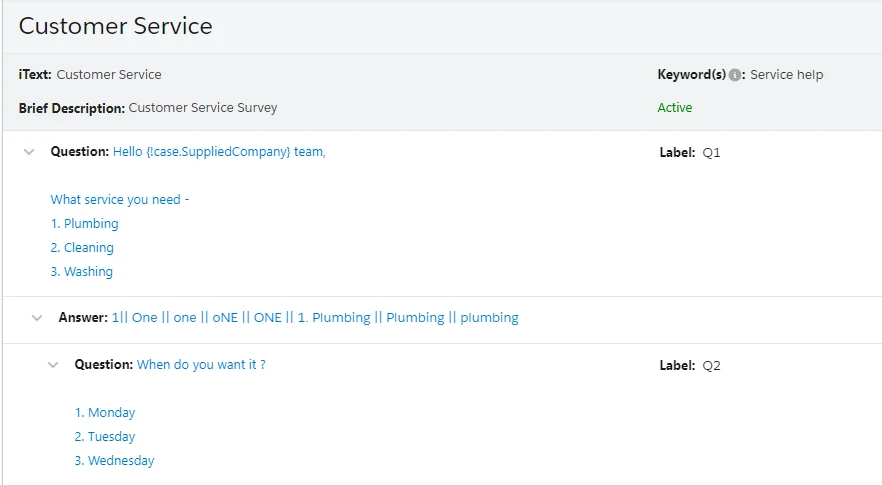
Fig 1: A Sample of Old iText Functionality.
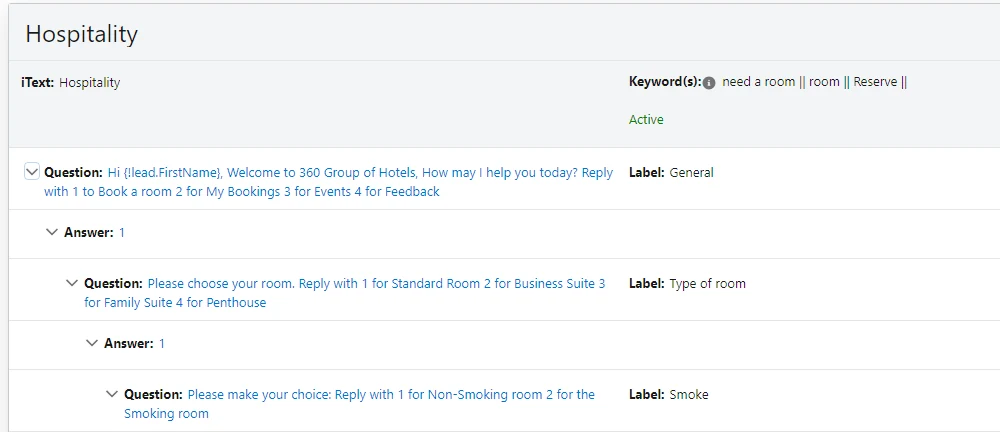
Fig 2: A Sample of New iText Functionality.
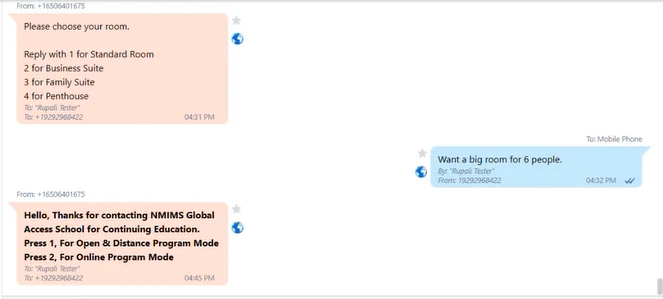
Fig 3: Sample Reply from the New iText Functionality.
Drip Campaigns
Drip Campaigns enable users to schedule text messages for delivery at specific times and dates. These messages are pre-planned to nurture and engage leads and customers for sales or resales.
A drip campaign is a marketing strategy that entails sending a sequence of pre-determined emails or messages to a targeted group of recipients over a designated time frame. The objective of a drip campaign is to nurture leads by offering valuable information and guiding them through the sales process. These messages are typically triggered by particular actions, such as subscribing to a newsletter or requesting more details about a product or service.
Uses of Drip Campaign
- Automated Payment follow-ups: Set follow-ups for payment reminders monthly, weekly, bi-monthly, or however you like.
- Lead follow-ups: Follow up with potential customers from time to time.
- Demo Scheduling: Schedule demos of your business with potential clients using Drip Campaign.
- Following up on the no-response leads after every few days without wasting agent time.
Setting up Drip Campaign in 360 SMS
- Users might set up 360 SMS Drip Campaigns with the Process Builder to send templated communications across any channel of their choice and initiate actions.
- Additionally, 360 SMS enables users to select “stop conditions” from the Process Builder, to automatically halt campaigns based on response rates, time, or progress.
- An alternative method for stopping Campaigns is simply choosing the Stop Drip Campaign checkbox on any Record Detail Page.
Access Drip Campaign in 360 SMS
- Click on the “Drip Campaign” object. Here the users can create or Clone drips and also see all the drip campaigns they previously created.
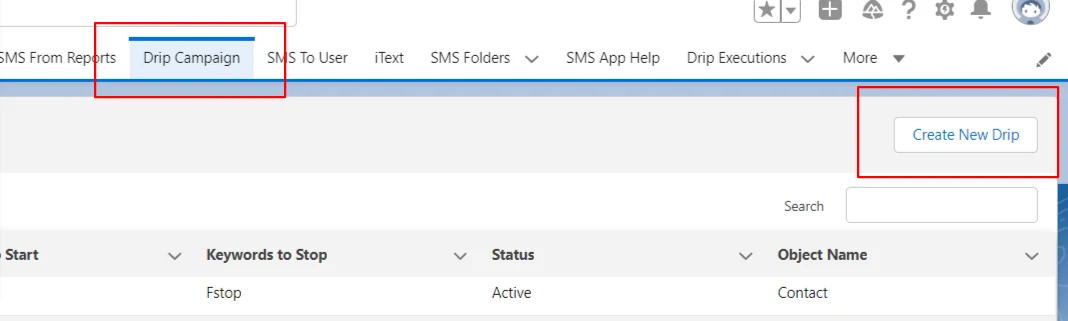
Fig – Drip Campaign tab
- Click on the “Create New Drip” button and fill the details and create the drip.
Fig- Create New Drip
- After filling in the details, click Save, Save and Create Action or Cancel.
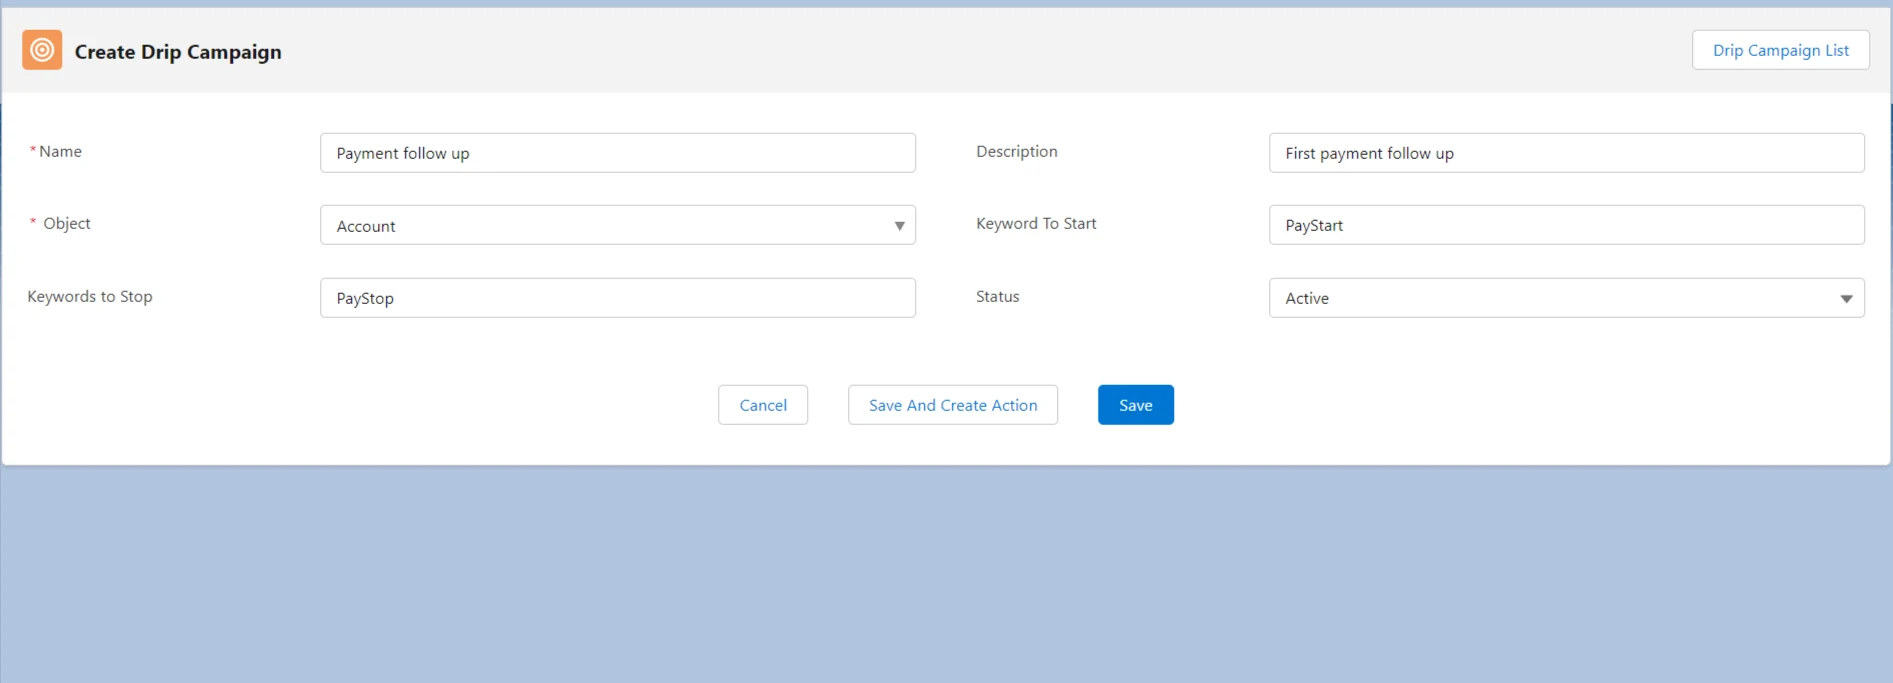
Fig Fill the details and save
The Save and Create Action button should open the page (as shown below) where the user can set up different actions for each SMS in a drip campaign.
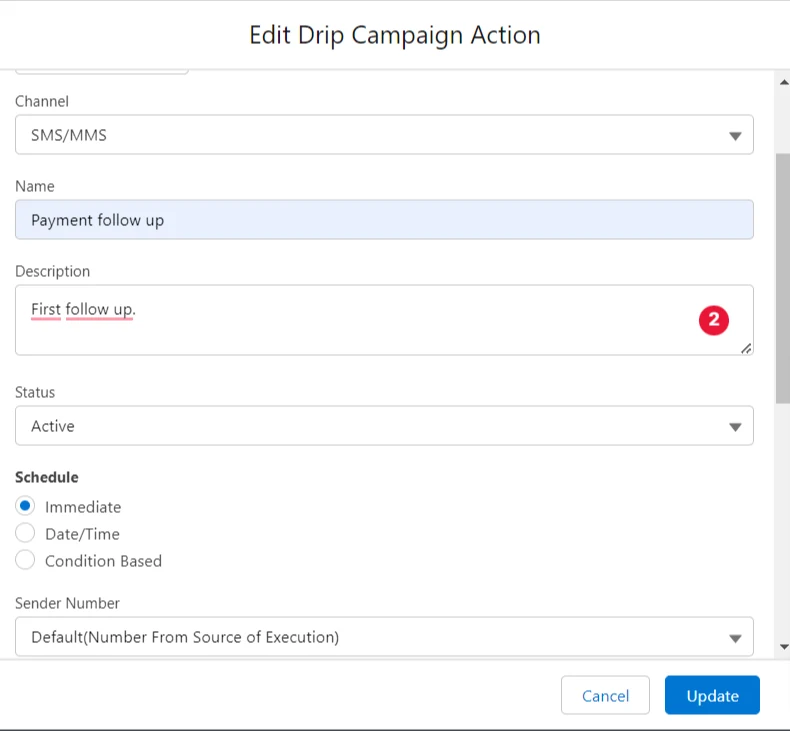
Fig Create Drip Campaign Action
Scheduling messages through different channels
Users can schedule messages in Drip Campaign in three ways:
IMMEDIATE
The ‘Immediate’ option allows users to immediately trigger an SMS Drip Campaign in the event of an incoming text with the desired keyword.
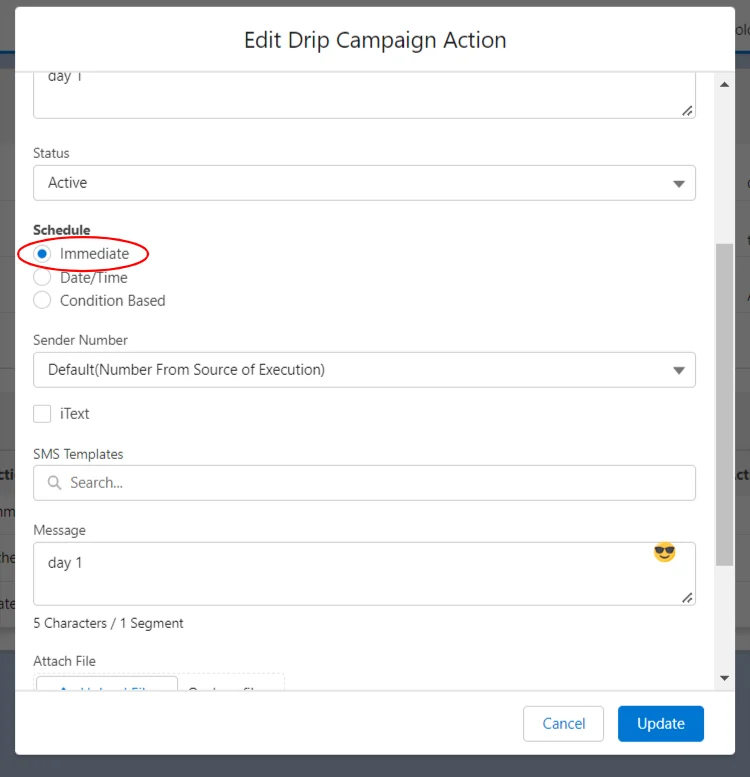
Fig 5: Immediate Campaign
SPECIFIC DATE AND TIME
The ‘Schedule Date Time’ field allows users to decide when to trigger an SMS Drip Campaign.
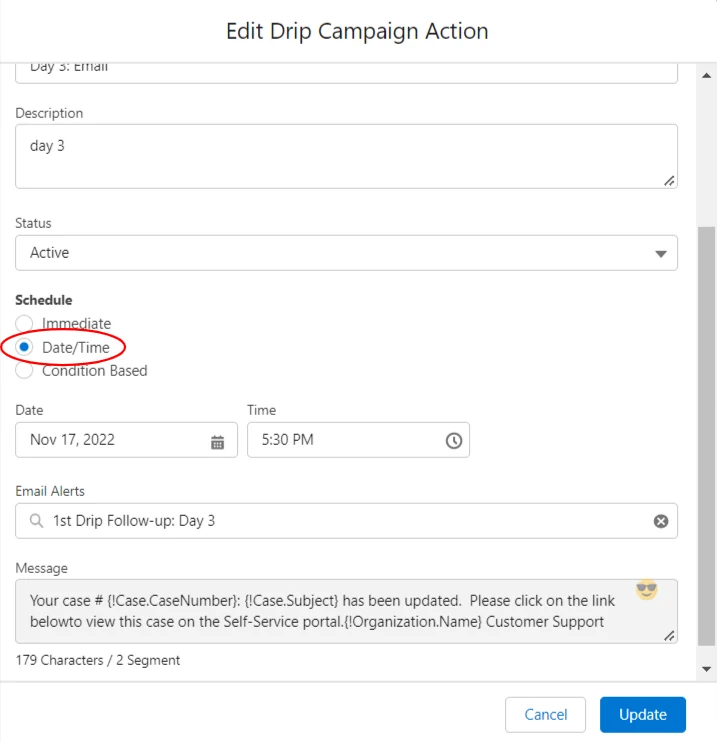
Fig 6: Date/Time based Campaign
CONDITION-BASED
Users can schedule messages using offset by days, hours, and minutes. If a user is scheduling using the offset field by the number of days, a user can decide the ‘Time’ to trigger a Drip Campaign. Also, users can specify BEFORE or AFTER how many days, hours, or minutes of a specific action; the SMS Drip Campaign should start.
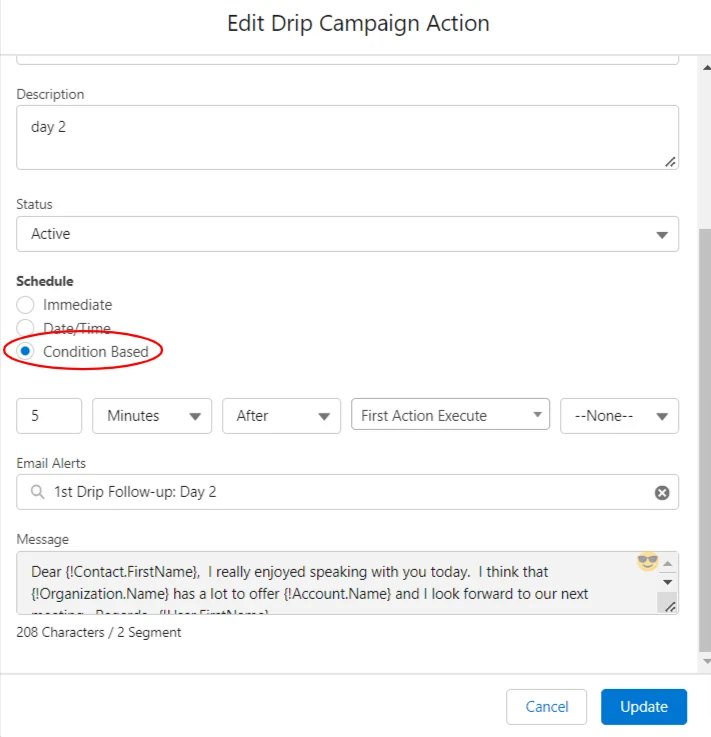
Fig 7: Condition based Campaign
This feature empowers users to schedule drip campaigns directly from the detail page, list view, and reports. It provides convenient and streamlined functionality for scheduling targeted and automated marketing campaigns, enhancing efficiency and effectiveness in managing customer communications.
Group Chat
Introduction
Group Chat allows you to send messages to multiple people through a single window. This feature is accessible within the Conversational View module.
This functionality works when you send text from any number from certain providers to US numbers. Previously, we only supported group chats with up to 5 members (5 recipients and 1 sender). Now, we have expanded our support to allow for up to 10 participants (To Number), in addition to the 1 sender member, to join a group chat.
Features
- Group chat participants receive notifications when new messages are sent to the group, ensuring that everyone stays updated on the conversation.
- Group chat administrators can assign roles and permissions to participants, controlling who has the ability to add or remove members, moderate messages, and perform other administrative tasks within the group.
Use Cases
- Enable employees to communicate and collaborate more effectively by creating group chats for project teams, departments, or cross-functional teams.
- Group chats can be created for different departments within an organization, such as sales, marketing, customer service, etc. This allows team members from the same department to communicate efficiently and stay aligned on departmental goals and initiatives.
Group Chat Enabled or not?
Below is the procedure by which we will see how to check whether your organization has a group Chat enabled or not.
To Create the Queue follow the below steps:
Go to SMS Setup- General Setting>> Scroll down to “Settings for Conversation View” section >> If “Enable Group Chat” option is disabled, contact a 360 SMS Support agent (support@360degreeapps.com) to activate it and provide a group chat-enabled number.

Fig Enable Group Chat
Requirements to create a group:
- Sender number – The number used to send the message to the customer.
- To numbers (participants) – Receiver/customer numbers.
Fig Fill In Information
Note – For now, the group chat functionality supports the SMS channel only.
Currently the following features are not supported: MMS, voice messages, and scheduling a message.
Enabling Group Chat on Desired Object
Group chat option is enabled for Leads and Contacts objects by default. To enable Group Chat on any other object, the user will have to create a lookup field to “Group Chat” object and “Group Chat Participant” object.
How to send messages in a Group?
Open the Conversation View >>In the “Send to” option, select the recipient numbers>>In the “Sender Number”, select Group chat-enabled number>> Click on “Send” Button and you will get a pop-up.
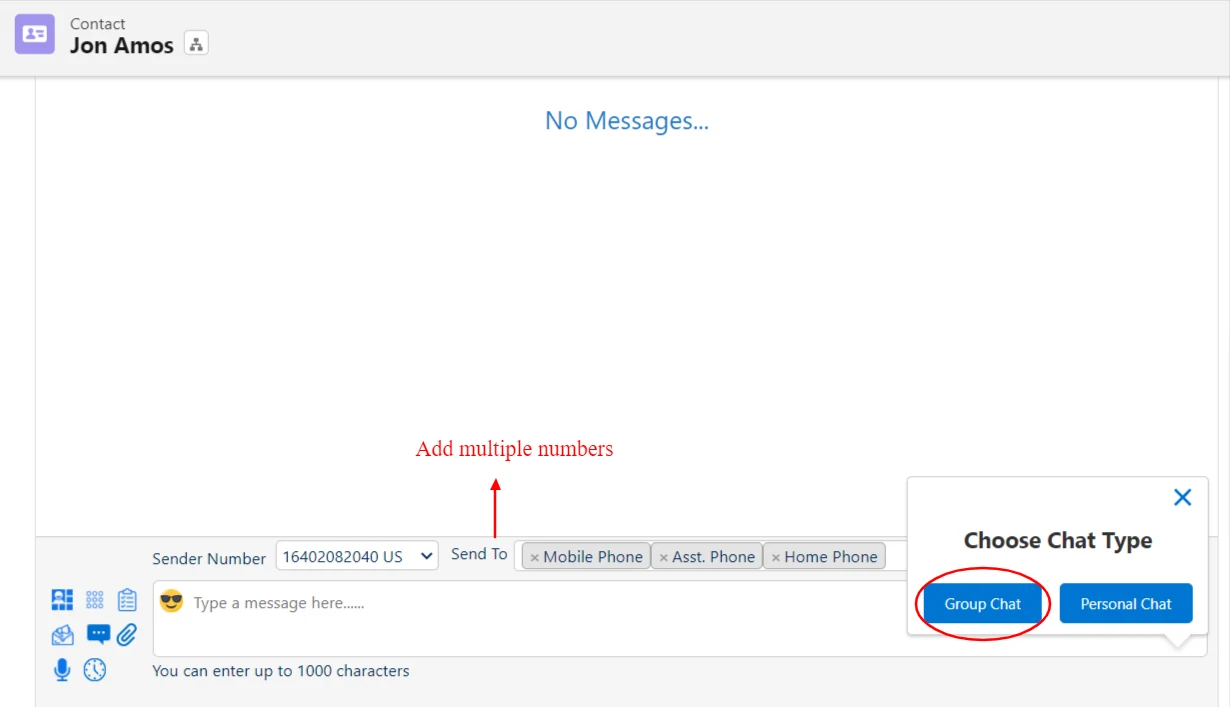
Fig Chat Type
The below option lets you decide whether you want to send the message individually to every number or in a group.
Fig Select “Chat Type”
Once the message is sent, this is how the Group looks like:
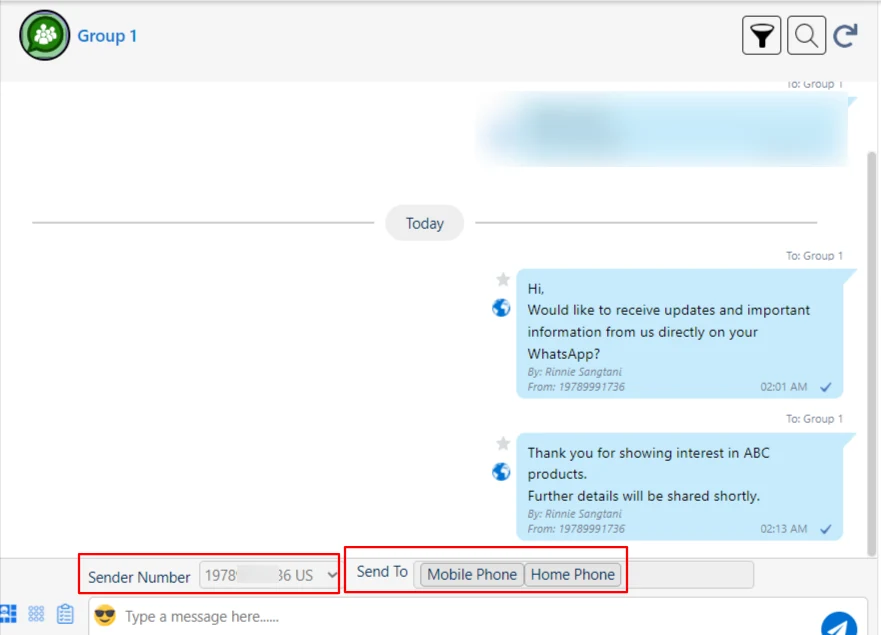
Fig Group
To view the Group details, click on the Group Name and you will be directed to the Group details page.
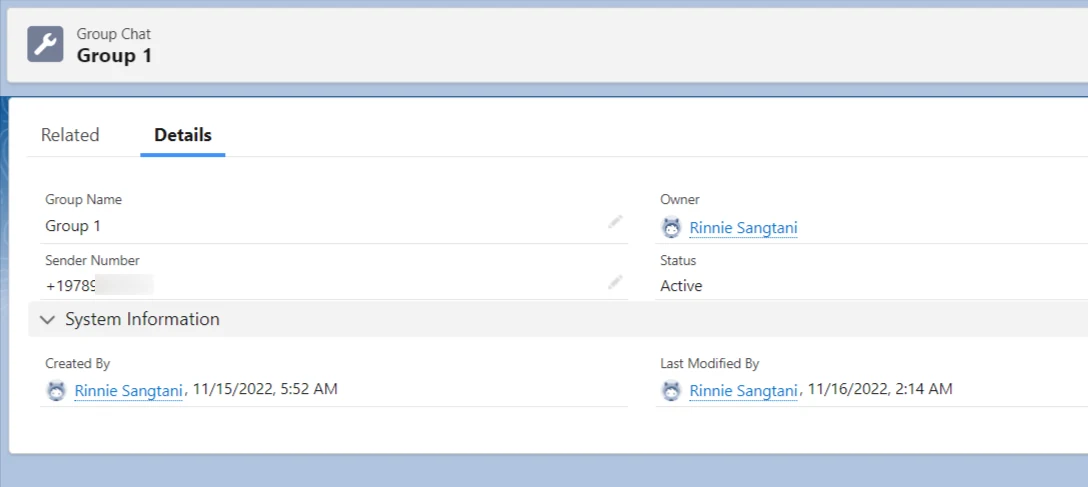
Fig Group Details
Activity Status
There are two activity statuses for Group Chat.
- Active: Indicates that all groups and the participants are active.
- Inactive:
- You can change the activity status of a group or a participant to “inactive”.
- Participant Status: If you set a participant activity status to “inactive” that means that participant is removed from the group, and you cannot revive this change.
- Group Status: If you set a group activity status to “inactive”, that means the group is deactivated, and you cannot revive this change.
Change Group Names
By default, group names are set as comma-separated field labels.
You can change the group name to the name you like.
- You will find Edit on the main screen of the group page, click it.
- The edit option will pop up.
- Change the name as per your convenience.
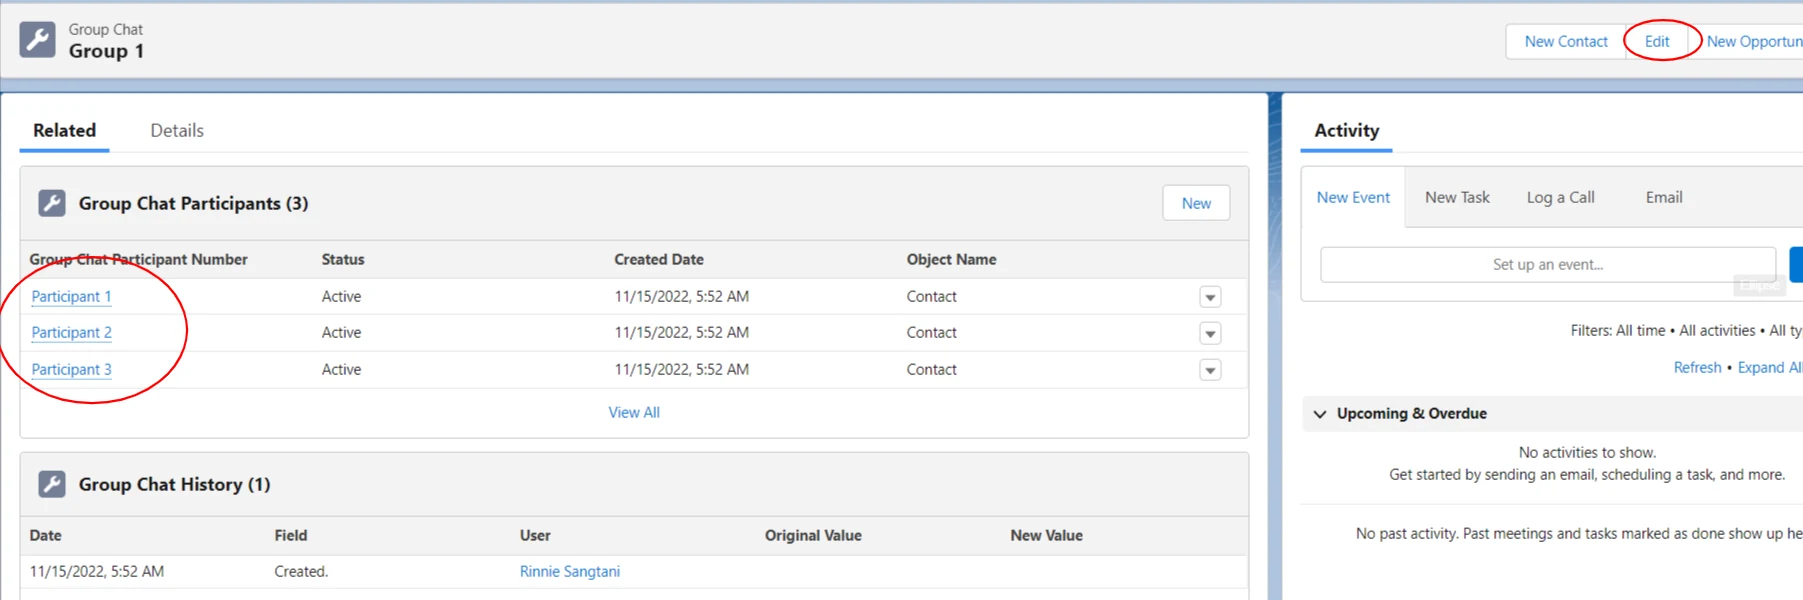
Fig Editing the Group information
Fig Edit button
Set “Default Message Sending Option”
To select a default chat type (group chat or personal chat): go to the General Settings and check Default Message Sending option. You can select whether the default send option should be group chat, personal chat, or always ask.
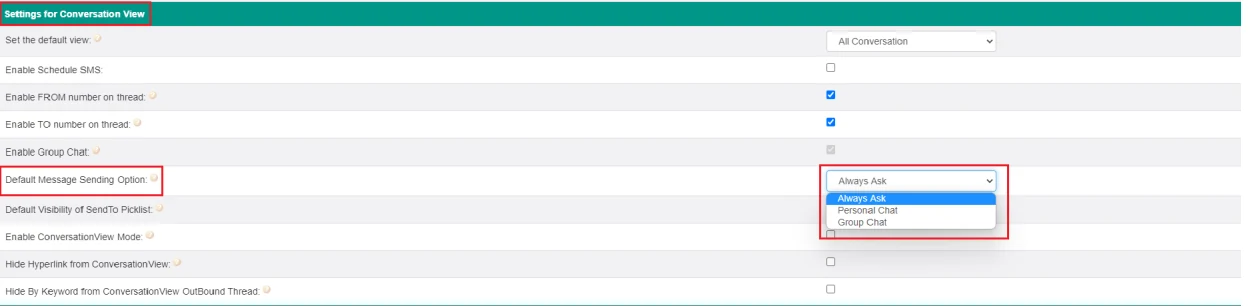
Fig Default Chat Setup
Group Chat Upgrades
- In addition to Lead and Contact, the system will also support all standard and custom objects.
- Group Chat is now compatible with the Compliance Mechanism.
- Group Chat functionality can now be accessed from the Conversation View with the phone API filter.
- The option to set Group status as inactive is now available. You can change the status from active to inactive, but once set as inactive, it cannot be changed to active.”
Contact Us
For more information or assistance, please contact 360 SMS experts at
Email: care@360smsapp.com
Phone number: +1 323 641 4417 (USA); +44 740 327 9473 (UK); +61 48885 3632 (AUS)
Website: https://360smsapp.com/