


.svg")

Release Notes
Search For:
Release Notes- 1.242 
No content found related to Release Notes- 1.242
New Feature:
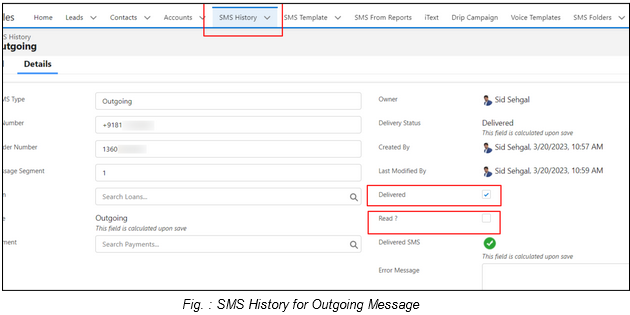
- Users can now check whether their outgoing WhatsApp message has been read or not in the Outgoing SMS History through the Status and Read fields.
- “Delivered” Checkbox field: When enabled, outgoing messages will display a 'delivered' sign (double tick) below the SMS. When disabled, users will not be able to see any delivery confirmation
- “Read” Checkbox field: When enabled, outgoing messages will display a'read' sign (with'read' written below the outgoing message). When disabled, the user will not be able to see any 'read' sign.
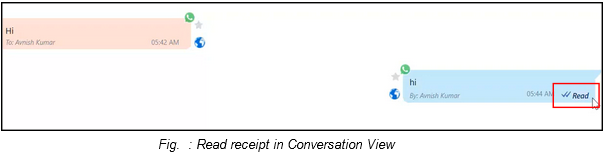
When you send a WhatsApp message, you will see a ‘Read’ below your message in the Conversation View after it is read.
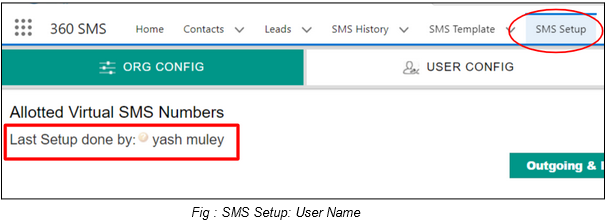
The first and last name of the user will be displayed beside “Generated By” or “Last Setup done by” on the SMS setup page.
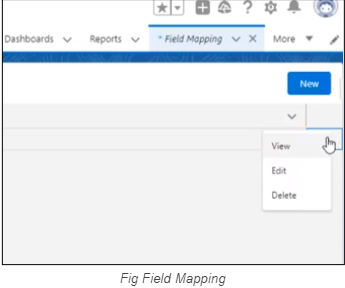
New features are added to field mapping when you create a new record. You can View, Edit and Delete a new record with the drop down (as shown in the image).
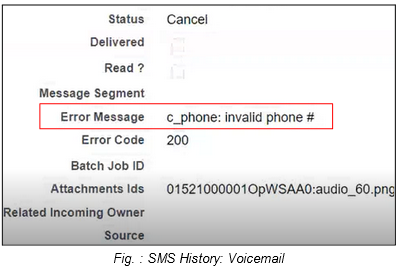
We now know whether a message has been delivered or not, and if not, what the reason for the failure is. An error message will be displayed in the voicemail history when a voicemail is not delivered to the receiving party.
SMS History -> Voicemail -> Error message
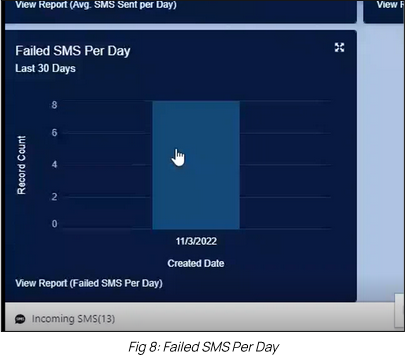
Under the SMS Analytics object, one more report is added named as “Failed SMS per Day”, which displays the number of undelivered SMS per day.
SMS History -> Voicemail -> Error message
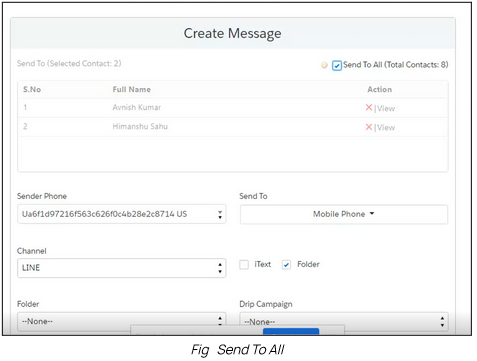
The new functionality allows users to select all records in the List View when sending bulk messages, thus bypassing the previous limitation of Salesforce, which restricted the selection to only 200 records at a time. This option can be checked true on the Create Message page from the Send SMS button on the List View. Once selected, it will select all the records in that List View, regardless of the user’s previous record selection.
Note: This feature works only if speed boosting is enabled in the user’s Salesforce organization.
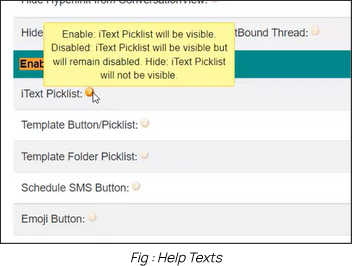
In the SMS setup page, under the section named as “Enable/Disable/Hide Interface Element”, help texts are added with all the fields that tell you about the field when you hover your cursor over it.
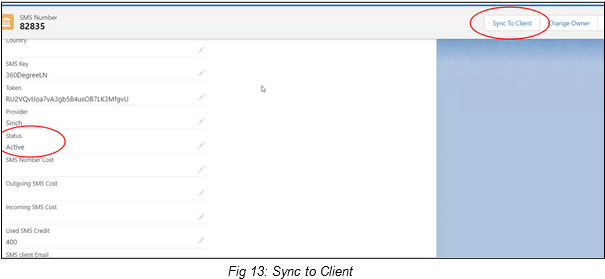
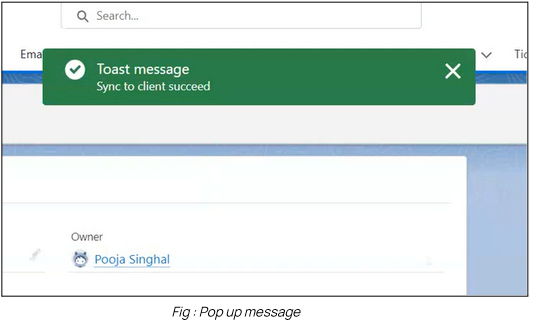
Sync the real-time value of the status. Once you change the status from inactive to active, click the “Sync to Client” button on the top right. It will show you that the record has been synced successfully.
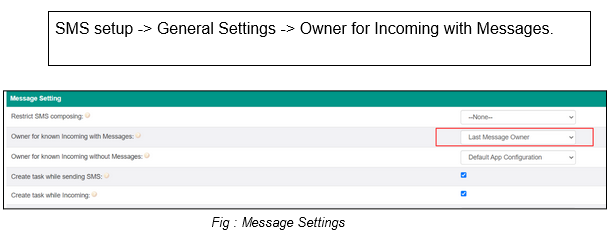
A new option called “Last Message Owner” has been added to this list. This means that you can now set the default as the “Last Message Owner”, and messages will be sent to the person who last sent you a message from the particular organization.
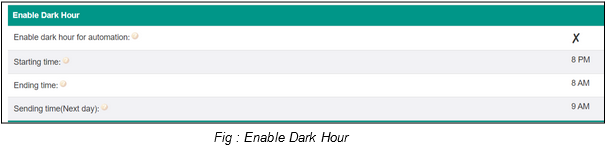
The Dark Hour works as "do not disturb" mode that can be enabled during certain hours of the day or night. When you enable the "dark hour," the app will typically stop sending you notifications during the specified time period. Instead, the messages will be stored in the app until the "dark hour" period ends, and then the notifications will resume. When enabled, the "Dark Hour" functionality will be active for the record. Its default value is set to true for system-generated records, and if created manually then the default value is set to false.
When a client creates a record for scheduling SMS and does not specify the channel, the default channel will be set as “SMS” if it’s a text message and “MMS” if they add any attachments.
MMS and link tracking are supported in the SpeedBoosting feature for SMS reports. With this feature, MMS and link tracking are supported, meaning that users can include multimedia content in their messages and track link clicks within them.S
Enhancements:
When you send several URL links in a message, a record for message URLs is created and stored in the SMS History's "Message URL" section.
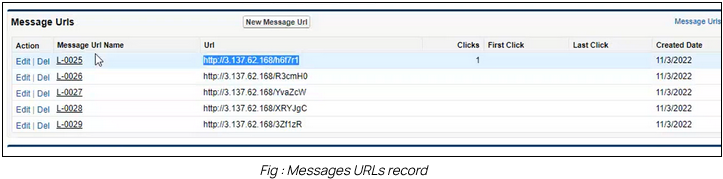
We can now track if the user clicks on those links, how many times they click them, and the timestamps. You can track 5 links at a time in a message.
In the past, Drip Campaigns, SpeedBoosting, and other similar marketing strategies did not fully support compliance mechanism features. However, now these strategies have been updated to include complete support for such features.
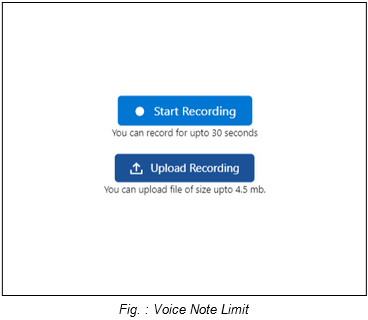
A limit will be shown below the recording button to display the supported limit. A recording limit as to how long your voice note can be is displayed below the recording button to make sure the user knows the time limit. Previously, the limit was not shown on the screen.
Recording Time Limit: 30 seconds
File Size Limit: 4.5 MB
Previously, "Link shortening using 360 domains" was a standalone field in the General Settings. However, it is now listed under the Link Tracking section within the General Settings
Dark hour features and direct field editing weren't supported by Drip Campaign before. The Drip Campaign for this release has undergone the following improvement:
- The UI has been improved which is now similar to Salesforce lightening UI.
- You can now navigate to the Drip Campaign Action page and directly view the field you have set for a specific field in the Field Set.
- You can also edit the field set as per your requirements.
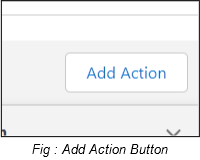
- “Add Row” is renamed "Add Action”.

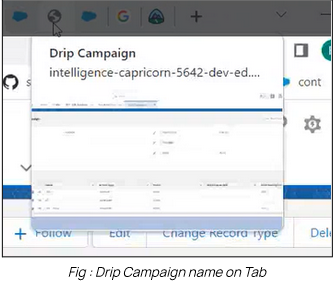
- Tab title on drip campaign tab: When you hover over the drip campaign tab you will now notice that it shows the drip campaign’s name.

- You can now also enable dark hour functionality for Drip Campaign.
If any number cannot be assigned due to a Salesforce issue, an error message will be displayed indicating that Salesforce is unavailable. one lead will be created and all other incomings will get synced to that.
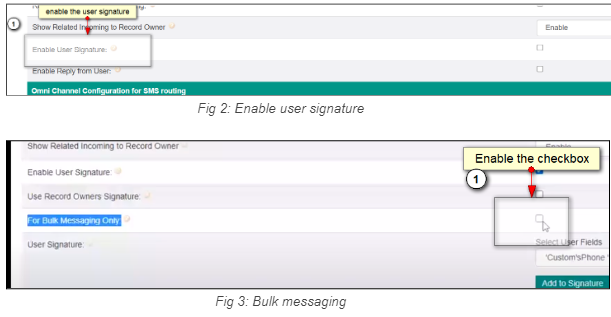
This functionality lets you enable user signatures (as shown in the image) to send signatures along with your messages in batches. This works for bulk messages only.
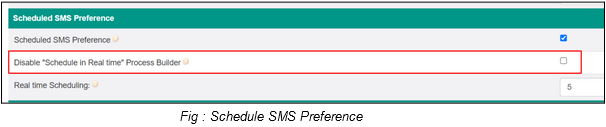
The scheduled time message is triggered in two ways, first by real-time process builder; second by job process builder. Previously, we had to go to the client’s org to change the client automation manually. Now we have introduced a new feature in General Settings, named as Disable “Schedule in Real Time” Process Builder. If this is enabled, all the messages will be sent from Job Mode.
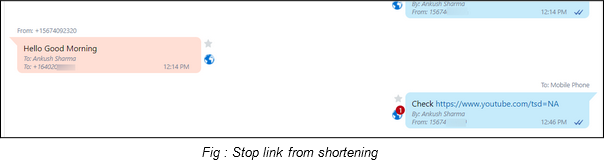
Users can customize whether they want a particular link to be shortened or not. You can stop a link from shortening by adding “tsd=NA” at the end of the link.
Example: CompanyName.com/tsd=NA
You can also do the same in custom settings.
Previously, there was a delay in the outbound replies for iText. It can be resolved by creating a custom setting (itextboosting) to boost speed in iText. The "ReplySMSRest" class should include a call to "itext boosting" before any operations are performed.
In the SMS App Owner section of the General Settings, initially, all the users with Salesforce licenses were displayed. To avoid long lists due to a large number of users, we have made a changes to only display the following users:
- Users with System Admin Profile
- Previous SMS App Owner
- Currently logged-in users with edit capability
Earlier, the number of records you could send data to through a report was set to 2000 at a time. Now, the limit has been increased to 50,000. 360 SMS supports scheduling messages to unlimited records from the SMS From Reports component with real-time data.
There are two cases for this:
Case 1: Less than or equal to 50,000 records
When the report’s records are less than or equal to 50,000 records, the following conditions need to be met:
- While creating your Salesforce Report, add the following:
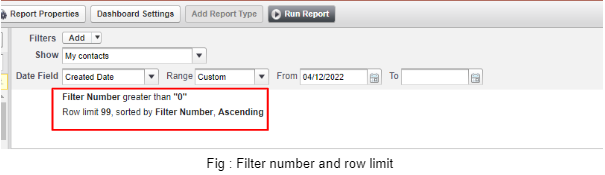
- Add a filter with the field ‘Filter Number’ > 0.
- Sort by Filter Number field, in ascending order
- Add the Record ID field and Filter Number field in the report. For instance, Lead ID if the report is on Leads.
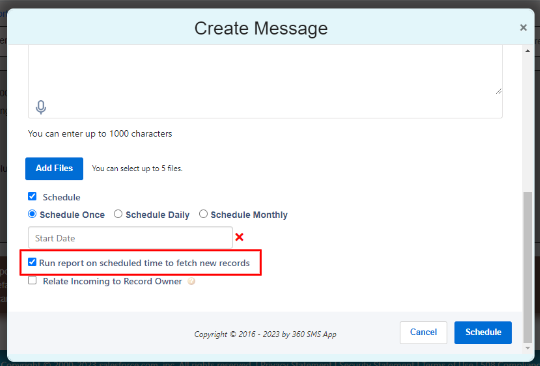
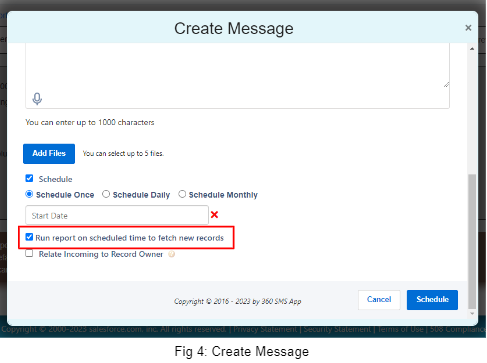
- When scheduling messages from the SMS from Reports, there is a checkbox named ‘Run report on scheduled time to fetch new records’.
- The checkbox is checked as True:
- When the report is executed at the scheduled time, it will automatically retrieve real-time data.
- For example, if there were 10,000 records in the report today, and at the scheduled time, which is tomorrow at 10 am, the total records increase to 14,000, then messages will be sent to those 14,000 updated records.
- The checkbox is checked as False:
- When the report is executed at the scheduled time, it will retrieve the records that were present in the report at the time of scheduling rather than real-time data.
- For example, if there were 10,000 records in the report today and at the scheduled time, which is tomorrow at 10 am, the total records are 14,000, then messages will be sent to those 10,000 records that were present at the time of scheduling.
Note: When you are scheduling a message and have checked the check box, you need to ensure that the number of records does not cross 50,000.
- The checkbox is checked as True:
Case 2: More than 50,000 records
When the report’s records are more than 50,000 records, the following are the conditions that need to be met:
- While creating your Salesforce Report, add the following:
- Add a filter with the field ‘Filter Number’ > 0.
- Row limit is set to 99.
- Sort by Filter Number field, in ascending order
- Add the Record ID field and Filter Number field in the report. For instance, Lead ID if the report is on Leads.
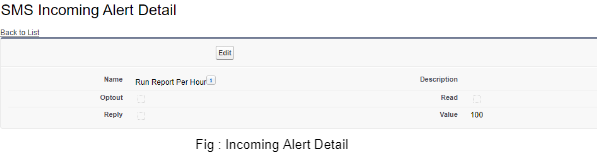
- Create a custom setting for ‘SMS_Incoming_Alert__c’ to control the chunk size with the below details.
Name:- Run Report Per Hour
Value:- chunk size (number of times a report can be run in an hour)
Total records fetched in an hour: 99*Value
For instance, Value = 200, so the total records fetched is 99*200 and messages will be sent to these records in that hour. Once this is done, the report is scheduled to fetch the next batch of records in the next hour.
The default value for ‘Value’ by 360 SMS is 200. However, the user can choose whatever they want. The maximum value for this field is 500 from Salesforce itself.
For both of the above cases:
When scheduling messages from the SMS from Reports, there is a checkbox named ‘Run report on scheduled time to fetch new records.’
- The checkbox is checked as True:
- When the report is executed at the scheduled time, it will automatically retrieve real-time data.
- For example, if there were 10,000 records in the report today, and at the scheduled time, which is tomorrow at 10 am, the total records increase to 14,000, then messages will be sent to those 14,000 updated records.
- The checkbox is checked as False:
- When the report is executed at the scheduled time, it will retrieve the records that were present in the report at the time of scheduling rather than real-time data.
- For example, if there were 10,000 records in the report today and at the scheduled time, which is tomorrow at 10 am, the total records are 14,000, then messages will be sent to those 10,000 records that were present at the time of scheduling.
In the case of drip through the record owner's email, the Email feature has been enabled. To activate this feature, a custom setting named "EmailSenderAsRecordOwner" should be created in the SMSIncomingAlert record, and the OptOut checkbox field should be enabled.
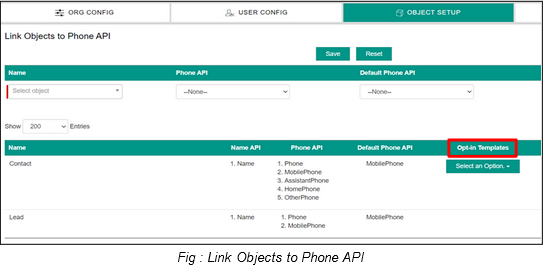
The Opt-in template in the object setup is now sorted by “Last Modified Date”. However, we were facing an issue where if there were more than 1000 templates, the system would crash. As a temporary fix, we have implemented a limit of 999 templates to prevent the page from breaking. Additionally, if there are any issues, we can edit old templates to bring them into the list.
Previously, you could only search Names in the SMS Composer, which is located in the utility bar. Now, the Case object may also be found using the SMS Composer's search feature.
Minor Bug Fixes:
Bug fixes and performance improvements.
Release Notes- 1.246
No content found related to Release Notes- 1.246
New Feature:
Previously, if a number wasn't assigned to a user, you couldn’t send messages. But now we have introduced a feature called Auto Assign Numbers, which is by default enabled. Whenever a record is updated, it will automatically assign the number to the user.
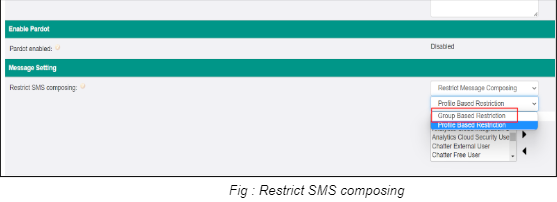
Earlier, the restriction on SMS Composition was only based on profiles. However, now we also have the option of restricting based on groups. In the Message Settings section of General Settings, you can edit your preferences for restricting SMS Composing.
Previously, Unicode character records were manually created in our organization. However, we have now introduced a new record type in the production org. The record type is a unique code character on the general setup object, where both Name and CC address are used. The CC address will be treated as a replacement for the name that needs to be replaced.
Signature text will now be selected or parsed based on the record owner's signature instead of the current user's.
Limitations:
- This functionality is dependent on the Org-Wide Signature General Setting. The Org-Wide General Setting must be enabled to use this functionality.
- This functionality will not work in the cases of Speed Boosting and Cross Object Automation.
Enhancements:
In the past, there was a delay in sending outbound replies through iText. This issue can be resolved by adjusting a custom setting named "itextboosting," which is designed to optimize the speed of iText operations. The "ReplySMSRest" class should initiate an "iText boosting" call prior to executing any DML (Data Manipulation Language) operations.
The 'Restrict Composing' feature is now also operational on the SMS Composing Utility. When this feature is enabled, only specific numbers that have been approved or added to a list of approved numbers can send messages to the restricted number.
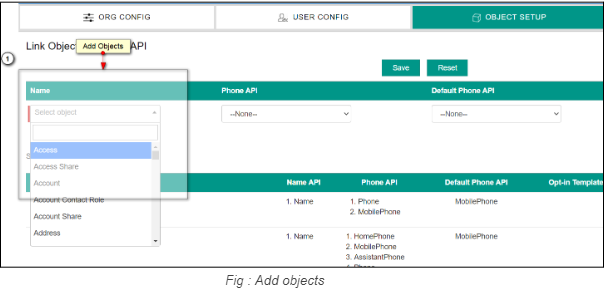
Previously, SMS templates would not work if the selected object in the template had more than 1,000 fields. We have added a new feature to the SMS templates. We only displayed a few standard objects in the SMS template, and there was no way to add any additional standard objects to the SMS template object picklist. However, this issue has now been resolved. To add a new object to the picklist, we simply need to add that object to the Object Setup page.
In the SMS App Owner section of the General Settings, initially all the users with Salesforce licenses were displayed. To avoid long lists due to the large number of users, we have made a change to only display the following users:
- Users with System Admin Profile
- Previous SMS App Owner
- Currently, logged-in users have edit capability.
Earlier, the number of records you could send data to through a report was set to 2000 at a time. Now, the limit has been increased to 50,000. 360 SMS supports scheduling messages to unlimited records from the SMS From Reports component with real-time data.
There are two cases for this:
Case 1: Less than or equal to 50,000 records
When the report’s records are less than or equal to 50,000 records, the following conditions need to be met:
- While creating your Salesforce Report, add the following - Add a filter with the field ‘Filter Number’ > 0.
- When scheduling messages from the SMS from Reports, there is a checkbox named ‘Run report on scheduled time to fetch new records’.

- The checkbox is checked as True:
- When the report is executed at the scheduled time, it will automatically retrieve real-time data.
- For example, if there were 10,000 records in the report today, and at the scheduled time, which is tomorrow at 10 am, the total records increase to 14,000, then messages will be sent to those 14,000 updated records.
- The checkbox is checked as False:
- When the report is executed at the scheduled time, it will retrieve the records that were present in the report at the time of scheduling, rather than real-time data.
- For example, if there were 10,000 records in the report today and at the scheduled time, which is tomorrow at 10 am, the total records are 14,000, then messages will be sent to those 10,000 records that were present at the time of scheduling.
- Sort by Filter Number field, in ascending order
- Add the Record ID field and Filter Number field in the report. For instance, Lead ID if the report is on Leads.
Note: When you are scheduling a message and have checked the check box, you need to ensure that the number of records does not cross 50,000.
Case 2: More than 50,000 records
When the report’s records are more than 50,000, the following are the conditions that need to be met:
- While creating your Salesforce Report, add the following: - Add a filter with the field ‘Filter Number’ > 0.
- Create a custom setting for ‘SMS_Incoming_Alert__c’ to control the chunk size with the below details.
Name:- Run Report Per Hour
Value:- chunk size (number of times a report can be run in an hour)
Total records fetched in an hour: 99*Value
For instance, Value = 200, so the total records fetched is 99*200 and messages will be sent to these records in that hour. Once this is done, the report is scheduled to fetch the next batch of records in the next hour.
The default value for ‘Value’ by 360 SMS is 200. However, the user can choose whatever they want. The maximum value for this field is 500 from Salesforce itself.
For both of the above cases:
When scheduling messages from the SMS from Reports, there is a checkbox named ‘Run report on scheduled time to fetch new records'.

- The checkbox is checked as True:
- When the report is executed at the scheduled time, it will automatically retrieve real-time data.
- For example, if there were 10,000 records in the report today, and at the scheduled time, which is tomorrow at 10 am, the total records increase to 14,000, then messages will be sent to those 14,000 updated records.
- The checkbox is checked as True:
- The checkbox is checked as False:
- When the report is executed at the scheduled time, it will retrieve the records that were present in the report at the time of scheduling, rather than real-time data.
- For example, if there were 10,000 records in the report today and at the scheduled time, which is tomorrow at 10 am, the total records are 14,000, then messages will be sent to those 10,000 records that were present at the time of scheduling.
- The row limit is set to 99.
- Sort by Filter Number field in ascending order
- Add the Record ID field and Filter Number field in the report. For instance, Lead ID if the report is on leads
The Opt-in template in the object setup is now sorted by “Last Modified Date”. However, we were facing an issue where if there were more than 1000 templates, the system would crash.
As a temporary fix, we have implemented a limit of 999 templates to prevent the page from breaking. Additionally, if there are any issues, we can edit old templates to bring them into the list.
Previously, you could only search names in the SMS composer, which is located in the utility bar. Now, the Case object may also be found using the SMS Composer's search feature.
Minor Bug Fixes:
Bug fixes and performance improvements.
Release Notes- 1.251
No content found related to Release Notes- 1.251
Enhancements:
While scheduling a message, if the time period is too short (2 to 5 minutes), the message will be sent immediately. This feature is usually for automated messages.
The drop-down options in various locations (such as SMS Templates, Drip Campaigns, General Settings, etc.) can be customized, and the number of items can be manually set by the user. The standard items are already displayed in the drop-down.
Earlier, the number of records you could send data to through a report was set to 2000 at a time. Now, the limit has been increased to 50,000. 360 SMS supports scheduling messages to unlimited records from the SMS From Reports component with real-time data.
There are two cases:
- If the report contains 50,000 records:
- The report will run synchronously in batch execution. When the batch of reports is generated, each report will be executed one after the other in the same process, without any parallel processing.
- The report will be generated in chunks of 2,000 rows at a time. The maximum number of reports that will be generated in a batch is 25, meaning that the total number of rows being processed will be 2,000 * 25 = 50,000. The report will be generated for each set of 2,000 rows, and after retrieving the 2,000 IDs, SMS messages will be sent in parallel, meaning that multiple messages will be sent at the same time.
- If the report contains more than 50,000 reports:
- In this case, we will run the report, collect the IDs, and send the SMS messages in parallel.
- If the booster is not enabled, the report chunk size will be set at 30 or 25, depending on the current functionality.
- If the speed booster is enabled, the report chunk size will be set to 100.
- If there is a limit reached for the number of reports that can be executed per hour, the batch will stop, and a new batch will be scheduled for execution after one hour for the remaining records.
Currently, different clients use different number formats, which are utilized in both the SMS and CTI systems.
In the case of WhatsApp, the provider gives us the profile name of the sender's account. We can use this profile name as the name mapping for new leads in incoming WhatsApp messages.
WhatsApp providers will give us the profile name saved in the SMS history. For lead conversion field mapping, we will map the field in the SMS history to the lead for the new lead name mapping, and so on in the conversion process.
Field mapping setup for creating new records.
Linked to the WA profile name, the admin can change the default lead name for unknown incoming messages.
Need to enable from General settings.
In the Sign option in General settings, a sign is automatically added to every outgoing message, which is the sign of the user who is sending the message (not the record owner [RO]). Through this setting, the sign can be changed to the record owner.
For example, if the marketing team is sending SMS, but the SMS is being sent from the RO because the field is checked, there can be one setting for one user, either to use the "sending user" sign or the RO sign as an organization-wide setup.
This setting can be changed for each user, and the user can change it through "My SMS setup" for a user-wise setup.
"Stop Autoplay" refers to disabling the automatic playback feature for the "voicedrop template selection." By stopping the autoplay feature, the voicedrop template will not play automatically and will only play when the user initiates it manually.
Previously, the last incoming message was marked as read only when an outgoing message was sent from the conversation view or the utility bar.
Now, incoming messages will be marked as read for all outgoing messages sent from anywhere (conversation view, utility bar, automation, etc.).
Whenever an outgoing message is sent, if there is an incoming message, it will be marked as "Read." This functionality is enabled through the General Settings. It will only work if it is set to true.
Currently, it is on the SMS Template used for filtering templates.
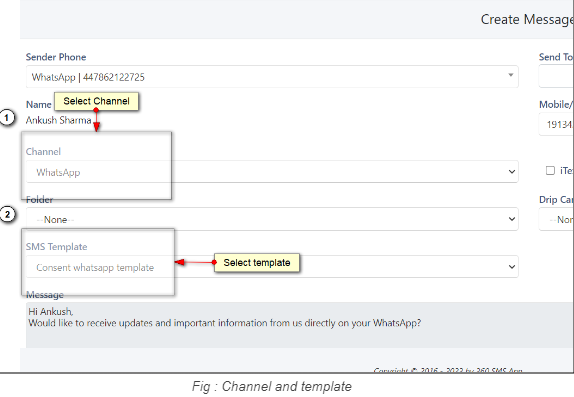
Once a channel is assigned, the template can only be used for that channel. There is a multi-channel picklist and the "Channel All" option.
Use case: This is used for WhatsApp-approved templates.
Outgoing messages will not be sent if the recipient number is on a blacklist. This is a security measure to ensure that restricted or unwanted numbers cannot receive messages from the app.
The sign is currently appended to all outgoing messages in the General Settings. Now, the sign can only be added to bulk messaging and not to one-to-one messaging.
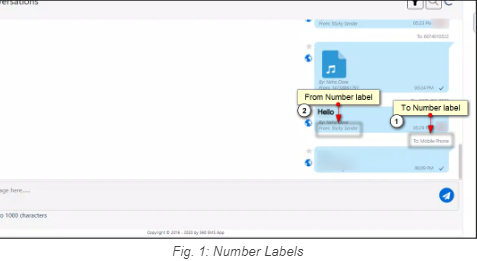
In the conversation view, the thread displays the "to" and "from" numbers. Currently, the numbers are displayed without a label.
For the "to" number, we will provide an option to display the label, such as "Mobile," "Phone," "Home Phone," etc.
For the "from" number, the label set in the org setup will be displayed.
In the conversation view, we have now added the scheduling option. This was previously only available in the "Send SMS" button. It is now live.
Whenever a new lead is created, the "SMS Last Sender Number" field will be prefilled. This can be done with a field mapping task. The field will only be updated once, when the lead is first created. Currently, the user has to manually update this field, but with this change, the first default value will be automatically set when the lead is created.
Minor Bug Fixes:
Bug fixes and performance improvements.
Release Note: 1.253
No content found related to Release Notes- 1.253
New Feature:
Previously, if a number wasn’t assigned to a user, you couldn’t send messages. But now we have introduced a feature called Auto Assign Numbers, which is by default enabled. Whenever a record is updated, it will automatically assign the number to the user.
You can add keywords to the Restricted Keywords section under General Settings in the SMS Setup. These words will be restricted from being sent to the customer.
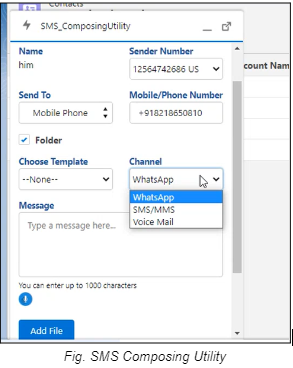
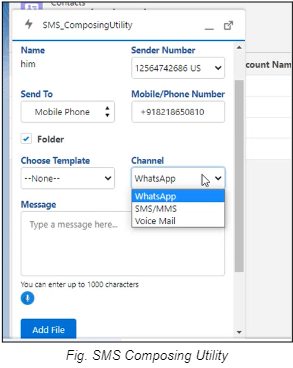
We have introduced three new channels with the SMS Composing Module, i.e., WhatsApp, SMS, and VoiceMail.
New features are added to field mapping when you create a new record. You can View, Edit and Delete a new record with the drop down (as shown in the image).
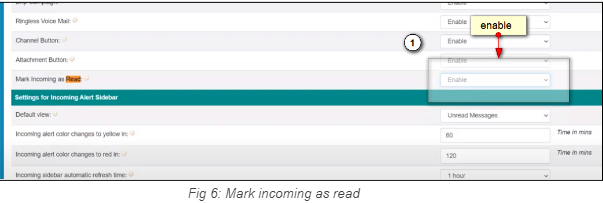
This new functionality will mark your incoming messages as read after you send an outgoing message to the same message. To enable this functionality, enable "Mark Incoming as Read" in the General Settings.
Enhancements:
When a customer clicks on the incoming/outgoing button, we fetch the partner and customer community license.
The "from" address will also be shown when we send emails through a drip campaign.
In the VTP History, verified phone numbers can be changed and re-verified, and the details can be seen on the details page.
You can now see the "WhatsApp profile name" field on the SMS History page.
You can now create different templates for different channels. Select your desired channel on the "Create SMS" page and choose the template.
This functionality lets you enable user signatures (as shown in the image) to send signatures along with your messages in batches. This works for bulk messages only.
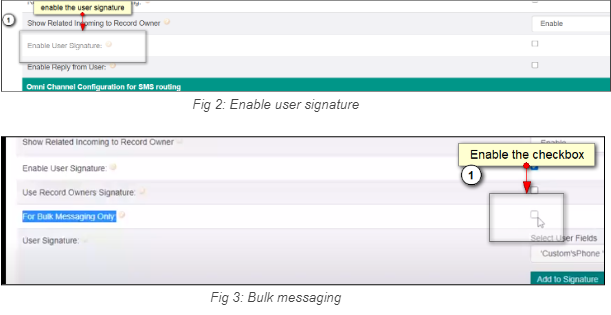
Previously, only the user signature was displayed, but now you have the option to enable the functionality to send the record owner's signature. This functionality won't work in the case of speed boosting and cross-automation.
Previously, we displayed various objects on the object setup page that clients would likely not use. Now, the number of standard objects has been reduced.
While scheduling a message, the message will be sent immediately if the time period is too short (2 to 5 minutes). This feature is usually for automated messages.
Earlier in the conversation view, we could see only numbers in place of ‘To number’, now we can see the API of the number. For example, if it’s a mobile number, ‘the'mobile number’ label will be displayed; if it’s a landline, home phone, or any other number, then that label will be displayed.
Previously, we created custom settings in the client’s organization, where we supported only five formats of numbers. Now, more than five formats are supported.
If two contacts have the same number, one of them is removed and marked as duplicated so that the same number won’t receive a message twice.
If you have blacklisted any number, you cannot send messages or voice notes to that number. If you try to send a message to a blacklisted number, an error will be shown.
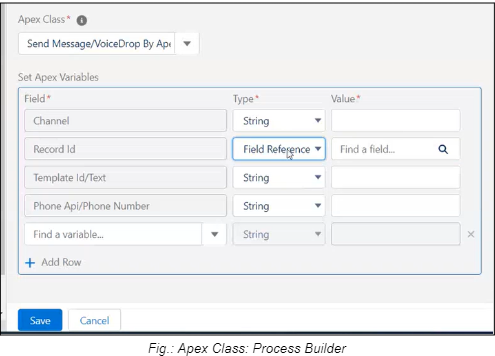
When you select Send Message in Apex Class through Process Builder, you need to fill in the following information, as shown in the image below.
Minor Bug Fixes:
Bug fixes and performance improvements.
Release Notes- 1.254
No content found related to Release Notes- 1.254
New Feature:
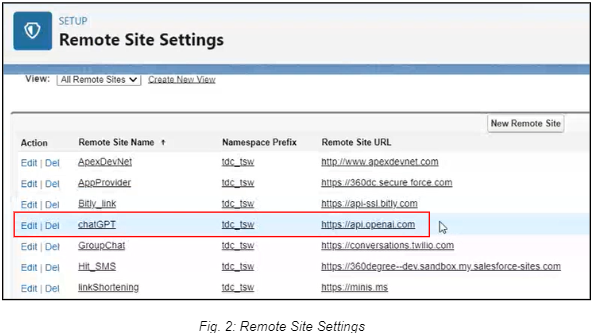
To start with ChatGPT, a manual remote site setting needs to be created with URL
- The CSM team will provide the user with a ChatGPT number.
- You can assign multiple ChatGPT numbers to a single 360 SMS organization.
- To link ChatGPT with 360 SMS, you need to create an account in ChatGPT and generate an API key through it.
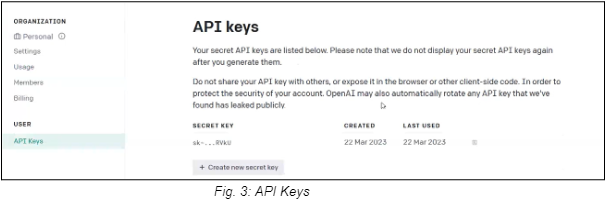
There are a few free trial credits already provided by ChatGPT, after which it becomes a paid feature.
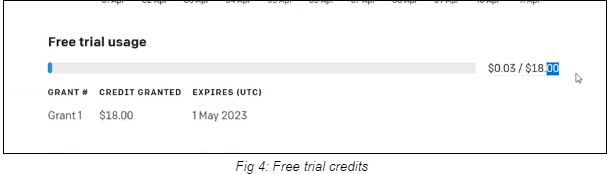
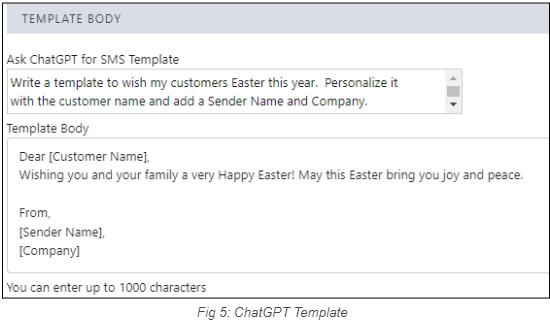
You can enter your required questions or suggestions in the ChatGPT Question box on the Create SMS page, and it will generate a prepared template that can be sent to your clients and customers.
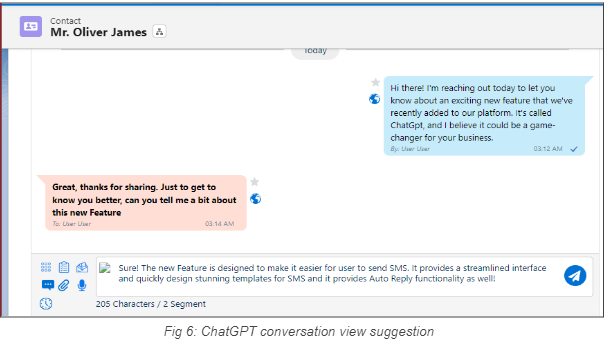
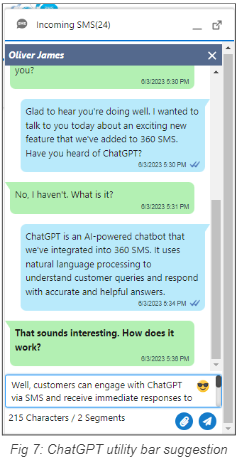
- ChatGPT also suggests a reply based on ten recent messages in the 360 SMS’ "Conversation view" and "Incoming SMS Utility bar."
There are a few free trial credits already provided by ChatGPT, after which it becomes a paid feature.
Minor Bug Fixes:
Bug fixes and performance improvements.
Release Notes- 1.259
No content found related to Release Notes- 1.259
New Feature:
Frequent Messaging feature prevents users from sending the same message to the same number and channel within a set time interval. This functionality helps prevent accidental spamming. For instance, it is useful when an automation at the backend goes wrong and spams the client with the same messages without the Admin being aware of it.
This feature allows you to enable or disable Frequent Messaging in the SMS Setup: General Settings. Once enabled, you can set the time interval for Frequent Messaging.

Fig: Frequent messaging and time
If this feature is enabled, and the same message is sent to the same number and channel within the specified time interval, an error message will appear on the screen, saying “Please select a different message” for a single transaction.
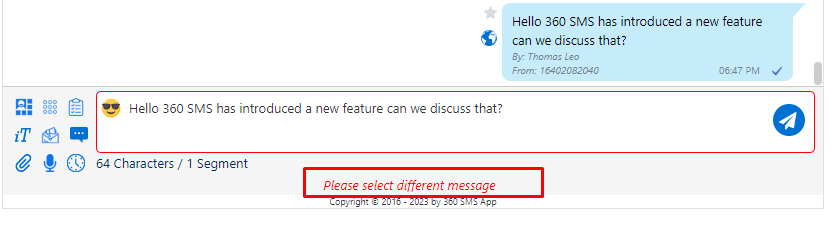
Fig: Error Message in Conversation View
For Bulk Messaging, no error message is shown, but an SMS history is created with an error code (360035) and message (Duplicate Transcation).
Note that while the error message will be shown in the Conversation View, it will not be shown in bulk messaging.
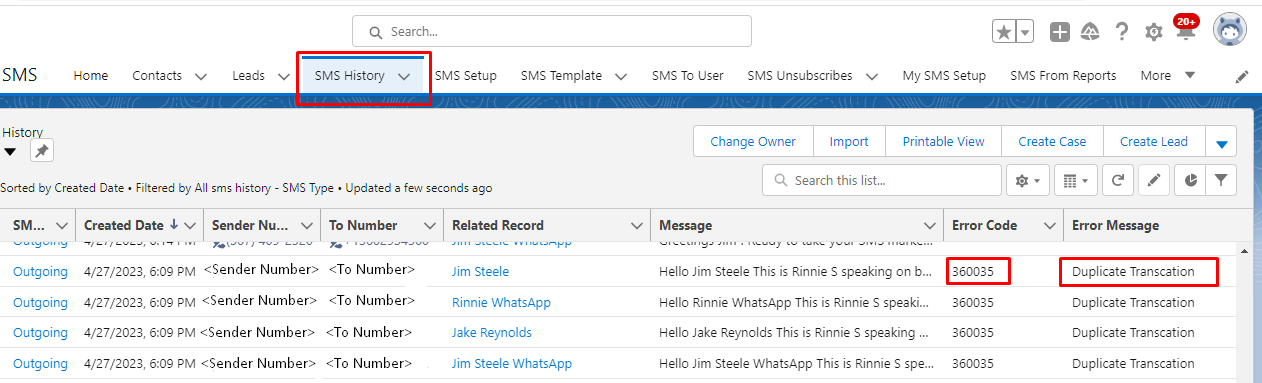
Fig: SMS History record having error code and Error message
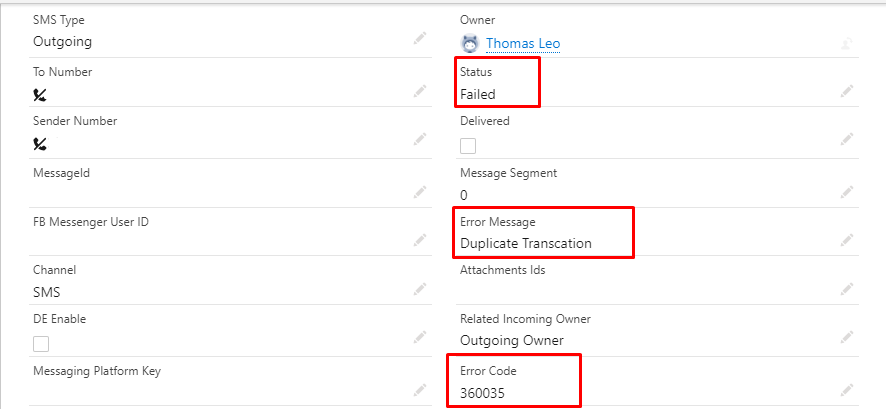
Fig: Error message and Error Code under SMS history
Now we have the ability to select multiple templates for bulk messaging in List View, SMS From Reports, and Campaigns. You can select multiple templates and when we send the message, it will be sent alternately using the selected templates. It will also reduce the chances of being marked as spam for that number.
For example- let's say you need to send bulk messages to 10 Contacts, and you send 3 templates via bulk message. It will send the templates 1, 2, and 3 in a sequential manner to the initial 3 Contacts, and then in the 4th contact, it will send template 1 again, and then the cycle continues sequentially for the rest of the Contacts.
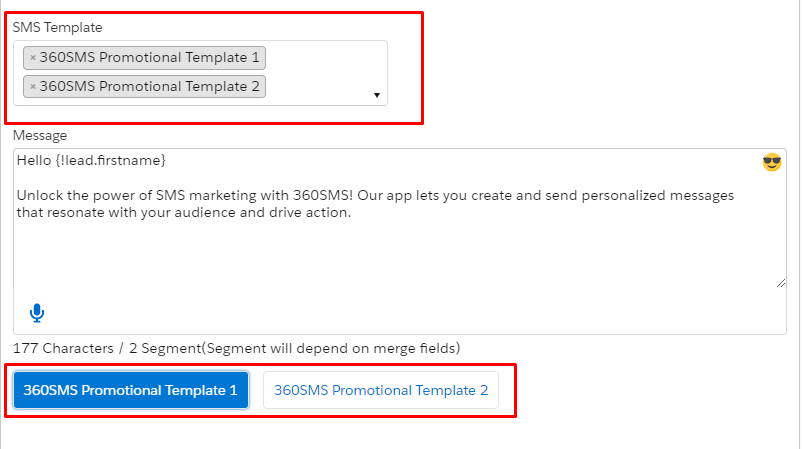 Fig: Multiple template selection
 Fig: SMS history of sending templates in bulk message
In SMS Setup: General Settings, there is now an option called 'Enable Channel Restriction for User Setup.' When this is enabled and you assign a number in the SMS Setup: User Config page, you can choose which channels the user can access using the 'Allowed Channels' field.
Only channels supported by the selected number will be displayed (as shown in the figure). If you choose only some channels, the user won't be able to use unselected channels and send cross-channel messages. The user will only see selected channels as active channels in the Conversation View: Channel list. Unselected channels will be visible as inactive and cannot be used. You can do this while assigning a new number or edit the existing number settings.
 Fig: Enable channel restriction for user setup option in general setup
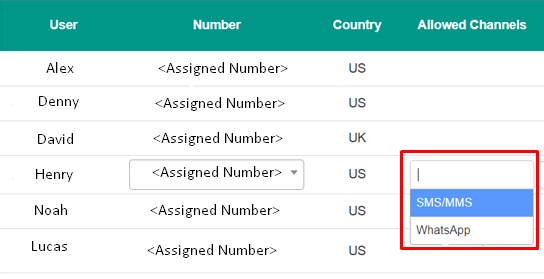 Fig: Assigned channels to user
We have introduced the LINE Channel with another provider. Previously, we offered this channel with another provider,, but it lacked support for attachments. With as our current provider, we can now support attachments up to 10 MB. As a result, we have added the LINE channel to our current provider.
It is important to note that this feature is only supported for one-on-one messaging and is not available for bulk messaging.
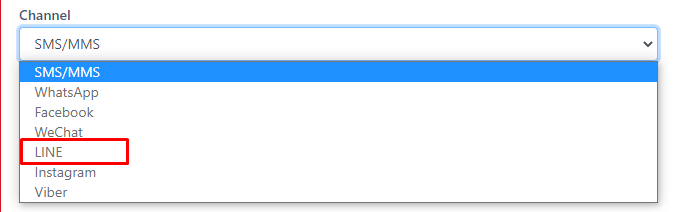 Fig: LINE channel
We are now supporting an additional channel in drip called 'Invoke a Drip'. This channel allows users to invoke another drip by selecting it from the Drip Campaign: Channel field, which displays a list of associated drips for the respective object.
For example, if we have a Drip Campaign set up for the Contact object and we want to execute another drip campaign for the same object, this functionality allows us to do so.
Note: Previously, we recommended that users add only 20 actions per drip, but now users can add as many drip actions as they desire without any limitations.
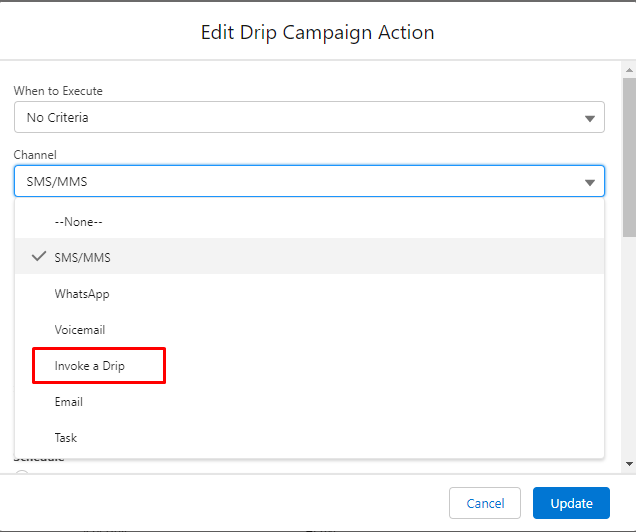 Fig: 10 Invoke a drip channel in channel list
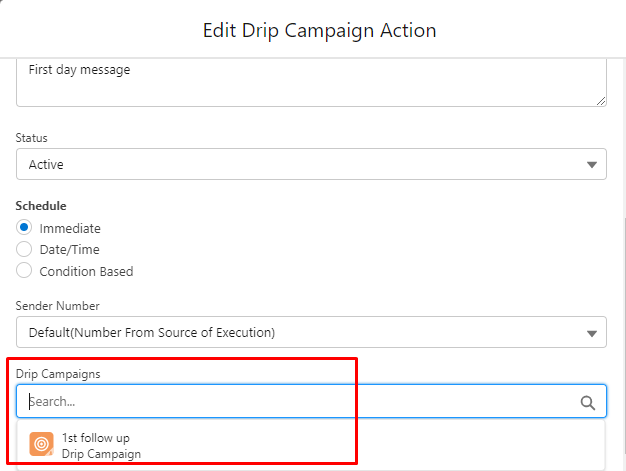 Fig: 11 Drip campaigns field
Previously, iText was not supported in the conversation view, but now it is supported (as shown in the figure):
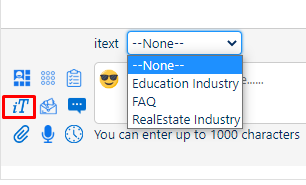
Fig: iText Icon
Buttons in quick replies in SF. We supported it before too. Template created at provider end. We made only content in our SF. So if button in provider template, it wasnt there in our sf. So for the client end, quick reply was visible, but SF user didnt see it. For meta too, the client has to create
Can give quickly reply with an approved template. Usually approved. But it can be used for normal WhatsApp messages as well as session messages.
A quick reply is clicked by the user, and it comes as an incoming message.
When a template is approved for a button, it will appear as a button on the WhatsApp receiver's end. Previously, these buttons were not displayed on the conversation view SMS thread. However, we have now added two options: quick replies and Call to Action.
If the respective template body is approved for Quick Replies, then when you send the template, the SMS will include the Quick Replies button, which the user can create on the respective template. You can add up to three buttons in a Quick Reply. For Call to Action, you can add up to two buttons. This functionality will also work for iText.
In Templates: To create a new SMS template, you should first click on the SMS Template Object and then click on the 'New' button
Initially, the notifications were sent through Salesforce Chatter. Now the app uses push notifications for Salesforce mobile app.
After clicking on 'New', you will enter the 'New Template' window, where you will need to provide the necessary details to create the new template. Additionally, you will see options under the 'Approved' button for 'Quick Replies' and 'Call to Action'.
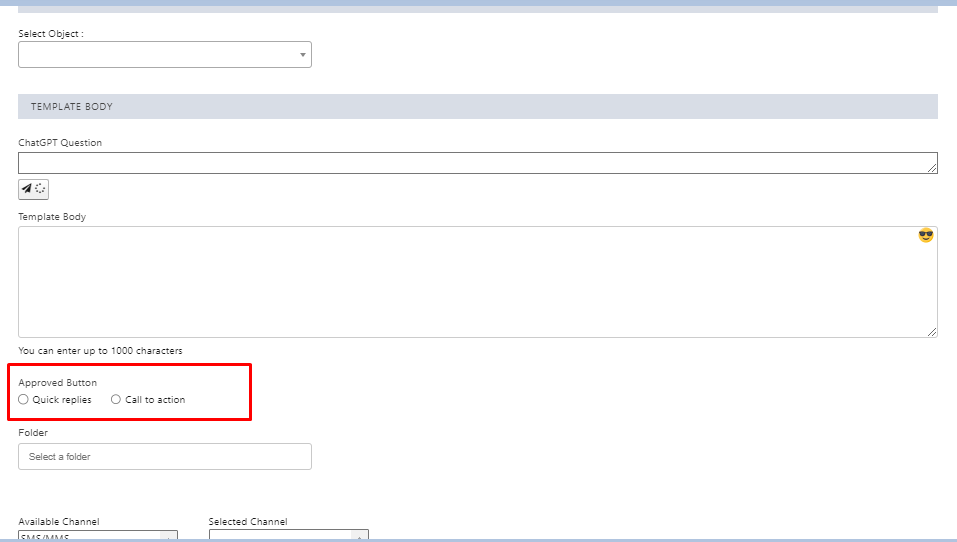 Fig: Quick replies and Call to action buttons in Templates
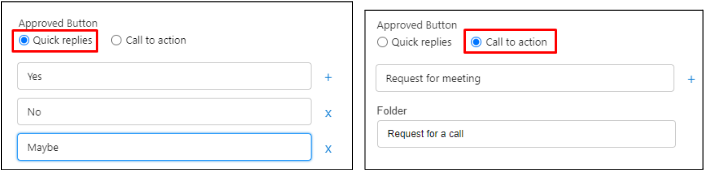 Fig: Quick replies and Call to action in templates
In iText: Similar processes will be performed in iText also.
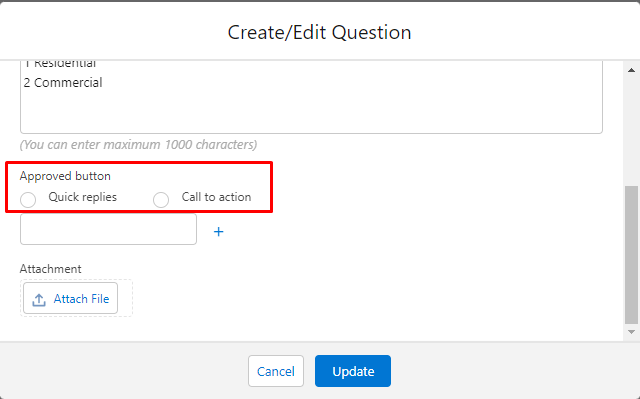
Fig: Quick replies and Call to action options in iText
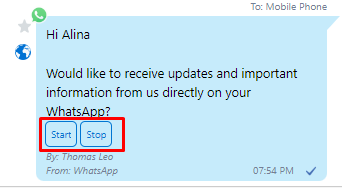
Fig: Quick replies in chat
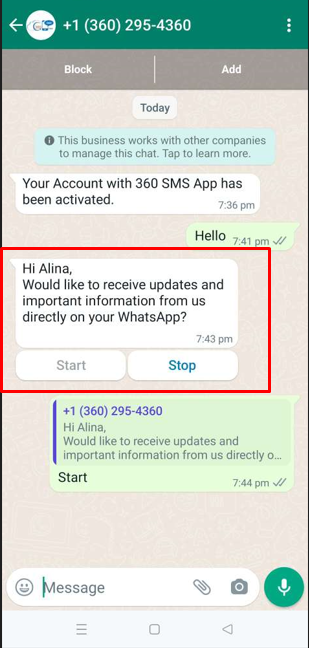
Fig: Message with Quick reply buttons in Whatsapp
Enhancements:
Previously, if we read an incoming message in the Multi-Conversation View,that message would still be marked as unread in the Incoming Alert. We have now synchronized both components - the Multi-Conversation View and the Incoming Alert and have resolved this issue.
We are restricting users who do not have a 360 SMS App’s license. Let's say there are two users in an organization - User-1 and User-2 - and only User-1 has been assigned a license for the 360 SMS app. Previously, some components of 360 SMS App (for instance, Incoming Alert, SMS_Composing_Utility, etc.) were visible to both users. However, now User-2 will not have access to any 360 SMS App’s components and will see a popup message that says, 'You do not have a license to access the 360 SMS app.' There is also a lightning button labeled 'Request for License' in the popup window. This button allows users to request a license. Once the user clicks this button, an email is automatically sent to the user who set up the 360 SMS App (displayed under SMS Setup- Org Config - “Last Setup done by:” requesting a license.
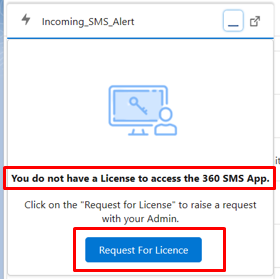 Fig: Request for License button
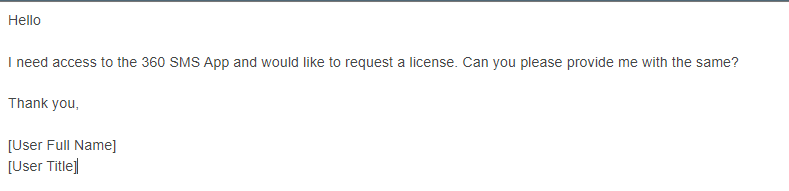
Fig: Sample email send by the user to request for license
Previously, the option to enable or disable the Emoji and Attachment buttons on the conversation view was only available in the SMS Setup: General Settings: Enable/Disable/Hide Interface Element section. Now, this functionality has been extended to the Multi-Conversation and the Incoming Alert utility bars. Users are presented with three options: "Enable", "Disable", and "Hide". These options provide greater flexibility and control over the use of Emoji and Attachment buttons in conversations.
Enable Option: To enable the Emoji button and Attachement Button.
Disabe Option: In this, the emoji and attachment buttons are visible but disabled.
Hide Option: In this, the emoji and attachment buttons are not visible.
 Fig: Emoji and attachment Enable/Disable button
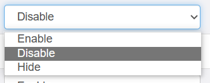
Fig: options available
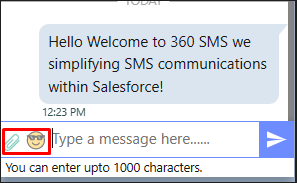
Fig: Emoji and attachments disabled
Previously, we only supported group chats with up to 5 members (5 recipients and 1 sender). Now, we have expanded our support to allow for up to 10 participants (To Number), in addition to the 1 sender member, to join a group chat.
For now, compliance mechanism: contact opts out. We can't send the next message. Record-wise and channel-wise compliance, we can do channel-wise mech too. Only manually done channel-wise.
If the client opted out of SMS, then by default he opted out of voicemail. Not both channels opt out. Unsub records.
Whenever a Ringless Voicemail SMS History record is created, the voicemail information will be included in the History record channel if the channel contains the voicemail value. Additionally, we have also introduced a new channel for SMS unsubscribers called Voicemail. With this channel, you can now stop sending voice mail to selected customers.
 Fig: Voicemail Channel Optout in SMS Unsubscribe
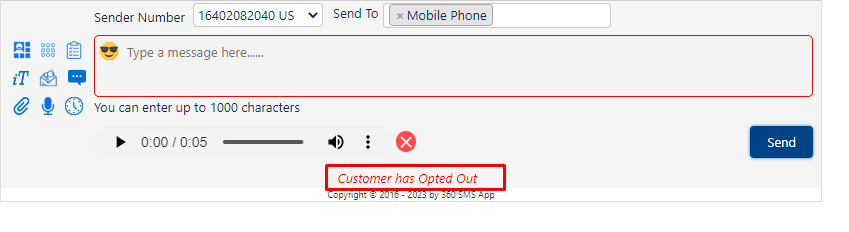 Fig: Voicemail Opted out
We have made some upgrades to iText:
- Previously, when creating a new iText, the status would default to "Inactive." However, now it will be set to "Active" by default.
- We have changed the display name from "Survey" to "iText."
- Previously, there was no option to “Add new” button to folders, but now “Add new" button is available in Folder field.
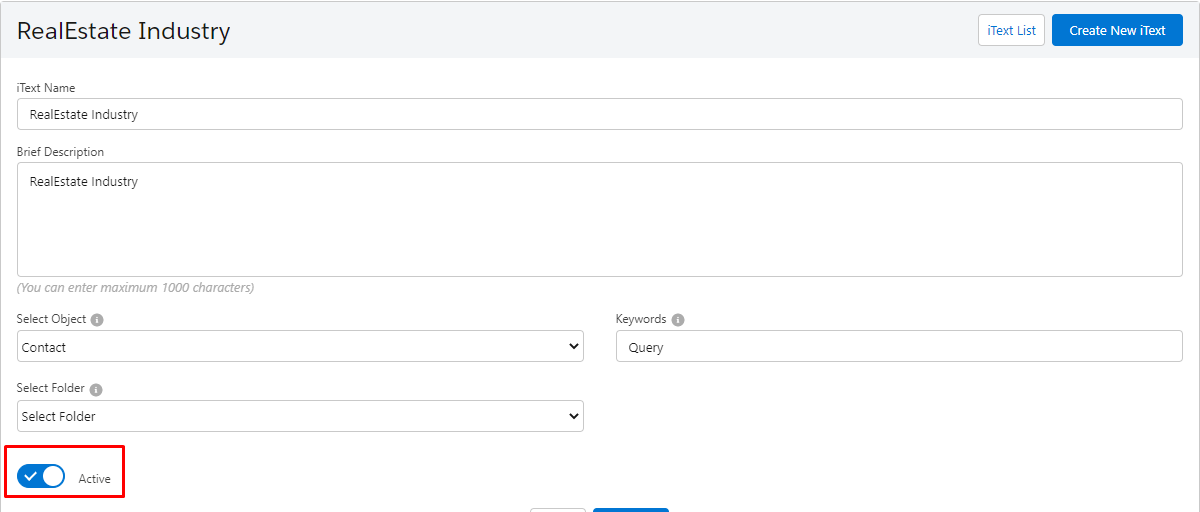 Fig: iText Active status
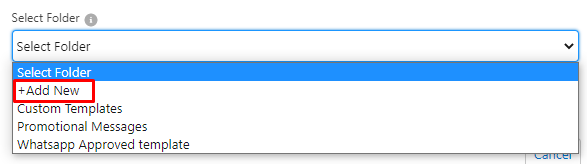
Fig: Add New button in Folder field in iText
Previously, 10–50 queries were allowed for answers to one question. This has been increased to 120 answers for one question.
Previously, there were query limitations for 10–50 answer records in iText (surveys). However, we have now increased this limit to 120.
Initially, the notifications were sent through Salesforce Chatter. Now the app uses push notifications for the Salesforce mobile app.
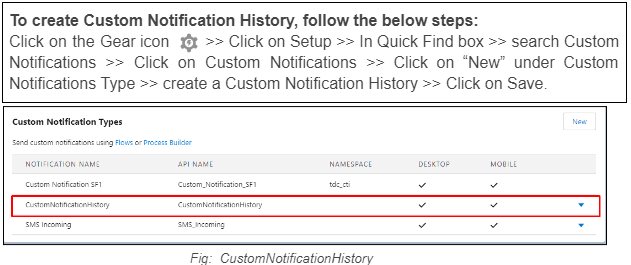
When an incoming message arrives, Salesforce's standard functionality displays notifications in the bell icon ![]() .We have introduced two options for custom notifications in SMSSetup: :General Settings: Enable Custom Notification and Custom Notification.
.We have introduced two options for custom notifications in SMSSetup: :General Settings: Enable Custom Notification and Custom Notification.
To use custom notifications, first enable the "Enable Custom Notification" checkbox and add the Custom Notification API. Then, create Custom Notification records under the Custom Notifications setup and edit the general settings accordingly.
When you receive an incoming message, you can check the notification via the bell icon. ![]() Clicking on the notification will redirect you to the respective record.
Clicking on the notification will redirect you to the respective record.
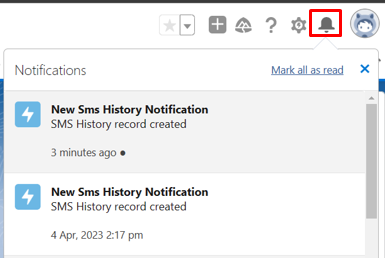 Fig: Custom notification
 Fig: Custom notification option in General settings
Minor Bug Fixes:
Bug fixes and performance improvements.
Release Notes- 1.266
No content found related to Release Notes- 1.266
Minor Bug Fixes:
Bug fixes and performance improvements.
Release Notes- 1.267
No content found related to Release Notes- 1.267
Enhancements:
We introduced a new Twilio API in the last package (1.266). But Twilio WhatsApp had a problem: assigned numbers didn't update when sending templates. So, we had to delete and recreate records.
With the new package installed, manual number re-assignment is unnecessary. Numbers will synchronize automatically.
Note:
- After installing the package, the user simply clicks the "Outgoing & Incoming Setup" button in the SMS Setup section to initiate the sync.
- The script will execute once after the package upgrade, updating all records.
Sinch Provider Delivery Changes
Before, delivery status for Sinch-Line messages didn't update on SMS History. Now, after an update, it's consistently resolved.
Minor Bug Fixes:
Bug fixes and performance improvements.
Release Notes- 1.270
No content found related to Release Notes- 1.270
Enhancements:
We now support media files (such as an image, video, or document) in WhatsApp approved templates from our current provider. You can send the WhatsApp Approved Templates with media files by selecting media using the attachment option from any of our modules (such as Conversation View, Send SMS button, etc.).
For the current provider, Link Tracking and Link shortening are supported for approved WhatsApp templates using merge fields.
We need to create approved templates that include variables. Instead of the variables themselves, we should use merge fields when creating an SMS template record. These merge fields should contain long URLs that need to be both shortened and tracked.
Minor Bug Fixes:
Bug fixes and performance improvements.`
Release Notes- 1.271
No content found related to Release Notes- 1.271
Salesforce is enforcing a major and mandatory change related to the Enhanced Domains, in the Mid-October 2023. Since all Salesforce sites would be affected, we have proactively rolled out this package release for 360 SMS to ensure that the services are not affected.
The 360 SMS App will stop working for you if you are on any previous SMS package (versions before 1.271).
To ensure uninterrupted product functionality, it is imperative that you upgrade the product package to 1.271 at the earliest. Please contact the 360 SMS Support team for assistance.
New Feature:
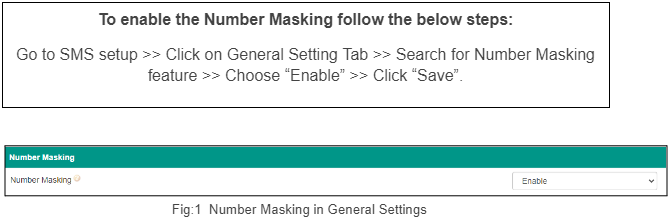
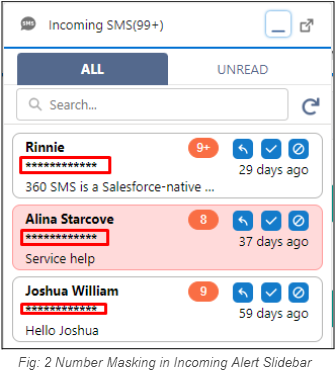
We have introduced a feature called “Number Masking,” and by Enabling Number Masking in the SMS general settings, we will now conceal the recipient's number in the Incoming Alert Slidebar, Multi Conversation View, SMS Composing, and Detail Page. (as shown in figure)
A new feature has been introduced to optimize PushTopic for creating, updating, or performing both operations. Anyone can access these options in the general settings.
Enhancements:
Introduction of a new enhancement feature, the ability to create tasks in asynchronous mode. With this update, users can now select the "Create task in Async Mode" checkbox in the SMS General Settings (as shown in Figure), enabling the generation of tasks in an asynchronous manner. This enhancement significantly improves workflow efficiency, streamlining the task creation process.

In this latest update, we have enhanced the functionality of "List View ALL" by introducing a dependency on the sender number's support for SpeedBoosting. With this improvement, if the sender number does have SpeedBoosting capabilities, the checkbox for “List View ALL” will be enabled, allowing users to take advantage of this feature. Conversely, if the sender number does not support SpeedBoosting, the checkbox will be automatically disabled to prevent any potential issues. This enhancement ensures that the checkbox availability aligns with the capabilities of the sender number, providing a seamless experience for users.
Provider has incorporated Speed Boosting into its latest update, thereby improving its overall performance and efficiency. Furthermore, the upcoming release will introduce link shortening functionality, which will further enhance optimization.
Previously, duplicate entries were prevented for messages with the same "To" number, even when sent concurrently from ListView, Campaigns, and SMS From Reports. This was achieved by adding a custom setting named "duplicateToNum" to SMS incoming alerts, enabling the unrestricted sending of messages to duplicate "To" numbers.
Now Preview functionality is available for File Records within Conversation View, Incoming Alerts, and Multi Conversation View.
Previously, the enterprise scheduling option automatically caused the flex queue to parallel execution. Now, users can choose when to send SMS with a customized schedule. Once they enable this feature, the system sets the schedule for 15 minutes after activation. Users can pick their time, but it must be at least 15 minutes later than the current time.
Minor Bug Fixes:
Bug fixes and performance improvements.